
Constructing a wooden spiral staircase for your house can be a visually striking and fulfilling undertaking. It adds a distinctive architectural element and stylishly maximizes available space. Building a spiral staircase by hand is a challenging but rewarding project, regardless of your level of experience with do-it-yourself projects.
The capacity of a spiral staircase to squeeze into small spaces is one of its main advantages. A spiral staircase, in contrast to a traditional straight staircase, allows you to go up and down in a small space, which makes it perfect for small homes or rooms. Furthermore, wood’s inherent beauty complements a variety of interior design schemes and adds warmth and character.
You’ll need to gather your supplies and tools before you can begin. A saw, drill, measuring tape, screws, and high-quality wood for the steps and central pole are necessities. This project requires precision because even small mistakes can compromise the stability and safety of the staircase. A meticulous design and precise measurements will guarantee that your staircase is both elegant and useful.
Your first concern should always be safety during the building process. Put on safety gear, go slowly, and don’t be afraid to ask for help or advice when you need it. When your spiral staircase is finished, the sense of accomplishment you’ll experience will be well worth the effort.
We’ll walk you through every step of the building process in the upcoming sections, from the preliminary design to the finishing touches. You can have a gorgeous wooden spiral staircase that improves both the aesthetics and functionality of your home with perseverance and meticulous attention to detail.
| Step | Description |
| 1. Planning | Determine the staircase location, height, and diameter. |
| 2. Designing | Create a blueprint with measurements and angles. |
| 3. Materials | Gather wood, screws, and tools needed for construction. |
| 4. Cutting | Cut the steps and central pole according to your design. |
| 5. Assembly | Start from the bottom, attaching each step to the central pole. |
| 6. Securing | Ensure each step is securely fixed and level. |
| 7. Finishing | Sand, stain, or paint the staircase to your preference. |
| 8. Installation | Install the staircase in its designated spot. |
- Advantages of spiral staircases
- What materials can be used
- Varieties of design
- Screw design elements
- Calculation of spiral staircase parameters
- Important nuances for calculations and installation
- Manufacturing of structural elements
- support pillar
- Steps
- Fences and railings
- Assembling a spiral staircase
- Video on the topic
- Assembling a spiral staircase with wooden steps with your own hands
- DIY spiral staircase
- DIY spiral staircase frame. Homemade spiral staircase. Part 1
- Installing a spiral staircase in 2 minutes
Advantages of spiral staircases
Selecting an interior detail like this shows that you are a practical person in addition to having good taste. Several benefits are associated with screw structures:
- Space saving. This is especially true for small spaces. Even 1.5 m² is enough to install a ladder. It is located around a special support and seems to hover in the air. It is this design property that allows you to save usable space.
- Visually increases the height of low rooms.
The cost of construction of spiral staircases will be significantly lower than that of marching staircases. This is due to the relatively small amount of consumables during the production of the product and low labor costs during its installation. - A simple manufacturing process and simple installation allow you to make a staircase without the help of specialists.
Screw structures are perfect for a private house or apartment, as there is no excessive traffic there.
Safety measures are something you should not overlook when constructing a spiral staircase at home. In cases where the structure is situated on a steep ascent with narrow steps, recklessness and rapid gait may result in harm. But strong handrails make it simple to overcome this disadvantage. Furthermore, it is critical to accurately determine the structure’s dimensions, taking into account the tread width and winder steps.
Creating a wooden spiral staircase at home is a fun and fulfilling do-it-yourself project that gives any area a touch of elegance and individuality. This tutorial will take you through all the necessary steps to ensure a beautiful and safe staircase, from measuring and planning to cutting and assembling the wood. With the correct tools and a little perseverance, anyone who is new to woodworking or an experienced enthusiast can build a gorgeous spiral staircase that will be a focal point in their house.
What materials can be used
Many raw materials are used in the construction of spiral staircases, and the quality and longevity of these materials are directly impacted by these factors.
The most common type of load-bearing structural element is a wooden pole or metal pipe. The support is frequently composed of brick, stone, concrete, or even asbestos cement. The completed load-bearing element is connected to the steps using bolts, couplings, or welding.
Usually, metal, hardwood, or a mix of these materials are used to make railings. Regarding the steps, glass and plastic items have taken the place of the customary alternatives composed of beech, oak, and ash.
Spiral staircases are another structure made of plywood. Both individual components and the entire structure can be made with this material. Plywood spiral staircases stand out for being inexpensive and environmentally friendly.

Varieties of design
Spiral staircases come in a variety of variations, with variations in step fastening techniques and design elements. All steps, however, are installed radially with a small rotation on each one, regardless of the kind. They have the appearance of a screw thread when in this position, which is why this particular style of staircase was given the name that goes with it.

As a result, the subsequent categories of spiral staircase designs are identified:
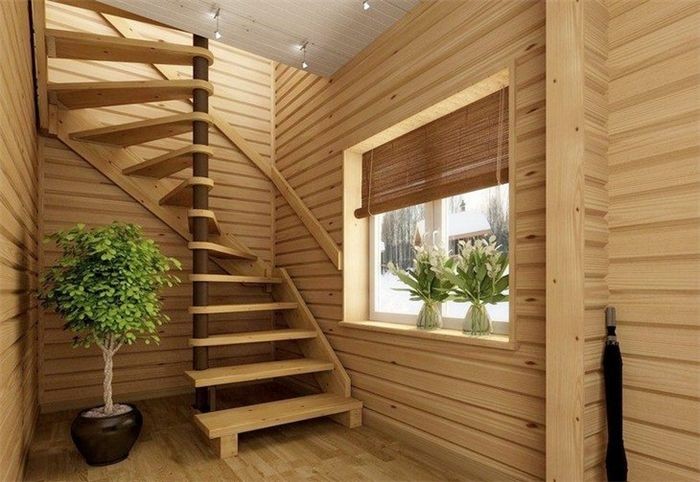
- With steps supported on an internal pillar and one or two walls located around the perimeter. Such structures are built in a narrow niche or in the corner of a room.
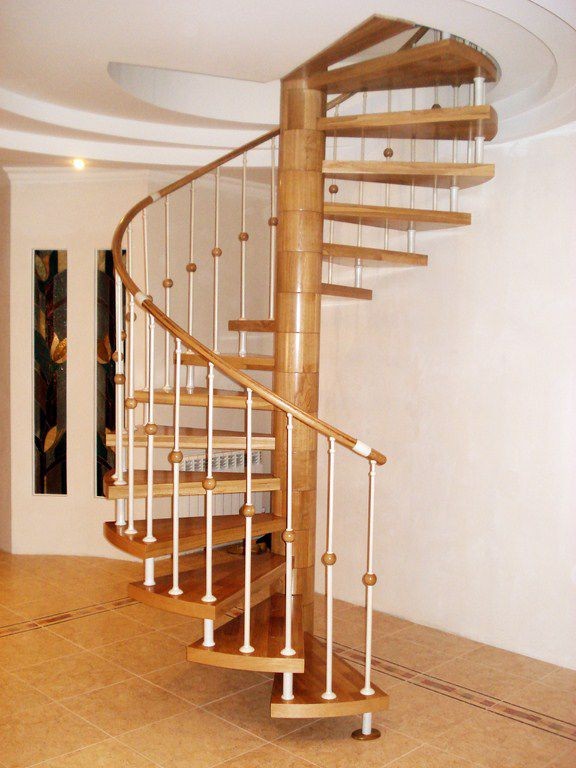
- With cantilever clamping of steps on the supporting element.
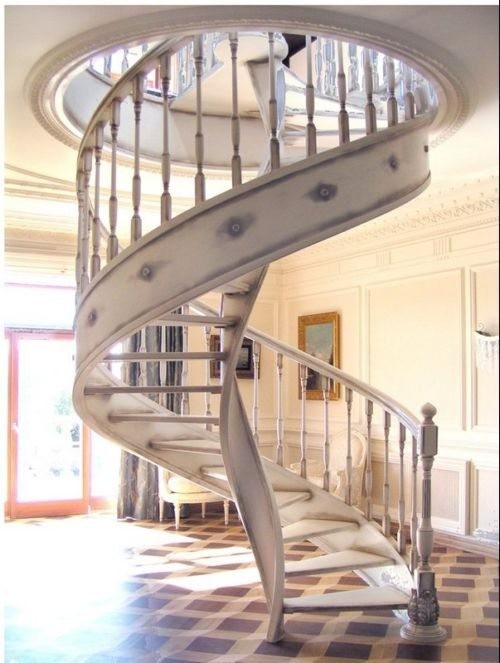
- With fastening steps to curved strings.
The screw devices listed above are the most typical kinds that a self-taught craftsman can construct. Some varieties are thought to be more complicated, so it is best to leave the production and installation of those to true experts.
Screw design elements
Prior to starting to construct a wooden spiral staircase by hand, let’s examine the following concerns:
- what elements it should consist of;
- location of components;
- methods of fastening elements.
The components of the staircase structure are as follows:
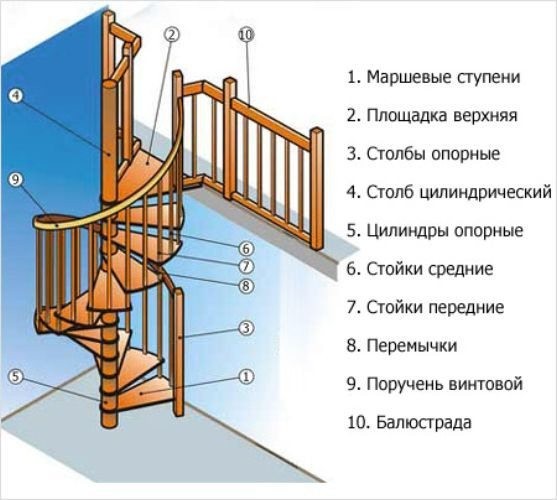
- steps;
- final platform located on top;
- a post designed to support railings and balustrades;
- the main load-bearing element, which is the basis of the structure;
- cylinders that make up the support column;
- balusters supporting the railings;
- jumpers;
- screw-shaped railings;
- fence on the top floor.
The aforementioned parts are connected at nodes to create a single device:

- Node "A". Here the supporting post or pipe is connected to the barrier on the top floor. To do this, a bolt or screw is fixed in the rear part of the post or pipe, onto which a handrail is placed through a through hole. A decorative cover is screwed on top to secure it.
- Node “B” is the place where the support column and the bushing, which is installed in the hole of the step, are connected.
- Node "B". In this section, washers and a sleeve are attached to the support, performing decorative and pressing functions.
- Node “G” – place of fastening of the support and base installed in the floor.
Calculation of spiral staircase parameters
First, calculations are made before any of the structure’s components are manufactured. Furthermore, the degree of safety of the staircase as a whole is directly correlated with how accurately they are implemented.
It is suggested to use a particular example with average statistical indicators for clarity in order to comprehend how the computations are carried out. Assume for the moment that the staircase is 90 cm wide (it usually ranges in size from 70 to 100 cm), 270 cm tall, and has a 30 cm diameter for the support.
Additional computations are performed utilizing the subsequent framework:
We calculate the spiral staircase’s diameter, or the projected top view. To accomplish this, multiply the staircase’s width by two and add the central pillar’s diameter to the resultant figure:
Drafting up the intended design. Accurately drawn wood spiral staircase blueprints ensure a satisfactory outcome.
We draw a circle on a piece of paper with a diameter of 210 cm, which we found in the previous paragraph. It is advised to use a scale of 1:10 for convenience. As a result, the circle in the drawing will have a diameter of 21 cm.
Another circle is drawn inside to show the trajectory of a person’s movement on the stairs in the figure. Its radius is calculated by dividing the width of the staircase and the support’s combined radii by two.
We figure out how many steps there are in every turn. The average step width is required in order to obtain this parameter. Since the external fence’s typical width for this section of the structure is between 40 and 45 cm, 25 cm is roughly the middle point that is used for calculations related to human movement trajectories.
The length of the circle representing the movement trajectory should be divided by the step’s middle width to determine the precise number of steps.
We obtain the outcome of 13 steps by rounding. Determine the step height. Cut the first circle into fifteen equal-sized pieces. Remember that the distance from the first to the last step is roughly equivalent to a tall person’s growth. Let’s say 1 m 90 cm. A 10 cm reserve and a 3 cm step thickness are added to this indicator.
Ascertain the height of every stage separately. This is accomplished by dividing the coil’s height by the total number of steps:
The entire structure’s height must be divided into a step height in order to determine the number of steps that the stairs will have.
You can determine how many revolutions the stairwell makes throughout its whole rise using the computations that are available:
Important nuances for calculations and installation
The staircase may become unsafe to lift and descend due to even tiny mistakes made in the calculations, construction, or assembly process. Consequently, it is not advised to disregard the guidelines and advice provided by experts during the process:
- The middle of the step is a place where the person’s leg is most often stepped when lifting and descent; For a confident step, its width should be at least 20 cm.
- The minimum support diameter is 5 cm.
- a spiral staircase and risers are not the best combination; they prevent you from fully placing your foot, which is dangerous due to the foot slipping and resulting injury.
- one turn of the stairs must have at least 11 steps.
- the height of the coil is determined based on the height of the tallest family member plus a margin of up to 20 cm; If you ignore this recommendation, then when going up and down you will have to bend over in some places to avoid getting a head injury.
Manufacturing of structural elements
support pillar
Concrete, brick, and wood pillars are used as well as metal pipes with a minimum diameter of 5 cm to form the support. Their diameter ranges from 15 to 50 cm, and occasionally even greater.

The hardest to work with supports are made of brick, concrete, or metal. Use couplings, bolts, and welding to secure the steps on it. Any method will work just fine to attach elements to a wooden post. These are placed vertically in the spaces between stages and can be either wooden blocks or metal corners.
Being the primary load-bearing component of the structure, the central pillar needs to be extremely sturdy to support the weight of a person carrying luggage in addition to the overall load of the entire structure.
Steps
The most popular wood species used in their production are oak and beech. They have a dense structure and can support the weight placed on them, unlike pine or spruce.
The structure’s height determines the step thickness. It is at least 5 cm if the staircase is not higher than two meters. If the structure is higher, it should be more than 6 cm.
Consider the material’s level of drying and processing when selecting it for a step. Experts advise purchasing planed boards instead. Over time, unevenly dried wood will start to lose moisture and take on a different shape. This means that more step replacements will be necessary; otherwise, the stability of the staircase as a whole might be jeopardized.
Expert carpenters advise utilizing laminated wood for stairs—a simple DIY project. The width of the bar panel should allow for the placement of two steps in different directions, and its length should match the length of the step.
To create laminated wood, you need to take the subsequent actions:

- Assemble the bars into a panel so that in closely spaced parts the structural pattern is directed in different directions.
- Coat the component elements of the panel with glue, tighten them with clamps and wait for the product to dry completely.
You must create a step template in advance that will be used to organize them in order to save time and effort. It is produced using computations from earlier work and a 0.5 cm margin of error.
You must use extreme caution when transferring the template’s contours to the block panel. It is crucial to show the wide edge of the component’s dimensions and the stand hole’s measurements precisely.
The structure’s upper level merits particular consideration. It’s a platform that runs from the top floor to the stairs. It is bigger than the previous steps. Furthermore, this element’s length is occasionally purposefully increased to reinforce the staircase’s structure.

When the job is finished, the manufactured steps are securely fastened to one another on both sides and stacked. The support post holes are made using this "batch" method.
Fences and railings
Making the balusters is the next step. Laminated veneer lumber with a minimum cross-section of 5 by 5 cm and a lathe are required for this purpose. You can purchase these components if you are unable to make them yourself.
The outer posts are shaped to connect two steps at the same time, ensuring structural rigidity. They won’t be able to activate the central support because of this.
There are various methods for fastening baluster posts:

- by gluing them into the holes made;
- fixing them to the steps using special fasteners;
- gluing using cuts made at the bottom of the posts.
Depending on the staircase’s curves and slopes, the last step involves marking and sawing off the baluster tops at an angle. Twisted wooden railings give spiral staircases a lovely appearance.
They are produced in a number of ways:
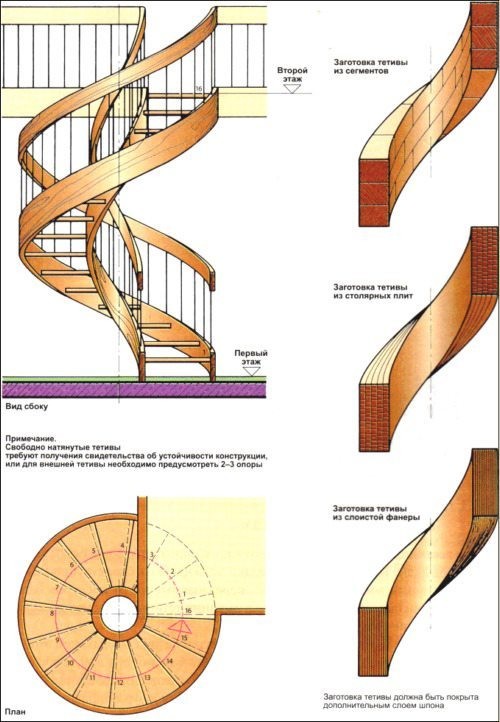
- cutting out the component elements of the railing from a solid piece of wood and their subsequent assembly;
- cutting out railings from glued wood;
- connecting an element from not very dense wood veneer.
These manufacturing techniques are all very intricate. You will need the right supplies and a specialized tool for these tasks. Experts advise ordering prefabricated handrails from a specialized supplier. All you have to do will be install them, though this can be left to a master in the field.
Regarding assortment, there are many different handrails available on the market, each with a unique look, feel, and cost. If you’d rather live in a palace, you can purchase carved railings to go up to the second floor via the spiral wooden staircases. Additionally, there are plastic railings that mimic the pattern of textured wood for customers on a more budget.
Assembling a spiral staircase
You must choose the structure’s location and whether or not it will come into contact with the wall before you can start installing it. Once you’ve finished this, you can start to adhere to the detailed instructions:
- Apply markings on the ceiling, establishing the center of the circle.
- Using a plumb line, project the center of the circle drawn on the ceiling onto the floor. This will be the location for the support pillar.

- Cut out a circle of the required shape in the ceiling and make a decorative frame around the edges.

Subsequent actions are contingent upon the attributes of the support post:
- If you purchase a ready-made set of spiral staircases, then the support, consisting of separate parts, is assembled simultaneously with the steps.
- If a monolithic concrete or brick support is used, then marks are placed on it where the brackets will be attached in the future. They are used for laying and fixing steps.
- The steps are attached to a large-diameter wooden support post using bars, the height of which is equal to the distance between the steps. Bars with a cross section of 3×5 cm or 5×5 cm are attached to the places marked on the post with self-tapping screws.
- When laying the first step, you can place a large wooden block on its wide side.
- The upper step is attached to the floor of the second floor.
- After setting all the steps, you need to install balusters. They can only be secured after their tops have been cut off at an angle depending on the slope and turns of the stairs.
- Railings are installed and secured with self-tapping screws. In order not to damage the racks, it is recommended to make channels for the screws in advance.
- Then the baseboard is attached, if this is provided for by the project.
After making sure you’ve followed the spiral staircase installation instructions exactly, move on to the last finishing. Select a paint, stain, or standard colorless varnish that works well for the structure.
A great design option for your house or cottage is a screw structure. And you will be happy with the outcome whether you went with the pricey option or the economy class.
Constructing a wooden spiral staircase for your house is a satisfying project that blends style and utility. It’s a focal point that gives your living area a distinctive architectural element while simultaneously conserving space. By doing this project yourself, you can alter the design to precisely fit the style of your house.
The procedure calls for meticulous planning, accurate measuring, and a solid foundation in carpentry. Paying close attention to detail is essential, from choosing the appropriate wood type to making sure every step is firmly in position. Take your time; it will ensure a sturdy and safe finished product. Don’t rush the process.
You will learn useful skills and develop a greater appreciation for craftsmanship throughout the project. There is no greater sense of satisfaction than finishing a project like this yourself, and the staircase will act as a constant reminder of your diligence and inventiveness. Additionally, you can use the knowledge you acquire for upcoming home renovation projects.
Never forget that safety comes first. Don’t be afraid to ask for assistance or advice when necessary; use the right tools, abide by the rules. You can showcase your DIY skills and improve your home with a gorgeous and useful wooden spiral staircase that you can build with patience and dedication.


