
Making interior doors by hand can be a satisfying and economical endeavor. You can design and construct doors that precisely match the dimensions and style of your house with a little preparation and the appropriate materials. This not only offers total customization but also gives your living area a unique touch.
It is crucial to gather all required tools and materials before beginning. Essentials include high-quality wood, hinges, handles, and basic carpentry tools. To make sure your door fits properly, you must take precise measurements of the doorway. Planning ahead and being prepared will prevent headaches later on.
Cutting the wood to size, putting the frame together, and, if desired, adding decorative elements are some of the steps involved in the process. Patience and attention to detail are needed for each step. You can still get excellent results even if you’re new to woodworking by following a step-by-step guide.
Correct door finishing is also essential. Enhancing the wood’s appearance and durability can be achieved by sanding the surface smooth and applying an appropriate finish. A professional-looking door can be achieved with the correct finish, regardless of whether you go for paint, stain, or varnish.
Constructing your own interior doors can be an enjoyable and rewarding endeavor. You can make something original in addition to saving money. You can create doors that are both elegant and useful, giving your house a unique touch, with careful planning and execution.
- Materials for making canvas
- Necessary tool
- Manufacturing and assembly
- Measuring the canvas
- Making door trim
- Preliminary assembly of the door leaf
- Marking and making cuts
- Assembling the door leaf and cutting in the fittings
- Installing glass in the opening
- Video on the topic
- Oak doors. DIY. Easy-to-make oak doors. DIY Do it yourself.
- How to make doors . How to make doors.
- ✅ DIY interior door | Wooden interior door | Innentür aus holz
Materials for making canvas
You must prepare the material before you begin to make an interior door yourself. For this purpose, wood is typically used. It is used to make both the door frame and the canvas frame. Apart from wood, the following can also be utilized:
- Styrofoam;
- Cardboard honeycombs;
- Glass;
- Fiberboard;
- MDF.
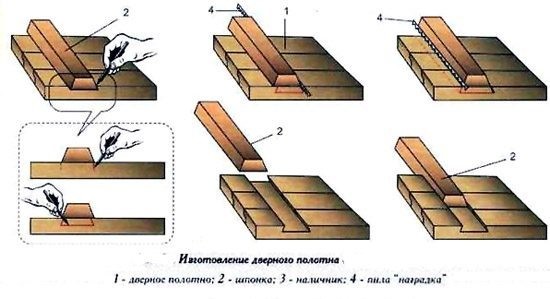
The door leaf is not composed of solid wood; instead, it is filled with polystyrene foam and cardboard honeycomb. The fact that these materials are lightweight is crucial for later use. Moreover, polystyrene foam can lower noise levels by increasing the fabric’s capacity to absorb sound.
The aesthetic aspect is the main reason why glass is used in interior door manufacturing. These inserts let you change the room’s design while also giving the impression that the space is larger. There is one more feature of glass. Perfect light transmission is possible through it. Consequently, even when the door is closed, the apartment’s hallways will be significantly lighter thanks to the glazed interior panels.
MDF, the more sophisticated version of fiberboard, is used as cladding material. These materials are in charge of the canvas’s design and will ultimately determine how the finished product is decorated. MDF serves as the final component at the same time, but fiberboard will need additional processing to make it look good.

Chipboard sheets that have been laminated can be used as cladding in addition to the materials already mentioned. This kind of finish is very popular because it comes in a wide variety of colors that mimic natural wood. Note that using laminated chipboard will increase the diagonal rigidity of the doors.
Confirmats or PVA glue can be used as a fastening agent. You’ll need varnish to coat the finished canvas. Stains and tinted varnishes solve the problem if you need to add color.
Necessary tool
Setting up the instruments required to construct an interior door will be the next step in the preparation process. You must have available:
- Manual or electric plane;
- Hacksaw or electric jigsaw;
- Set of chisels and chisels;
- Manual electric router;
- Grinding machine;
- Miter box;
- Square and ruler;
- Hammer and mallet;
- Pencil and tape measure.
You can begin creating any carpentry product safely with this set. Along with sawdust, you should also get a vacuum ready to swiftly remove any dust that might get on the product’s surface while painting.
Making your own interior doors may be a fun and affordable project that gives your house a unique touch. You have total control over the design and quality, guaranteeing that the doors precisely fit your space and taste, by selecting the materials, style, and finish. Even individuals with no prior woodworking experience can make stunning, personalized doors that improve the usefulness and aesthetics of any space with a few simple tools and some instruction. This post will walk you through all the necessary procedures and advice to successfully construct your own interior doors, transforming an apparently difficult task into a do-it-yourself project.
Manufacturing and assembly
When the preparatory phase is over, the real work begins. The following actions must be taken, one by one:
- Take dimensions;
- Process the material;
- Perform markup;
- Cut down and assemble the frame of the canvas;
- Install fittings.
It is worthwhile to prepare a drawing in order to ensure that the work proceeds quickly and that the final product is of the highest quality. It makes it simple to mark and ensure that the future door’s configuration is correct.


Measuring the canvas
Measure the doorway before starting any work. You will be able to compute the box and canvas dimensions and ascertain the future product’s configuration with this operation. It is best to make a single-leaf door block if the opening is no larger than 80 cm. To lessen the strain on the loops and improve the overall look of the product, you must create two canvases for larger sizes.
The final size has to have its height and width decreased by two centimeters. In order to create an assembly seam between the opening slope and the frame block, this is necessary. It is filled with polyurethane foam after installation. A drawing is created using the measured measurements, using which you must construct an interior door.
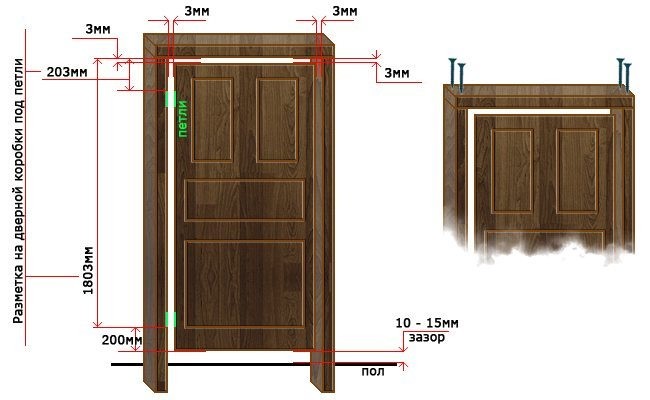
The door leaf’s measurements ought to be included in one of these manuals. To compute them, deduct the thickness of the box beam at the location of the quarter selection from the opening’s width and height. You must deduct an additional 4 mm in width and between 4 and 12 mm in height from the final size. These figures match the space that needs to exist in order for the door leaf to be eligible for a free rebate. All of the drawing’s data is derived in this manner.
It should be mentioned that the box beam is not required to span the whole wall’s thickness. After installation work is completed, an extension can easily be installed to cover the remaining space.
Making door trim
Once the dimensioned drawing is finished, you can proceed to the next phase of the project. At this point, the material needs to be processed and the door leaf frame needs to be ready. You ought to use a plane for this.

You can use an edged board measuring 40 by 100 mm for the frame. Buying planed material would be the best choice as it will simplify and expedite the work considerably. You could, however, also use plainly sawn boards. To make them smooth, a plane will need to process them. You should keep a close eye on the bar corners while planning. They have to be at an exact ninety degree angle. A square can be used to check the work.

The components are then labeled in accordance with the dimensions shown in the drawing. It will be necessary to saw them off. All of the frame’s horizontal sections will be longer by the equivalent of two tenons if the parts need to be fastened together. For instance, a tenon 70 mm long will be needed for connection on bars 100 mm wide. In this instance, the workpiece size should be increased by 140 mm, resulting in two tenons on either side of the component.
One must choose a quarter or groove in the workpieces’ sides during processing. If solid wood doors were selected as the door manufacturing option, this is required for glass installation or panel inserting. You can use a handheld electric router for this task. After inserting a cutter with the appropriate profile into the tool, a sample is created on the side shown in the diagram.

In order for the door leaf to close the opening, the components of the door frame must have a quarter. Additionally, a router is used to set the sample’s width and depth. The thickness of the door leaf should determine the quarter’s size. To improve the rebate, add 1 mm to it. The quarter needs to be at least 10 mm deep.
Preliminary assembly of the door leaf
You can perform a basic hand assembly of the interior door leaf once the frame components have been processed and the fastener locations have been sawed. You can verify that all elements have been correctly marked and sawed with this operation. The construction is put together "dry," meaning no glue is used. If the connection type was selected to be verified, all you have to do is entice them without pulling a tight twist.

Verify the door leaf’s length and width after all the components have been put together and secured. Should variations be discovered from the blueprint, the components must be adjusted. The product is inspected and reassembled after work is completed. You can move on to the next step if all requirements are satisfied.
Marking and making cuts
Parts marking and cutting should be mentioned in particular. This is a meticulous process where a mistake could lead to the need to remake the entire product and cause damage to the material. As a result, you should only draw any pencil lines after you have verified the size. Before beginning to saw, the marking itself should be compared to the drawing.

You can make adjustments by adding 1 mm when marking. In this instance, it will be possible to painlessly fix the workpiece’s uneven cutting. If everything goes according to plan the first time, the extra millimeter is easily planed away. Take a square and place it exactly at this point on the block to transfer the drawn line to the opposite side. The markings made at the beginning will be precisely repeated on all sides of the part because of its even 90-degree angle.
Should spikes and eyes be selected as the connection, these elements must be fully marked. The nesting area needs to be precisely in the middle. You just need to divide the bar’s thickness by two to get this data, and then you can mark the resultant number from any plane on the part. The tenon’s actual size should be one-third the workpiece’s thickness. It is possible for the nest’s width to be half a millimeter smaller than the spike’s width.
After carefully drilling the eye in accordance with the markings, it should be cleaned with a chisel. The structure will become brittle and the connection will be weakened if you extend past the lines’ boundaries. The instructions state that a half-millimeter reserve must be left since the tenon joint must be precisely adjusted.
Assembling the door leaf and cutting in the fittings
The door leaf assembly starts after all the connections have been verified and the measurements precisely match what is shown in the drawing. Applying glue to the inner surface of the nests and the tenon plane is required when creating a tenon joint. Following this, the components are fitted into one another and pounded with a mallet. If using a hammer for this procedure, place a small wooden block on the surface that needs to be hammered. By doing this, you can protect the assembled product from harm.
There should be no gaps at the joints once all the parts have been assembled. You should pound this place once more if there are any. Using clamps to tighten the door leaf would be the best course of action. In the event that they are absent, you can attach a metal corner to the board, measure the canvas’s width from it, add three to four centimeters to this measurement, and fasten another corner. To lay the door, you’ll need three boards. The cracks are entirely filled in by inserting a wedge into the space created by the canvas bar and the corner.

The cladding is fixed to the door’s surface upon assembly. The sheets are placed on the frame after being cut to fit. Adhesive is used for fastening. Nails can also be utilized. In particular, if the cladding has a finishing coating, this operation needs to be done very carefully to avoid damaging its surface.
The filler is installed first, then the second sheet is laid on the back side of the interior door. In order to accomplish this, honeycombs made of foam plastic or cardboard are cut to fit the dimensions of the empty spaces inside the canvas. Ensuring the integrity of the future door requires a snug fit. After that, the canvas is finished off with the installation of the second sheet of cladding.

The hinges must be installed for the door to open. They are situated 20 centimeters away from the door’s edges. Pencils that have been finely sharpened are used for marking. Using a chisel, the nest must be carefully chosen inside the line and not extend past its boundaries. The seat hinges need to fit together perfectly. Self-tapping screws or the screws included in the kit are used to secure the part once the socket has been prepared and inspected. See the article "Installing hinges on a door" for more information.
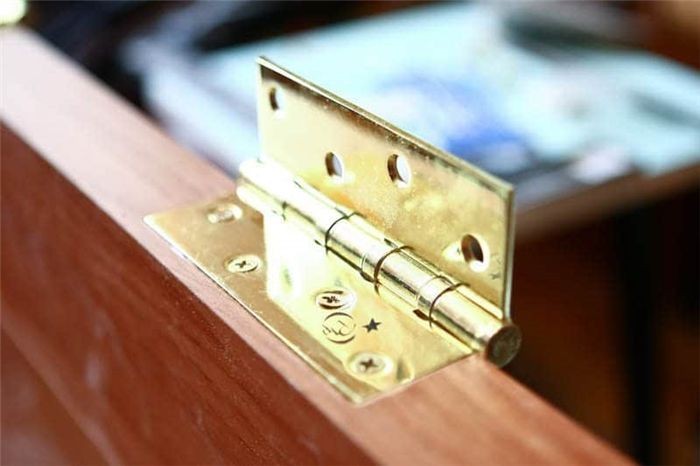
The handle is an additional component of an interior door. It frequently has a lock inserted into it so that the room can be locked when needed.

The handle’s center ought to be one meter above the ground. With a drill, a through hole is drilled for the lock. A chisel is also used to clean the seat. There shouldn’t be any spaces left after the lock is installed. Find out more about how to install a handle on an inside door.
Installing glass in the opening
If glazing is needed for the interior door, get a glass cutter ready and choose the kind of glass you want. A quarter that is chosen along the whole inner rim of the door receives this element. Glass is cut to fit its installation space by two millimeters.

Any imperfections in the sheet that remain after using a glass cutter must be eliminated. For this, pliers can be used. It is necessary to draw another cutting line if there is a significant remainder (beyond 2 mm). Eliminating excess will become simpler and more effective as a result. After the process is finished, you must use sandpaper to smooth the glass’s edges.
The glass is then fitted into the door’s quarter. A decorative arrangement is fastened by nailing it down with tiny nails. This guarantees the potential for prompt repairs in the event that the installed glass is harmed.
| Step | Description |
| 1 | Select materials |
| 2 | Measure door frame |
| 3 | Cut door panels |
| 4 | Assemble door frame |
| 5 | Attach hinges |
| 6 | Sand and finish |
| 7 | Install door |
Making interior doors by hand is a fulfilling project that gives your house a unique flair. You can precisely match the design, size, and finish to your interior decor by following this process. It’s a chance to pick up new abilities and develop a greater respect for artistry.
You’ll learn the value of exact measurements, choosing the appropriate materials, and becoming proficient with the tools of the trade throughout this journey. The final product’s quality and appearance are enhanced by every stage, from cutting and assembling the door panels to sanding and painting. A door that fits perfectly and improves the overall appearance of your room is guaranteed when you take the time to plan and carry out the task with care.
In addition to saving money, making your own interior doors allows you to customize and personalize the finished product. This project has the potential to fill you with pride and a sense of great accomplishment each time you open your specially designed door. Regardless of your level of experience with do-it-yourself projects, this project will provide you with a tangible outcome that you will appreciate for years to come and valuable experience.
Accept the challenge and delight in the act of making something by hand. You’ll have a lovely, useful piece that gives your house personality and coziness if you have patience, pay attention to detail, and use a little creativity. Have fun constructing!


