
Slab floor installation is an essential component of new home construction that guarantees a strong basis for your living areas. Knowing the steps involved in building a new home or remodeling an old one will help you get the greatest results. To help you approach your project with confidence, this guide will take you through the necessary steps and best practices for installing slab floors.
Priority one should be given to selecting the best kind of slab for your requirements. Slabs made of concrete are the most popular because of their strength and longevity. They can sustain large weights and offer a solid foundation for different kinds of flooring. A successful installation depends on careful planning and preparation.
Go on to the foundational work next. In order to avoid future problems like cracks or uneven surfaces, the subgrade must be prepared. This include removing any vegetation, packing down the earth, and covering it with gravel to aid in drainage. Every stage contributes to building a solid slab foundation.
Concrete must be carefully poured and allowed to cure. Appropriate mixing, pouring, and curing times will impact the slab’s durability and strength. Throughout this stage, patience can save expensive repairs later on. Furthermore, adding reinforcement to the slab—such as wire mesh or rebar—can increase its strength.
Finally, think about moisture management and insulation. These components can improve your floors’ resilience and comfort. While moisture barriers guard against mold growth and moisture, insulating the slab aids in temperature regulation. You can guarantee a long-lasting, successful slab floor installation by adhering to these recommendations.
| Rule | Description |
| Level the Subfloor | Ensure the base is flat and smooth before installation. |
| Use Quality Adhesive | Apply a high-quality adhesive for strong bonding of the slabs. |
| Proper Spacing | Leave small gaps between slabs to allow for expansion. |
| Check Alignment | Regularly check that slabs are aligned correctly as you install. |
| Secure Edges | Ensure edges are securely attached to prevent lifting. |
Types of floor slabs
You have to choose the type of horizontal structure before you can begin installing it. Prefabricated structures made of reinforced concrete come in the following forms:
- multi-hollow;
- flat (PT);
- tent panels with ribs located along the perimeter;
- with longitudinal ribs.
The most popular option is to use hollow-core reinforced concrete. Depending on how they are made, they come in two varieties:
- round hollow (PC);
- continuous molding (CB).
For many years, round hollow core slabs have been a reliable and established product in the construction industry. For them, numerous installation guidelines and regulatory documents have been created. 220 mm is the thickness. During individual construction, there is inconvenience as products are installed based on serial sizes.
Formwork preparation is a prerequisite for producing non-standard products, as the manufacturing process for these slabs involves the use of reusable molds for pouring. As a result, the price of the necessary size may rise dramatically. PC slabs typically range in length from 2.7 to 9 meters in 0.3-meter increments.

Products made of reinforced concrete can range in width from:
1.8 m wide structures are very rarely purchased because of how difficult it is to install them in their intended position due to their heavy weight.
PBs and the prior type are utilized nearly identically. However, you can give the product any length thanks to their manufacturing technology. 220 mm is the thickness. Same width as the PC series. The drawbacks include inadequate regulatory documentation and limited usage experience.
Flat PTs are frequently acquired as extra components for hollow-core slabs. They can cover bathrooms, storage rooms, and narrow hallways because they are smaller and come in thicknesses of 80 or 120 mm.
Supporting the slabs
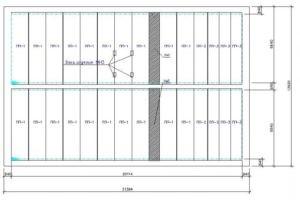
After the project or diagram on which the products are arranged is ready, the floor slabs are installed. The choice of floor components must ensure that they are positioned without gaps in width and have adequate support from a brick wall or expanded clay concrete blocks.
The length of the PB and PC series determines the minimum support required:
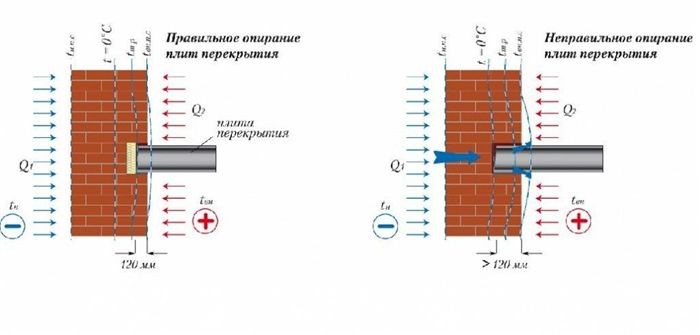
- products up to 4 m long – 70 mm;
- products longer than 4 m – 90 mm.
Designers and builders typically agree that 120 mm is the ideal wall support value. This figure ensures dependability even in the event of minor installation deviations.
It would be appropriate to arrange the house’s load-bearing walls so that laying the slabs would be simple. The following formula is used to get the distance between the walls: standard slab length less 240 mm. Supports on both short sides of the PC and PB series must be laid without any intermediate supports in between. For instance, PC 45.15’s size is 4.48 m; 24 cm is taken out of it. As it happens, there should be 4.24 meters between the walls. In this instance, the goods will rest, guaranteeing the ideal level of assistance.
Products from the PT series require a minimum of 80 cm of wall support. With support points on all sides, such reinforced concrete slabs can be installed.
Ventilation ducts must be able to pass through the support without obstruction. The load-bearing internal brick wall should have a maximum thickness of 380 mm. The reinforced concrete floor is positioned 120 mm below on each side, leaving 140 mm in the center, which is the standard ventilation duct width. It is imperative to lay it as accurately as possible in this situation. If the product is shifted in the direction of the ventilation hole, its cross-section will decrease and the area won’t get enough ventilation.
- PC and PB series up to 4 m are supported on both sides by at least 7 cm;
- PC and PB series more than 4 m – not less than 9 cm;
- PT series – on two, three or four sides no less than 8 cm.
Slab storage

The products must be placed on the construction site for simple installation in the design position after the scheme has been developed and purchased. Guidelines exist for the storage of materials:
- elements must be laid under a canopy;
- the storage location must be located within the access area of the crane;
- support points are provided with pads.
A break in half will occur if the final rule is broken. The way that PC, PB, and PT products function is that the emergence of solid bases or intermediate supports causes cracks to appear. The following is the order in which you lay:
- wooden blocks or boards are laid on the ground under the edges of the slab;
- I transfer the ceiling element onto the boards using a crane from the machine;
- boards or bars are placed again on the laid slab;
- unload the second slab from the machine;
- repeat points 3 and 4, maximum storage height is 2.5 m.
Masonry requirements
Making sure the following special conditions for a brick wall are satisfied is necessary before installing floor slabs correctly:
- evenness of the masonry in the place where the floors are laid;
- laying in three rows until overlapping reinforcing mesh with a cell of 5 by 5 cm made of wire with a diameter of 3-4 mm;
- the top row of the frets on the inside should be butted.
A monolithic belt is also positioned underneath the floors if the slabs are set atop enlarged clay concrete blocks. The load from heavy floors will be more evenly distributed thanks to this design onto weaker expanded clay concrete blocks. Using a construction technology, a monolithic concrete strip that is 15-20 cm thick is poured onto the blocks.
Laying floors
A minimum of three workers will be needed to complete the task: two will install them in the design position, and one will handle the slinging. When installing the slab, if the installers and the crane operator cannot see each other, a second worker will be required to direct the crane.
A four-branch sling, the branches of which are fastened at the corners of the slab, is used to secure the object to the crane hook. To regulate the support’s levelness, two people must stand on either side of it.
Bricks or blocks are placed on both the top and bottom of the slab when installing a PC because the process is done rigidly. Hinge fastening is advised when utilizing PB series floors. Avoid pinching the slabs from above when doing this. Many builders install the PB series in the same manner that PCs and buildings are installed, but this practice is risky because load-bearing structure installation quality affects human life and health.
The fact that it is forbidden to create technological gaps in products from the PB series is another crucial aspect of using them.
Sewerage, water supply, and heating pipes require these punches. Once more, a lot of builders overlook this, even when building multi-story structures. The challenge is that, because no objects built very long ago, the behavior of this type of floor under load over time has been thoroughly studied. Punching holes are prohibited for several reasons, but the main one is preventive.
Slab cutting
Sometimes a slab needs to be cut in order to be installed. The technology entails using a disc and a grinder on concrete. Because PC and PT slabs have reinforced reinforcement in their support zones, they cannot be cut to length. Such a cut slab will weaken at one edge and develop significant cracks if it is supported. PB slabs can be cut to length because of the specifics of the manufacturing process. To make the work easier, a board or piece of wood is placed underneath the cut location.
Separation along the length happens along the section’s weak point, or the hole. This technique works well for PCs, but it is not advised for PBs due to the holes’ too-small wall spacing.
Following installation, mineral wool or lightweight concrete are used to fill the holes in the wall support sections. This is essential to give the walls more strength where they pinch.
Slab house floor installation is a basic building process that requires meticulous planning and accuracy. These floors guarantee stability and longevity by serving as a strong foundation for the entire building. You can create a high-quality finish and steer clear of common pitfalls by adhering to the proper installation guidelines.
It is essential that the subfloor be prepared properly. It must be clear of debris, level, and clean. By taking this action, future problems like uneven flooring and cracking are avoided. It’s also advised to use a vapor barrier to shield the slab from moisture, which over time may erode its structural integrity.
The slabs must be laid precisely. Every slab needs to be placed accurately, with regular alignment and spacing between them. By doing this, structural weaknesses are avoided and an even distribution of weight is guaranteed. The longevity and functionality of the floor are greatly enhanced by using the proper equipment and supplies, such as high-quality mortar and reinforcement.
Last but not least, in order for the slabs to achieve their maximum strength, sufficient curing time must be allowed. Hastily completing this procedure may result in insufficient healing and possible harm. A sturdy and dependable floor that endures over time can be achieved with perseverance and adherence to advised curing times.
Slab house floor installation demands precise planning and execution to guarantee a sturdy and stable foundation. Creating a level base, selecting the appropriate concrete mix, and applying the right reinforcing techniques are all necessary steps in this process. It is essential to pay close attention to every detail at every stage, from pouring the slab to curing the concrete, in order to avoid cracks and make sure the floor can support the weight of the building and regular use. These fundamental guidelines will help you create a durable, smooth slab floor that serves as a strong foundation for your house.


