
Constructing a wooden staircase leading to the second floor on your own can be a useful and satisfying project. It gives you a sense of accomplishment and lets you alter the design to suit your tastes and the aesthetic of your house to the letter. With the correct equipment and advice, building a staircase is a doable project for anyone, novice or expert woodworker.
Make sure you have everything planned out before you start. Take into account the available space for the staircase installation, the kind of wood you plan to use, and the design that best meets your requirements. Precise measurements are essential to guarantee stability and safety. Planning ahead will help you steer clear of common pitfalls and guarantee a trouble-free building process.
Cutting the stringers, making the treads and risers, and assembling the parts are some of the crucial steps in the process. Precision and attention to detail are necessary for every step. Even though the project might initially seem overwhelming, it can become more approachable by being divided into smaller, more doable tasks. In addition, there are lots of resources available to help you at every step.
Selecting top-notch materials is one of the main benefits of building your own staircase. This improves the staircase’s aesthetic appeal in addition to its durability. You can build a stunning, long-lasting, and useful staircase with a little perseverance and work.
By taking on this project, you’ll not only avoid paying a professional, but you’ll also acquire useful woodworking knowledge and expertise. This project blends imagination, skill, and usefulness to create a staircase that is all your own. So prepare to build a staircase that will be the center of attention in your house for many years to come. Roll up your sleeves and gather your tools.
- Types of structures
- Choosing a staircase scheme
- Preparation of materials
- Calculation of the main parameters of the stairs
- Width
- Length
- Height
- Parameters of the opening in the ceiling
- Stair slope
- Steps
- Online calculator for calculation
- Installation of a marching wooden staircase
- Frame assembly
- Installation of components
- Finishing
- Video on the topic
- Staircase on the stringer. Maximum strength!
- Lifehack Stairs to the second floor – 3000 rubles. With your own hands.
- Do-it-yourself staircase to the second floor, calculating the steps How to make a wooden staircase in a private house
- The simplest string for stairs.
- Making stairs to the 2nd floor. Part 1.Frame, Bowstring, steps
- How to make a wooden staircase to the 2nd floor with your own hands in detail
- DIY wooden staircase to the second floor. How to make a staircase from boards
Types of structures
You need to be able to use a tool and be familiar with the construction guidelines and drawings in order to build a staircase. This will enable:
- design all the constituent elements of the structure;
- take into account potential weaknesses and correct shortcomings at the project stage;
- calculate the size of the steps so that it is convenient to go up and down.
For stairs, wood is the best material to use. This building material is practical, eco-friendly, and easy to work with—all of which are crucial for beginning craftspeople. You can create a staircase with a shape that perfectly complements your interior using a specialized tool:
- straight or rounded;
- simple or decorative;
- heavy or light.
The popular styles of wooden staircase designs that are differentiated below are as follows:
-
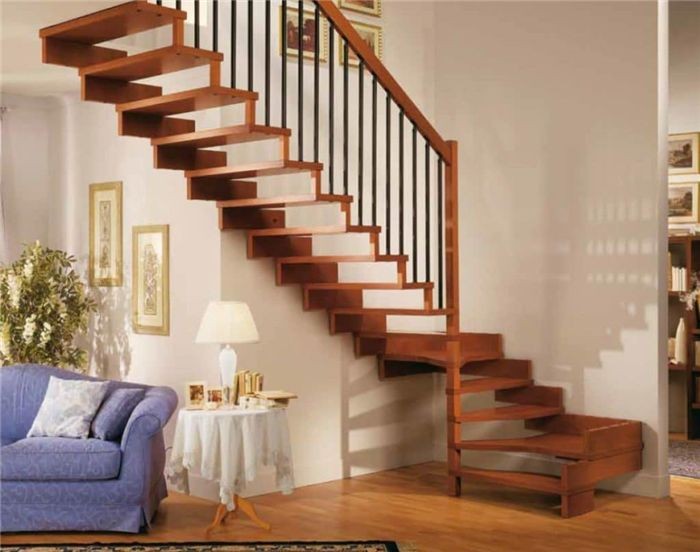
on stringers – the most common option. The main beam is a ridge on which the steps rest on top. The most commonly used scheme is with 2 stringers, but there are also options with 1 and 3 load-bearing elements.



Choosing a staircase scheme
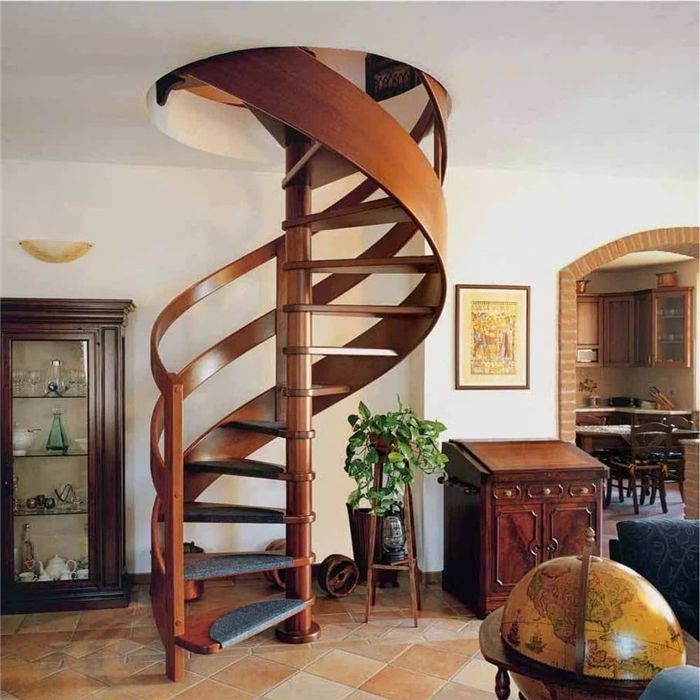
Both a spiral staircase and a marching staircase are appropriate for a private home or country estate. But let’s not overlook the fact that spiral structures need special components (like rounded railings) and must be installed with extreme precision. You must be an expert in professional installation technology in order to make them.
This is particularly true for more intricate staircase designs, which should initially only serve as models for inspiration rather than replication. Pre-made diagrams are not a reliable source of information because they do not account for all the details of your situation.
(function(s, t, w, d, n)) We have w[n] = w[n] || []; w[n]. push(function()) Rendering Ya.Context.AdvManager (blockId:"R-A-510923-1",renderTo:"yandex_rtb_R-A-510923-1",async:true>);>);t=d.getElementsByTagName("script")[0];s=d.createElement("script");s.src="//an.yandex.ru/system/context.js";s.async=true;t.parentNode.insertBefore(s,t);>).
It is far simpler to construct and install the flight stairs yourself. They exist in different configurations:

- straight single-march;
- winder turning: right or left, depending on the layout of the house;

- U-shaped two-flight;

- L-shaped two-flight;

- screw.
It is advised to divide a staircase leading to the second floor with more than ten steps with a turning platform before continuing up the wall at an angle of either 90 or 180 degrees.
The layout of the house and your personal preferences will determine which model you choose.
Preparation of materials
Prior to building your own wooden staircase to the second floor, you must choose which building material to use. The two most common wood species are larch and pine. Larches have superior performance characteristics because they are less prone to rotting.
Larch does not mind getting wet; in fact, the structure gets stronger the more liquid is absorbed. Considering that there will always be some humidity in the house, this is a pretty big benefit. Oak, cedar, beech, and other wood varieties are also good choices for building stairs, though they are not the least expensive option.
How the lumber is dried has a major impact on the tree’s lifespan. The maximum humidity level for wood should not exceed 12%.
The cost of well-dried boards is higher, but the stairs’ durability more than makes up for it.
You will need to dry the wood yourself if it is extremely wet. It must be kept in a room with adequate ventilation and a steady temperature for a minimum of three months in order to achieve this.
Calculation of the main parameters of the stairs
Certain sizes are advised. When building a scheme, the precise dimensions of the second-floor staircase are computed.
Width
The typical width is between 90 and 150 cm. However, the following factors need to be considered when calculating this indicator:

- how convenient it will be at the same time two people to meet each other;
- does the width you choose allow you to carry large objects (furniture, appliances) up the stairs?.
Length
You must count the steps and determine their dimensions in order to compute this indicator. Past experiences indicate that errors are inevitable when drawing by hand on paper. The staircase thus gets longer in real life than it does in the drawing. Here are some ways that you can escape this situation: Add a few winder steps to the staircase’s design.
Height
Inexperienced craftsmen frequently make mistakes when calculating the overall height. They only consider the distance between the upper floor’s ceiling and the subfloor. This isn’t totally accurate. When creating a drawing, you must consider the upper floor’s floor thickness as well as the finishing and the first floor’s final mark.
Parameters of the opening in the ceiling
It’s crucial to allow adequate space between the upper floor ceiling and the steps. It is usually between 190 and 200 cm tall, or the height of the tallest person.

Stair slope
It is advised to follow the staircase’s 40–45 degree slope when constructing a wooden staircase by hand on the second floor. It will be challenging for young children and the elderly to climb it if you go over this limit.

The amount of building materials used and the usable area of the space decrease when selecting a gentle structure. For this reason, you should start your calculation from the available space when calculating this indicator.
Steps
Their two main components are approaching and aiming. You should consider foot size 45 when choosing the tread size. As a result, 30 cm is thought to be the ideal step width.
Depending on how steep the stairs are, the riser’s size can vary from 15 to 20 cm.
The structure’s total height should be divided into one stage’s height in order to determine the number of steps. The final figure is obtained by adding the riser’s height and the board’s thickness.
The following should be taken into account when creating drawings:
- All steps should be the same in size.
- If the structure has more than 18 steps, then it is advisable to include 2 flights in the project and provide a platform. It is called the observation, rotary or intermediate. Its location may be the center of the flight or an area near the beginning of the stairs.
Online calculator for calculation
A handy online staircase calculator is available for all calculations at your convenience. Consequently, ready-made drawings and a material specification will be sent to you.
Installation of a marching wooden staircase
The production of risers, tucks, and kosoura (also known as bowstring) is the first step in installing a wooden interstory staircase.
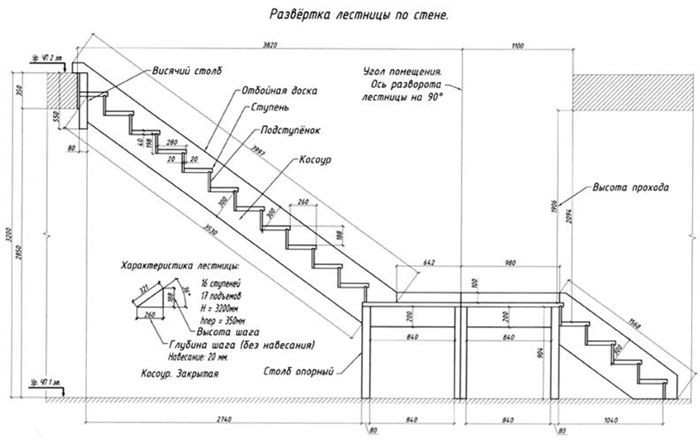
Using a template that has been prepared in advance, treads are cut from the board. They range in thickness from 30 to 40 cm on average. Doing more will result in an unnecessary material consumption and heavier construction. Risers serve a purely aesthetic purpose in the structure. As a result, you can use a 10-15 mm board to save money on them.
Solid, imperfect-free board is used to make stringers. In order to prevent an uneven and skewed staircase, both stringers need to be the same.

Frame assembly
Making cuts in the floor beam at the top of the staircase is the first step in installing stringers. Occasionally, metal stops are used in place of the cuts; these stops need to be fastened to the vertical ceiling using anchors. Whichever technique you decide on, the stringers need to be securely fastened to the ceiling.

A support beam is set into the floor on the lower level, exactly where the first step is located. Fasteners are used with anchors.

Installation of components
The steps are simple to install. After applying glue to the stringer cutouts, risers are positioned against them; these must then be aligned and fastened with screws.

On top, treads are installed and fastened to the stringers and risers. It is advised to position tape-shaped polymer gaskets underneath them. This will stop wooden components rubbing against one another and squeaking.


Balusters serve as the fence’s structural element, so it’s critical to maintain evenness when installing them. Installing the upper and lower columns and joining them with a stretched thread will accomplish this. It acts as a reference when adding additional components. Screws or self-tapping screws that are covered in grout or plugs can be used to fasten balusters.

On the balusters, the handrail is fixed and installed. It may be made of metal, wood, or another material.
Finishing
All surfaces, including those that are difficult to reach, ends, and joints, need to be sanded after installation. After that, the structure is painted or varnished and given a protective coating.
| Step | Description |
| 1. Planning | Decide on the design and measurements of your stairs. |
| 2. Materials | Select the type of wood you will use for the stairs. |
| 3. Tools | Gather tools like saws, drills, and measuring tape. |
| 4. Cutting | Cut the wood pieces according to your measurements. |
| 5. Assembly | Assemble the cut pieces to form the staircase structure. |
| 6. Installation | Secure the assembled staircase in its designated place. |
| 7. Finishing | Sand and finish the wood for a smooth surface. |
| 8. Safety Check | Ensure the stairs are stable and safe to use. |
Constructing a wooden staircase that leads to the second floor is a satisfying project that blends imagination, skill, and practicality. By taking on this task, you can ensure that the finished product blends seamlessly into your home by tailoring the design to your unique aesthetic preferences and space requirements. Despite being difficult, the process gives you the chance to gain useful woodworking skills and the satisfaction that comes from creating something by hand.
Accurate measurements and meticulous planning will be essential throughout the project. Careful planning and selection of the appropriate wood species, as well as thoughtful design of each stair component, guarantee a strong and aesthetically beautiful outcome. To guarantee a seamless construction process and steer clear of common pitfalls, make sure you use the right tools and adhere to safety regulations. Since each step builds on the one before it to create a sturdy, useful staircase, patience and persistence are essential.
In the end, creating your own wooden staircase is more about the process than the final result. You will feel more comfortable taking on other home improvement projects because you will have the knowledge and skills from this project to carry with you into your future woodworking endeavors. An intricate modern structure or a simple rustic design, a self-produced staircase is a testament to your hard work and dedication. Accept the challenge and delight in the process of turning unfinished materials into a stunning, useful addition to your house.
Constructing your own wooden staircase leading to the second floor can be a fulfilling endeavor that blends skill and usefulness. If you do this yourself, you can alter every little thing to suit your tastes and the design of your house. With a little bit of basic carpentry knowledge, the appropriate equipment, and thoughtful planning, you can build a stunning and robust staircase that will enhance your home’s aesthetic appeal in addition to fulfilling a practical need. Self-production also enables you to save costs and develop a greater appreciation for the labor-intensive nature of home renovation.


