
Decorative stones give any building or remodeling project a sense of elegance and individuality. Making your own decorative stones can be a rewarding and affordable project, whether your goal is to improve the visual appeal of your garden, walkway, or interior walls. This post will walk you through the steps of creating these exquisite stones at home.
There are a few essential processes in the making of decorative stones, all of which are easily learned with some practice. To get started, you don’t need to own expensive equipment or be a skilled mason. You can create gorgeous stones that rival those found in upscale stores with simple tools and basic materials.
Concrete is one of the main materials you’ll need because it serves as the foundation for your stones. You can create a wide variety of colors to fit your design preferences by combining different pigments with concrete. Another crucial element is molds, which help you shape your stones into the shapes you want. You can buy these molds or even make your own with common household objects.
As you work through the procedure, you’ll discover that your stones’ appearance can be significantly altered by adding textures and finishes. You can achieve a smooth, polished finish or a natural, rugged look with your stones by using techniques like stamping, carving, or textured mats. To create stones that are genuinely unique, you need to be creative and experimenting.
We’ll take you step-by-step through every process in this article, from getting your materials ready to the ultimate curing procedure. By the end, you’ll be equipped with the know-how and self-assurance to craft ornamental stones that showcase your unique style and craftsmanship while also enhancing your space. Let’s begin this thrilling journey of creating stunning, personalized stones with your own hands!
- What are there?
- Natural
- Artificial
- Materials for manufacturing
- Gypsum based
- Cement based
- How to make forms?
- Made from silicone
- From a compound
- Instructions for making it yourself
- Materials and tools
- Step-by-step algorithm of actions
- Correct drying
- Video on the topic
- DIY decorative bricks from gypsum – a complete manufacturing process | Eng Sub
- How to make a decorative gypsum brick – a business that has been working for a long time
- Artificial marble made of polymer concrete. Artificial marble from polymer concrete.
- Production of Artificial Stone as a business idea
- DIY artificial stone ROCK Part 1 Molds for stone.
- PRODUCTION IN THE GARAGE Venetian brick . Optimization of production is your success ! Formmarket.pro
- STONE PRODUCTION ! FROM LUBRICATION TO PACKAGING! VIDEO LESSON
- Artificial Stone With Your Own Hands The Entire Manufacturing Process + Correct Proportions of Gypsum. 4K
What are there?
Decorative stones can be big, small, rectangular, flexible, or uneven in shape. With this knowledge, we can now create a plethora of finishing options for any interior style in a variety of rooms, including the kitchen, living room, hallway, bedroom, and corridor.
The distinction between artificial and natural decorative stone is still traditional, though.
Natural
When it comes to durability, natural stones are better than artificial ones for interior decoration. Moisture, UV light, and mechanical stress are not things that scare natural materials. It also has outstanding aesthetic qualities and thermal insulation.
"Wild" stone has drawbacks in spite of its benefits:
- high price;
- difficulties during processing and installation;
- lack of unity of composition.
The final point indicates that every natural stone has a distinct relief and pattern, and there is very little chance of finding the necessary quantity of blocks with the same texture or pattern.
Artificial

Natural stone and artificial stone are equally beautiful. Almost any kind of material can be produced:
- light;
- dark;
- plain;
- multicolor;
- with overflows;
- interesting transitions;
- relief and other features.
Because artificial stone is lighter than real stone, it puts less strain on structures and architectural forms. Installing the material is simple and it costs less.
Since the workpieces don’t need to be resized or altered in shape or pattern, each block is fixed with a unique adhesive composition quickly because of the smooth back surface.
It is simple to restore and repair stone that has suddenly changed over time (for instance, if a portion has been damaged).
Among the benefits are hydrophobicity, low cost, and ease of maintenance; among the drawbacks is the possibility of abrasion from mechanical stress (if the material is of poor quality).
Materials for manufacturing
Various materials are used to create artificial stone, which affects both its appearance and functionality. The cement and gypsum models are the most widely used.
Gypsum based
Gypsum siding is used everywhere. Any surface, including walls, furniture, niches, shelves, and even bed headboards, can be adorned with it. The material is affordable, lightweight, and aesthetically pleasing. It is also easy to install using glue.
Because of its porous structure, gypsum stone can let water through. Moreover, a unique varnish is impregnated into it to stop this from happening.
Benefits

- non-flammability;
- ease of installation;
- environmental friendliness;
- resistance to temperature changes.
Nowadays, the most popular stone for finishing is gypsum.
To get ready, you’ll need:
- white plaster;
- slaked lime;
- pure water;
- dry pigment or water-based paint.
Please enjoy this video, which highlights the benefits of using gypsum to make stone:
Cement based
Premium Portland cement is the foundation for making cement stone, along with a few other ingredients:
- sand;
- plasticizing and modifying additives;
- hydrophobic composition;
- reinforcing substances and pigment.
You can get a purer, richer shade by using white cement.
This mixture creates a facing material that is easy to install and restore if needed. It is also long-lasting and resistant to moisture. Stone made of cement is strong and resistant to the elements.
For example, in a country home or at home, you can prepare your own concoction.
We would like you to view this video about the technology used to make stone made of cement:
A satisfying and affordable way to add flair to your building and remodeling projects is to make decorative stones at home. This post will walk you through the key tools and easy procedures required to make stunning, long-lasting stone blocks at home. You’ll discover the supplies, equipment, and methods required to turn unfinished materials into gorgeous accent stones, making it simple to add one-of-a-kind, handcrafted elements to your spaces. This easy method will help you accomplish results that are on par with professionals, whether you’re a professional or a do-it-yourself enthusiast.
How to make forms?
You can create multiple blocks at once by using forms. It is best to construct it yourself because the number of them depends on the size of the mold.
Made from silicone

Forms must adhere to certain specifications:
- have strength;
- good abrasive resistance;
- resistance to aggressive chemicals.
Although silicone molds are lightweight, practical, and simple to remove the finished blocks from, exposure to chemicals can harm them.
One more drawback of silicone is that it has a high risk of bubbles forming in molds, which can result in block defects.
Matrix forms are used to create decorative stone.
To create the form, you will require:
- silicone in liquid form with hardener included;
- several samples of the stone that should be the result (5-10 pieces);
- a sheet of chipboard or MDF (frame) and 4 bars about 2 cm thick;
- acrylic sealant.
First, you must carefully follow the dosage recommendations in the instructions to make a premium silicone solution.
- On a flat horizontal surface, it is necessary to construct a formwork from 4 pieces of MDF or laminated chipboard. They are fastened with screws, and the resulting gaps in the corners are filled with acrylic sealant.
- A flat sheet of laminated chipboard or MDF is placed under the formwork.
- Samples of stones are placed in the center of the formwork with the textured side up. The distance between them should be at least 1 cm. The height of the formwork should be at least 1 cm higher than the highest point of the blocks.
- Then the blanks must be covered with a separator – ordinary machine oil or alcohol. This is necessary so that the blanks can be easily removed from the form.
- The last step is pouring with silicone solution. They must be completely covered with the composition so that a flat surface is formed
We recommend watching this video to learn how to create a silicone mold for a stone:
From a compound
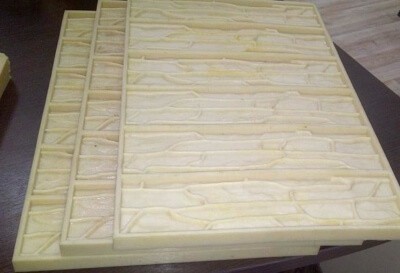
Matrix forms are more frequently created using a polyurethane-based compound; although this form is more costly, its service life is significantly longer. Although the algorithm is similar, there are a few differences:
- The resulting solution must be immediately poured into the formwork, and not wait, as with silicone, for a few minutes.
- Vaseline or special wax is used as a lubricant.
- After filling the form, it must be shaken a little to remove excess air, knock on the walls.
- It is better to increase the hardening time to 48 hours.
Only a spatula can be used to mix the compound. Using a drill or a construction mixer is not permitted.
After separating the completed form from the stone, the latter is suspended in midair for an additional two to three days.
Instructions for making it yourself
Although decorative stone can be ordered or purchased from any hardware store, many people prefer to make it themselves because they are aware of the technology involved in its production.
- Firstly, the process of making the material yourself saves money. Sometimes the amount is reduced by 7 times.
- Secondly, you can create a stone with an individual design, choose the texture, size and shade of the blocks yourself.
Materials and tools
The type of material must be decided upon beforehand in order to prepare the necessary equipment.
In order to work, you’ll need:
- material for creating blocks (gypsum or cement composition);
- matrix form made of silicone or polyurethane;
- 2 identical sheets of chipboard, MDF or plywood, matching in size to the shape;
- electric drill with mixer attachment;
- vessel for mixing the composition (bucket or basin);
- tray for drying blocks;
- brushes and spatulas;
- dye.
Step-by-step algorithm of actions

It will take a long time to complete, and plans don’t always work out. It’s normal to occasionally finish less work in a day, especially if you’re just starting out.
Ordering:
- Set up a work area in advance: balcony, garage or room. If the main work will be carried out in the apartment, the furniture and floors must first be covered with film or newspapers. You also need to prepare work clothes and rubber gloves.
- Take care of a perfectly flat working surface – for this you need a level.
- Prepare a molding mixture. If it is gypsum, it must be added to the water (and not vice versa) in the ratio specified by the manufacturer. For strength, sand is added (approximately 100 g per 1 kg of gypsum), PVA glue is used as a plasticizer. The last step is to add dye.
- Put the matrix shape on the flat surface on top of a sheet of chipboard or MDF. Smear it with a separator (machine oil, alcohol, petroleum jelly.). If necessary, apply the dye to the lower surface.
- Fill the compartments of the mold with a gypsum mixture. Each compartment is first filled separately. Then you need to take the form by one edge and gently shake it, and only after that the remaining part of the material spills into the matrix. In order for the second layer to be distributed evenly, it is necessary to raise the support of the form (sheet of chipboard or MDF) and shake sharply.
- Spread the mixture with a spatula until you get a smooth surface. Excess gypsum from a form that is visible between the blocks must be completely removed so that the workpiece can be easily extracted.
- Cover the matrix with a second sheet of chipboard, plywood or MDF. Take the entire structure and turn over so that the substrate is on top.
- Gently remove the upper sheet (substrate), shape.
Correct drying

Dry prefabricated blocks in a warm, dry space:
- First, the material should “gain a foothold” on the faner after removing the shape-matrix.
- Then they are moved to a pre -equipped rack or in a special dryer, where the temperature should be at least 20 and no more than 55 degrees. It is better to gradually increase the temperature.
- After two days, stones are transferred to the box, and the next batch can be placed in the dryer.
| Step | Description |
| 1. Gather Materials | Collect cement, sand, water, and pigment for coloring. |
| 2. Create a Mold | Use wood or plastic to build a mold in the desired shape and size. |
| 3. Mix Ingredients | Combine cement, sand, water, and pigment in a mixing container. |
| 4. Pour the Mixture | Fill the mold with the mixed materials, ensuring even distribution. |
| 5. Let it Set | Allow the mixture to cure in the mold for the recommended time. |
| 6. Remove the Stone | Carefully take the hardened stone out of the mold. |
| 7. Finish the Stone | Apply sealant or paint if desired for added protection and aesthetics. |
Making your own ornamental stones is a satisfying and affordable way to improve your house or landscaping. You can create distinctive blocks that perfectly fit into your design plans and satisfy your aesthetic preferences with the correct materials and techniques. In addition to saving money, this DIY method enables customization—something that store-bought options frequently do not permit.
The first step in the process is choosing the right materials and molds. Although plaster or concrete are frequently used for the stones themselves, silicone molds are well-liked for their adaptability and simplicity of use. Your stones can have a bold, artistic flair or a natural look by adding color pigments and textures. It takes some accuracy to mix and pour the material into molds, but with practice, it becomes an easy task.
The blocks are prepared for use in a variety of projects once they have dried and set. The options are unlimited, whether you’re making one of these wall decorations, garden paths, or one-of-a-kind artwork. The joy of making something by hand adds a unique touch that raises the aesthetic appeal and monetary value of your house.
Apart from the functional advantages, crafting ornamental stones by hand can be a delightful and imaginative endeavor. It provides an opportunity to try out various designs and methods, and the outcomes are enduring and observable. You’ll be well on your way to becoming an expert in the production of decorative stones if you adhere to the instructions provided in this guide.


