
It is important to know the correct slope when building a pitched roof with corrugated sheets for both practicality and aesthetic reasons. A roof’s slope is its degree of steepness, which has an immediate impact on how well it drains water and endures elements like snow and rain.
For a pitched roof composed of corrugated sheets, a slope of five to twenty degrees is usually advised. This range offers adequate structural support for the roofing material and guarantees effective water drainage. Water runs off a steeper slope more quickly, which lowers the possibility of leaks and water damage.
A slope that is too shallow may cause water to collect and possibly leak, particularly in the event of strong rains or snowmelt. It also affects the roof’s overall longevity because standing water can hasten the corrugated sheets’ deterioration over time.
However, an excessively steep pitch may not be required in every climate and can raise building expenses. The local climate, building design, and the particular needs of the roofing material being used all play a role in striking the right balance.
- SNiP recommendations
- Degrees, percentages and ratios
- Minimum slope angle
- Advantages
- Flaws
- Optimal
- Wind and snow loads
- How to do the calculation yourself?
- Rafter system and sheathing depending on the slope
- Important aspects of construction and installation details
- Leak protection for low-slope roofs
- Video on the topic
- pitched roof
- We twist the corrugated sheet on the pitched roof of a HITEK house.
- We cover the roof with corrugated sheets. 3
- Where to turn the screws? UP or DOWN waves
SNiP recommendations
When covering with profiled sheet metal, the standards specify a minimum slope of 8° and an upper limit of 70°. The limit for single-pitch structures is lowered to 10–60°.
Manufacturers are also proposing an amendment: for outbuildings and open roofs, a minimum of 8° is deemed appropriate; for residential buildings, this number is increased to 10–12°. There is no guarantee that the roof will remain tight when it deviates to a lesser degree.
SNiP II-26-76 states that a 20 ° angle is ideal for roof coverings composed of profiled sheets. With a slope like this and compliance with all technological specifications, the design will have better tightness and durability indicators and minimal windage.
Degrees, percentages and ratios
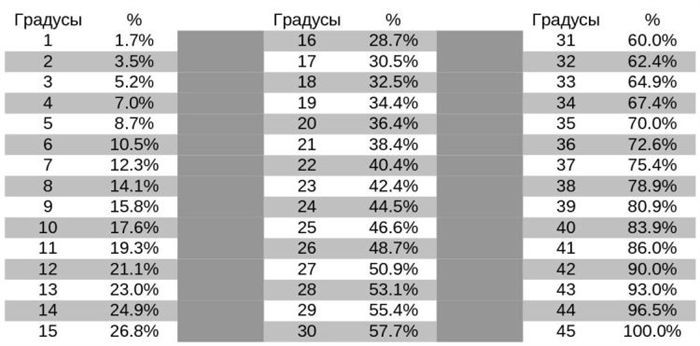
Although degrees are the standard unit of measurement for slope, regulatory documents may also use percentages or numerical ratios to express this value (that is, the roof’s height divided by its length).
According to SNiP, a minimum slope of 8% translates to 14% or 1:7, and an angle of 45° is interpreted as 100% (meaning the slope’s height and length are equal). Tables and calculators are used to convert between units; as a rough guide, 1% is equal to 27 degree minutes, and 1° is equal to 2.22%.
Minimum slope angle
When given the choice between steep and shallow slopes, most developers opt for the latter. The explanation is straightforward: a steeper gradient makes the structure heavier and makes installation more difficult. However, the best option is chosen after weighing all of the advantages and disadvantages.
Advantages
The following are some benefits of this performance:
- Reducing expenses on the roofing system, cake and coating itself, savings on the pediment and attic overlap.
- Reducing weight load. In small -scale regions, single -sided roofs with a minimum bias and profiled coatings cost many times cheaper than other varieties. Even in the thickest roofing brands, the weight of 1 m 2 coatings does not exceed 7 kg.
- Low complexity and safety of work.
- Small sailing of the structure. With standard overhang sizes, such roofs can withstand strong gusts of wind better.
- Lack of a traditional skate and the simplicity of organizing roof ventilation.
Flaws

Cons mostly show up based on how long a roof lasts and how much it costs when there is snowfall.
The snow must be manually removed from low-bias slopes or melted with the use of pricey heating systems.
The lack of such an opportunity results in stricter specifications for the coating, lathing, and rafter systems, which raises costs significantly.
The requirement to install a solid base with a slope of less than 15 ° beneath the corrugated sheet is another drawback. Solid sheathing systems are always more expensive and have inadequate ventilation, which shortens the life of the thermal insulation cake and the structures.
The final disadvantage is situational: low-slope roofs may not always work into projects involving the layout of an attic floor or the use of interior space for other purposes. It is advised to raise the slope to 30 to 40 degrees in these circumstances.
For a pitched roof made of corrugated sheets to be functional and long-lasting, the proper slope must be chosen. The pitch, also known as the slope, is responsible for ensuring effective rainwater drainage and preventing accumulation that may cause leaks or structural damage. A recommended slope for corrugated sheets usually falls between 5 and 15 degrees. This range preserves structural integrity while enabling efficient water runoff. The best performance and lifespan of the roof are dependent on a number of factors, including the local weather and the building’s specific requirements when choosing the slope.
Optimal
Because of the thin sheathing and low rise of the rafters, the recommended SNiP slope value of 20° is accepted by the majority of developers, which allows for cost savings. Additionally, even with common brands of corrugated board, the tilt of the roof is achieved with good tightness, and its thermal insulation and ventilation are unaffected. Approximately ±5° deviation is deemed acceptable and has minimal impact on the estimate and windage.
However, the specified value will only be ideal in areas with minimal snowfall. Raising the slope to 40–45° is advised when there are substantial snow loads, but this isn’t always feasible.
A different approach would be to install the same 20° slope using robust sheathing and a layer of stiff, self-supporting corrugated sheets with a profile height of more than 35 mm and a sheet thickness of 0.7 mm. This option requires strengthening the rafter system or planning ahead for a snow removal strategy for the roof.
Wind and snow loads

In order to prevent mistakes, climate maps (appendix to SNiP 2.01.07-85) are used to verify wind and snow load values prior to calculation.
The slope of the slope can be increased to 35–45° without any issues in areas with average wind loads; it can only be increased to 15–25° in areas with strong wind loads.
It’s also not advisable to make a lonesty row with large overhangs when there are strong wind loads. No matter where you live, if you are building a home with a pitched roof, you should try to place a high wall facing continuous, one-way traffic. Simultaneously, a larger roof area increases the influence of wind load, and vice versa.
When the slope is less than 40–45°, the snow load chosen from the map is always added to the total weight. The parameter must be considered when designing and selecting the grade of profiled sheet, as it varies from 56 to 560 kg/m2.
It is clear that owners face a conundrum in areas with high winds and snowfall because the specifications for the ideal angle are in conflict with one another. In this instance, it is obvious that experts were consulted in both the parameter selection and roof design.
How to do the calculation yourself?
By multiplying the length between horizontal supports by the tangent of the selected angle of inclination, the formula L=H√tgA is used to determine the lifting height of the second load-bearing wall or vertical supports of the structure.
The angle itself can be calculated or verified using the same formula. Additionally, you can quickly determine the minimum length of the rafters when performing your own calculations (Lc=L/sinA); the resultant value needs to be increased by the indentations on the overhangs.
It is sufficient to divide the lift height by the separation between the load-bearing walls and multiply the result by 100 to determine the angle as a percentage (A= L/H*100). The aforementioned tables are used to convert between degrees.
Rafter system and sheathing depending on the slope
High-quality lumber (mauerlat with a section of 100 × 150 mm, timber from 80 or board from 50 × 150) or a metal profile is used to lay the rafter system of roofs covered with corrugated sheets. Wooden systems are less expensive and weigh less.
The ideal rafter leg pitch ranges from 50 to 80 cm; however, because of the low slope and higher snow loads, it must be lowered. Only when there is more than 6 meters separating the load-bearing walls are additional vertical supports added to the rafter structure.
The type of sheathing is directly related to the slope; a solid base is found on slopes with an angle of less than 15°. Installing loose sheathing beneath the corrugated sheet in increments of 30 cm is necessary for slopes greater than 15°.
The brand and height of the sheet profile determine the precise pitch value; as the thickness and steepness of the roof increase, so does the distance between adjacent planks, which increases to 60-100 cm for conventional types and 100-400 cm for self-supporting profiles.
Important aspects of construction and installation details
When installing corrugated sheeting on a roof, design errors are essentially invisible during the installation process; leaks, sheet failures, and structural or coating deformation occur later, during windy or rainy seasons.
To stay out of such circumstances, you ought to:

- take into account all possible loads in the complex;
- fulfill all the requirements of the installation technology (increase the overlap of sheets or reduce the pitch of the sheathing when the slope decreases, use the correct fasteners and laying patterns);
- think in advance about the length and method of covering the cornice and blowing out the roofing cake;
- lay reliable gutters along the edge of the slope;
- install continuous sheathing under the corrugated sheet in places where it adjoins the roof"s through elements (if any) or loaded areas (mounting points for antennas, solar panels, walkways for inspecting and cleaning the roof).
The technology must meet the following requirements:
- Laying the corrugated sheet with a mandatory overlap – from 1 corrugation on the sides with a slope of ≥12 °, and from 170 mm vertically. The exact value is indicated by the manufacturer.
- Fastening the sheets according to a pre-selected pattern – in blocks, with horizontal alignment of the lower overhang, from bottom to top.
- Use of special roofing screws with pointed tips and round sealing washers-gaskets.
- Screwing in the fasteners in the center of the sheathing elements, strictly perpendicular. The entire area of the sheet, with the exception of the joint, is attached to the lower ridge, the overlap at the joint is attached to the upper ridge.
If any of the specified requirements are broken, the tightness of the roof sheets will decrease or they will tear off.
All of the pie’s ventilation gaps must have access to fresh air during installation. This is because condensate buildup makes complete overlap or excessive contact between the corrugated sheeting and base dangerous.
Leak protection for low-slope roofs
In the event that low-slope roofs require the installation of corrugated sheets, a few more requirements are needed:

- The amount of overlap of rolled waterproofing materials is increased to 15-20 cm.
- The base is solid, but a 5-10 cm gap is left between the sheets or boards for ventilation and compensation for thermal expansion of the sheathing.
- The overlap of the sheets is increased to 300 cm horizontally and up to 2 corrugations on the sides. Each sheet is secured with at least 9 self-tapping screws with rubber gaskets.
- Overlapping areas at the joints of sheets are completely coated with roofing sealants. It is not recommended to save on them; non-target brands of sealants lose their properties under the influence of heat and precipitation after 6-12 months and the stage has to be repeated.
It is important to know the slope of a pitched roof composed of corrugated sheets for both practical and aesthetic reasons. For such roofs, a slope of five to fifteen degrees is usually advised. This range guards against water pooling, which can cause leaks and structural damage, and guarantees efficient water drainage during rainy seasons.
Lower-sloped roofs—roughly 5 degrees—are simpler to build, but they might need extra waterproofing to keep water out. However, steeper slopes—roughly 15 degrees—offer better water runoff and are frequently chosen in areas with high rainfall.
Take into account the local weather when calculating the slope of your corrugated roof, as heavy rain or snowfall can affect the ideal pitch. Selecting the ideal slope also depends on your building’s design and personal taste in design.
Speaking with a roofing expert or contractor can help you get insightful information that is specific to your needs and guarantee that your pitched roof will not only function well but also improve the overall appearance of your building or remodeling project.


