
If you’re not sure where to start, starting a laminate flooring project can be both exciting and a little intimidating. Correct laminate installation is essential to creating a stunning and durable floor. Whether you’re a novice or an experienced do-it-yourselfer, knowing the fundamentals is essential.
Making preparations is the first step. This include taking measurements of your area, selecting the appropriate laminate, and making sure your subfloor is level and clean. Don’t rush things; doing so can cause issues later. Take your time and do it correctly.
Next, get your equipment ready. A tape measure, saw, spacers, tapping block, and hammer are required. Having everything ready before you begin can help the process go more smoothly and prevent unneeded hiccups.
Plan your layout, finally. To achieve a natural look, choose the direction of your planks and arrange them in a staggered pattern. Although this step may seem tedious, it will have a significant impact on how your floor looks in the end.
Laminate flooring installation can be a doable and satisfying project with the correct planning, supplies, and preparation. You’ll have a gorgeous new floor if you follow these instructions.
| Step | Details |
| 1. Prepare the Subfloor | Make sure the subfloor is clean, dry, and level. Remove any old flooring or debris. |
| 2. Install Underlayment | Roll out the underlayment over the subfloor to provide cushioning and moisture barrier. |
| 3. Plan the Layout | Determine the direction you want the laminate to run and measure the space to decide on the starting point. |
| 4. Start Laying the First Row | Begin laying the laminate along the longest wall. Use spacers to maintain a gap between the laminate and the wall. |
| 5. Cut Laminate as Needed | Measure and cut the last piece of each row to fit, leaving room for expansion. |
| 6. Continue with Additional Rows | Stagger the seams by starting each new row with the leftover piece from the previous row. |
| 7. Fit Around Obstacles | Measure and cut pieces to fit around doorways, vents, and other obstacles. |
| 8. Finish the Installation | Install the last row, ensuring a snug fit. Remove spacers and install baseboards or molding. |
- Where should you start laying laminate flooring?
- Factors that determine the start of work in a room
- Laminate with chamfer and embossing
- Laminate assembly method
- Furniture arrangement
- Traffic intensity
- When laying in the whole apartment
- The nuances of laying the first and subsequent rows
- Video on the topic
- HOW TO INSTALL LAMINATE FOR A BEGINNER. Full video review.
- Laying laminate flooring with your own hands, where to start laying laminate flooring. Calculation of laminate trimming
Where should you start laying laminate flooring?
The floor can be installed from any angle at the start of work when installing standard laminate panels. How this will impact the flooring’s performance attributes is another question. Let’s attempt to determine the best place to begin laminating and the rationale behind it.
Factors that determine the start of work in a room
The desire to conceal the connecting seams, which are positioned parallel to daylight and become invisible, explains the misconception that has grown over time regarding where to begin installing lamellas. But this ignores a lot of recently discovered information that makes us reevaluate the best starting angle for laminate flooring installation. Among them are:
- production of lamellas with V and U-shaped chamfer and embossed surface;
- laminate assembly method;
- furniture arrangement;
- traffic intensity.
Laminate with chamfer and embossing
Technology advancements have made it possible for laminate producers to create panels with chamfers and embossing, which can sometimes fool even experts into thinking that a floor covering is real wood because they are unable to tell the difference. As a result, the slats naturally resemble boards composed of different kinds of wood.
But achieving such an effect requires departing from the traditional floor installation canons. It is imperative that the laminate be laid at an angle or with side lighting to allow the light to emphasize the chamfer’s presence. The first instance refers to the laying as transverse, while the second uses the term "diagonal."

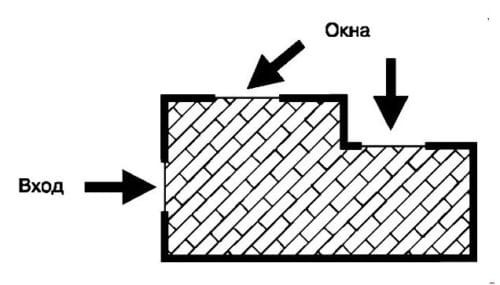
Problems occur when laying transversely around heating pipes because it is hard to close the lock with the fewest possible lamella cuts. As a result, if you are facing the window opening, you must begin at the left and lay it parallel to the outer wall’s corner.
For reference, the advice to begin work from the far right corner of the room, or from the left, if you are facing the window opening, confuses a lot of inexperienced finishers for some reason. In one room, the heating pipes are to the left of the window, while in another, they are to the right. Please be aware that the beginning point of the work is unaffected by the pipes’ location. Right-handed persons should take note of this recommendation as it facilitates snapping the end lock into place. Naturally, the advice will be the same for left-handers.
Embossed surfaces don’t always call for deviating from the standards.
Texture of structure. The panels’ surface is lightly embossed, giving the laminate a coarse texture. Compared to a smooth surface, it appears more noble and is unrelated to exact imitation. Starting points are the left corner parallel to the outer wall and the right corner parallel to the flow of light.

Sign up. Embossing in the register is the most expensive and effective way to replicate natural boards (True-Touch Deep Nature). In this case, producers were able to replicate even wood fibers. The only way to accentuate the effect of a "living" floor is to begin installation from the wall’s left corner where a window is located.
Particular daylighting is not necessary for laminate textures that mimic aged wood (Aged Wood), manual processing (Handscraped or Handcrafted), or infinite board (Infinite Board). As a result, they can begin at any angle and be laid in any direction.
Laminate assembly method
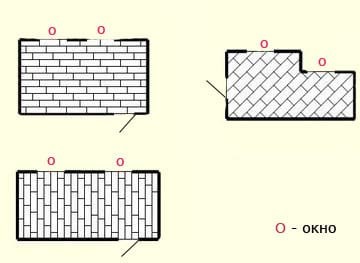
Lamellas are laid using the following techniques in practice:
- along the light stream;
- across;
- diagonally;
- “herringbone” – laminate panels are located at an angle of 90 degrees to each other;
- labyrinth – artistic laminate layout.
To conceal the connecting seams, the slats are positioned parallel to the window’s light source. This installation’s classic beginning is in the far right corner.
With the introduction of new laminate types, such as chamfered and embossed, cross laying is growing in popularity. In this case, the floor panels are arranged so that they face the light. Beginning at the left wall corner, the work should be done in a line parallel to the window wall.
It is possible to perform diagonal installation as needed and for design reasons. Although starting from a corner is an option in this instance, it is challenging to achieve the intended laying angle right away. Placing the first lamella in the center of the room is the appropriate course of action in this case.
Starting work at a right angle to one another when laying laminate flooring does not impose any restrictions. Any corner of the space could be it.
The only people who know where to begin installing laminate in a room with a labyrinthine artistic panel layout are skilled builders, or mosaic tilers. However, there’s no big secret here: the work always begins in the middle of the hall, directly beneath the chandelier, if it is hanging. This is where mosaics are usually used because they don’t look good in smaller spaces.
This method is the only one that permits you to leave the mosaic laminate panels untrimmed close to the walls; instead, the empty space is filled with slats that, in each instance, run parallel to the side of the laid rectangle (square).
Furniture arrangement
Lamella strips have a weak lock as a problem. Installing side legs for a bed or sofa should be done parallel to the installed furniture to prevent them from falling onto a single slat panel and quickly destroying the lock. The solution is to arrange the sofas diagonally if they are in corners or next to other walls. You can see how to get to work in these situations above.
Traffic intensity
Walking causes parallel-laid slats in hallways and corridors to creak. The solution to the problem is the diagonal laying of lamellas, which can begin in any location within these rooms.

When laying in the whole apartment
In an apartment, the question of where to begin installing laminate flooring is answered slightly differently. Here, entirely different rules apply: when laying laminate in other rooms, take care not to harm the previously installed floor. Installation therefore starts in the back room of an apartment and ends in the hallway.
Another point to consider is that the slats in laminate flooring tend to rise with variations in temperature and humidity, so avoid laying it as a continuous carpet in nearby rooms. Consequently, creating a threshold at the doors is essential. A threshold must be created even in cases where there isn’t a door between the kitchen and the hallway because there’s a good chance the floor will rise as it expands.
Planning and preparation are essential before beginning to install laminate flooring correctly. This include selecting the appropriate laminate type for your area, making sure the subfloor is dry, clean, and level, and assembling all required equipment and supplies. By taking a methodical approach, you can improve the durability and aesthetic appeal of your floors while creating a professional-looking finish. This includes allowing the laminate to become acclimated to the environment of your home and precisely measuring and cutting each piece.
The nuances of laying the first and subsequent rows
One more crucial detail about how to begin installing laminate flooring correctly. Let’s break down each step by step:
- The concrete screed is covered with a backing, which allows you to hide the uneven base and create a damper between the laminate and the screed;
- The initial installation location is determined taking into account all factors;
- Along the perimeter of the walls, purchased wedges or homemade spacers are installed, providing a technological gap (10-12 mm) – needed to compensate for the expansion of the floor under the influence of fluctuations in temperature and humidity. Spacers are also required at the beginning of each row (it’s enough to just leave a gap at the end) – when snapping the transverse lock, the floor can move close to the wall;
- Pre-laying is carried out – the size of the last lamella is determined. If it turns out that in the last row the panels will have to be cut by more than 2/3, it is necessary to cut the first row of lamellas by 1/3;
- The connecting lock is cut off from the wall side of the laminate;
- The first row of lamellas is laid;
- In preparation for laying the second row, the first panel is shortened. Manufacturers recommend cutting ½, practice – 1/3 of the length of the lamella strip. This operation ensures a shift of the second row in relation to the previous one – the transverse joints are shifted. If this is not done, at the point where the transverse locks coincide, their strength drops several times;
- The third row is also shifted, but in relation to the second – 2/3 of the panel is cut off.
Although installing laminate might seem overwhelming at first, with the correct method, it becomes doable and even enjoyable. Recall that preparation is essential. Before you start, make sure your subfloor is dry, clean, and level. Making this fundamental move now will protect you from problems later on.
Take your time to arrange the layout as you begin applying the laminate. Think about the boards’ orientation and the way they will appear in the room. As you move from corner to corner of the room, make sure that every board fits snugly and is correctly aligned.
Remember to leave space for expansion around the room’s edges. This tiny gap keeps the laminate from buckling or warping by allowing it to expand and contract in response to changes in humidity and temperature.
Finally, exercise diligence and patience. It takes accuracy to cut and fit the boards, especially where there are obstructions like vents and doors. For a flawless finish, measure and cut slowly and precisely.
You can install laminate flooring with confidence by following these steps, and the finished product will look professional and improve the aesthetics and usability of your room. Cheers to flooring!


