
The first step to getting a polished and professional look in your room or apartment is deciding where to start laying laminate flooring. For many homeowners looking to update their space, laminate flooring offers a reliable, stylish, and affordable option. It’s important to think about a few important factors before beginning the installation process as they may affect your choice.
Examine the room’s layout and measurements first. Make a note of any architectural details, such as rounded corners or alcoves. It is generally advised to begin installing laminate flooring on the room’s longest, straightest wall. This method reduces the need for cuts and modifications in the middle of the floor and helps to produce a more uniform appearance.
Next, think about the room’s natural lighting sources. Start installing the laminate flooring perpendicular to the incoming light, if at all possible. This arrangement can lessen the visibility of the plank seams and improve the space’s visual depth. A straight and seamless installation can also be ensured by beginning the alignment process close to a natural light source.
The movement of people’s feet around the room is another thing to consider. Starting the laminate flooring installation along the longest path of travel is advantageous for areas that see a lot of traffic, like hallways or entryways. By placing it strategically, you can help the floor wear and tear more evenly over time, extending its lifespan and keeping its attractive appearance.
Lastly, before beginning the installation process, gather all required tools and supplies. Planks of laminate flooring, spacers, underlayment, a tapping block, a saw suitable for cutting laminate, and measuring tools are all included in this. Having everything ready guarantees a seamless installation process free from hiccups.
- Within the room
- Within the apartment
- The nuances of laying the first and subsequent rows
- Video on the topic
- How to lay laminate flooring in a single contour without thresholds | Repair Tips | Apartment renovation in St. Petersburg
- Where to start laying laminate flooring correctly. Laying laminate flooring for beginners
- How to lay laminate along or across a room? What determines the direction of installation??
Within the room
When determining where to begin installing laminate flooring, take into account a number of factors pertaining to the material’s texture as well as the features of the space.
- Boards with embossing and chamfer. This texture implies a visual emphasis on embossing and chamfering – thus achieving the complete illusion of a natural material, so the traditional arrangement of lamellas is not beneficial. In this case, it is recommended to lay the laminate crosswise, i.e.e. along the window, or diagonally. The flow of natural light will highlight the uneven embossed surface and emphasize the division of individual boards, indicated by longitudinal and transverse chamfers;

- Structural texture. With the help of embossing, the board surface is given artificial roughness, which visually resembles a natural surface made of wood or stone. For such a texture, standard placement along the wall perpendicular to the window is possible;


- Register. Lamels with such embossing are considered the most expensive and beautiful products, which are very difficult to distinguish from wooden boards in appearance. From what angle to start laying the laminate in this case? Professionals recommend starting installation from the left corner, if you look directly at the window. By placing the boards along the wall in natural light, you can achieve the effect of a natural coating;
- A pattern imitating aged wood. To visually perceive such a texture, it is not necessary to use natural lighting, so the lamellas can be arranged in any order;
- Placing large furniture in the room. When planning the installation of laminate flooring, you need to imagine how the furniture will be arranged in the room. The weak point of the slats is the lock connection, and if the legs of the sofa or cabinet are on the same board, after a while you should expect the lock to break, which will lead to the need to replace the covering. The way out of this situation is to place the laminate diagonally;
- Degree of coating wear. The highest degree of wear is experienced by coatings located in the corridor or hallway, so longitudinal placement of lamellas in such rooms is not recommended (increased wear leads to squeaks), diagonal installation would also be the best option.
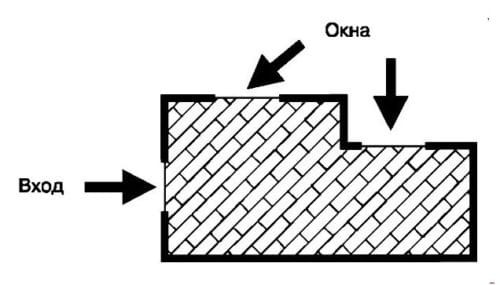
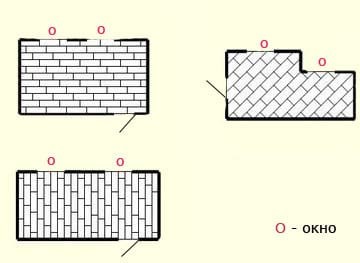
When we compile every possible configuration for the lamellas in the space, we obtain the image that follows:
- Styling along the wall and perpendicular to the natural light source It is recommended to start from the far right corner when looking at the window. This method is used for any standard drawings and allows you to hide the joints of the boards;
- Transverse installation Performed from the left far edge, if you look at the window. It is used when installing lamellas with embossing or beam;
- Diagonal location laminate can be started with the center of the room or from the corner, and the installation from the middle of the room will more clearly calculate the required angle in relation to the walls;
- Laminate installation "Herringbone" you can start with the right and the left corner. In this case, the binding to a certain place is not important;
- Laying by the method "Labyrinth" possible only from the center of the room. Only professional finishes can perform a set of panels like mosaics, so you should not use this installation option yourself. This method is suitable exclusively for rooms with an area of 20 kV.m. and more, in a small room all the complexity of the pattern will not be visible.
The initial step in installing laminate flooring in your room or apartment is critical to ensuring a seamless and polished finish. Maximizing aesthetics and practicality will determine where to start. It is usually advised to begin installing laminate from the longest straight wall in the space. This method reduces the need for future cuts and adjustments while guaranteeing a symmetrical appearance. Furthermore, orienting the planks so that they face the main natural light source can improve the room’s perceived openness. You can achieve a polished finish that improves the overall appearance and usability of your living area by starting right and making advance plans.
Within the apartment
Once you have determined the best place to begin installing laminate flooring in a room, you need to determine the best way to begin installing laminate flooring in an apartment. In this instance, considerations such as the existence of passage doors, the corridor’s restricted size, and work-related technology are required.
It would be appropriate to begin installing the laminate in the furthest room in order to prevent damage to the previously installed floors during the material transfer and installation process. Installation then takes place in the kitchen, the hall, and the remaining rooms. The corridor and hallway come next. In this manner, the work will be completed in a sequential manner and there won’t be any unintentional damage to the newly laid floor.
It is advised to leave a technological gap and cover it with a unique joining threshold when joining flooring in adjacent rooms. This precaution will help keep the coating intact in the event of an emergency in one room because swollen boards from a water leak in one room won’t damage the laminate in the adjacent room.
Although the flooring in these rooms is typically visually combined, a technological gap must be created between the kitchen and the hallway in addition to the typical arrangement of a technological gap in the doorway.
The nuances of laying the first and subsequent rows
The way you begin installing the laminate will determine how the flooring looks in the room overall, so it’s critical that you adhere to these detailed instructions, especially if you are doing the work yourself:
- The concrete base is leveled, cracks and chips are puttied, and a substrate is laid on the prepared, clean surface. This material allows you to eliminate minor differences in the height of the screed, and also performs the function of heat and sound insulation.
- Taking into account the recommendations, determine the place to start laying the coating.
- To ensure a technological gap, special wedges of centimeter thickness are installed near the wall. This procedure is mandatory when installing laminate flooring, since when the humidity conditions in the apartment change, the lamellas slightly expand, and a gap along the walls of the room will help to avoid swelling.
- After you have decided where to start laying the laminate in the room, you should make a preliminary fitting of the material according to the dimensions of the room. This is necessary in order to optimally select the size of the lamella trim for laying the rows in a staggered pattern. Usually, the board for the start of the second row is cut by 1/3 or 50%. It is also important to determine how much the last board in the first row will have to be trimmed, if too small a piece remains, the first lamella in the row will need to be shortened.
- The first row is laid with the ridge towards the wall, but to ensure the correct gap, the ridge is cut off.
- The first row is laid with a whole board (if the need to adjust the first lamella was not revealed when measuring the room).
- The second row is laid with a board cut by 1/3 or half. This eliminates the possibility of mating transverse locks.
- Subsequent rows are also laid with an offset.
| Preparation | Installation |
| Clean the floor | Start from a corner |
| Level the surface | Lay underlayment |
| Measure the room | Place first plank |
| Acclimate the laminate | Click planks together |
| Gather tools | Maintain spacing |
The final appearance and longevity of your installation can be greatly impacted by the location in which you begin installing laminate flooring. It is usually advised to begin on the longest, straightest wall in the space. This method aids in developing an eye-catching arrangement that flows organically throughout the room.
Make sure the subfloor is level, dry, and clean before starting. This setup guarantees that the laminate locks together properly and is essential for a seamless installation process. To prolong the life of your flooring, add underlayment to offer cushioning and moisture protection.
To account for natural expansion and contraction, leave a consistent expansion gap all the way around the room when installing the first row of laminate. In the future, baseboards or quarter-round molding can be used to hide this gap. Stagger the end joints of neighboring rows as you go to make a more visually appealing and robust pattern.
Prior to installation, make sure the laminate flooring has had time to adjust to the room’s humidity and temperature. By taking this action, the planks won’t warp or buckle in the future. After installation, fit and trim the final row with the proper tools to guarantee a neat and polished finish up against walls or other obstructions.
These tips will help you install a gorgeous, long-lasting laminate floor that will improve any room in your house. A successful flooring project requires meticulous layout planning, sufficient subfloor preparation, and close attention to detail during installation. Take pleasure in your freshly renovated area with assurance in its durability and aesthetic appeal.


