
Have you ever noticed that your wallpaper is beginning to swell or bubble, detracting from the sleek appearance of your walls? Wallpaper blistering is a common problem that happens when moisture or air gets trapped between the wallpaper and the wall surface. If ignored, it can cause more harm in addition to being unsightly.
Several factors can cause wallpaper to swell. Improper surface preparation prior to wallpaper installation is one of the main causes. As the wallpaper sticks to the uneven surface, air bubbles or moisture pockets may appear beneath it if the wall wasn’t properly cleaned, smoothed, or primed.
The room’s overabundance of moisture is another problem. Elevated relative humidity, particularly in steamy areas like kitchens and bathrooms, can permeate the wallpaper adhesive and eventually cause it to loosen and blister.
It’s essential to properly prep the wall in order to avoid wallpaper swelling. Before applying wallpaper, make sure the wall is dust- and residue-free, smooth, and clean. To make a surface that is smooth and adhesive-friendly and promotes uniform wallpaper adhesion, use an appropriate primer.
Furthermore, lowering interior humidity levels can greatly lessen the chance of wallpaper blistering. In areas where moisture accumulation is common, such as bathrooms, think about installing a dehumidifier. Alternatively, increase ventilation to let moisture escape rather than get trapped behind the wallpaper.
Don’t worry if you’ve already seen blisters developing; there are solutions available. Depending on how bad it is, you can use a razor blade to carefully cut a slit in the blister, gently remove any remaining air or moisture, and then use adhesive to reattach the wallpaper to the wall. If the blisters are bigger, you might have to take off the damaged area, clean the wall again, and reapply the wallpaper correctly.
You can have a smooth, lovely wall covering that lasts for years by being aware of the reasons wallpaper blisters happen and taking precautions when installing and maintaining it.
| Reason for Wallpaper Swelling: | Poor initial adhesion due to inadequate surface preparation or improper application of wallpaper adhesive. |
| How to Fix It: | Ensure the wall is clean, dry, and free from dust before applying wallpaper. Use a suitable adhesive and apply it evenly. Smooth out bubbles immediately after application to prevent blisters. |
What causes wallpaper to bubble, and what can be done to stop and avoid these irksome blisters? This post explores common causes of wallpaper swelling, including inadequate surface preparation and trapped air during installation. Learn useful tricks for eliminating current bubbles and guaranteeing a smooth, bubble-free wallpaper application going forward. Whether you’re working with paper, vinyl, or textured wallpaper, knowing these reasons and how to fix them will make it easy for you to keep a perfect wall finish.
- Why do bubbles appear??
- During pasting
- After pasting
- What to do and how to fix it?
- Vinyl
- Non-woven base
- Paper
- In the corner
- Preventing the appearance of blisters on the wall
- Video on the topic
- How to remove wrinkles from wallpaper after they appear
- How to remove a bubble on long-pasted wallpaper / If suddenly it happened …
- One way to remove bubbles on wallpaper
- How to easily remove bubbles from wallpaper.
- How to remove bubbles on wallpaper without cutting; remove bubbles on non-woven wallpaper after painting
Why do bubbles appear??
Air bubbles can occur during the gluing process or afterwards, depending on the kind of wallpaper. The primary reasons for bloating:
- low-quality materials;
- haste of people;
- room temperature, etc. d.
During pasting
It’s critical to assess the material and glue quality before beginning any repairs. As soon as the first sheet is hung, bubbles on the wallpaper start to show. There could be a number of causes behind this:
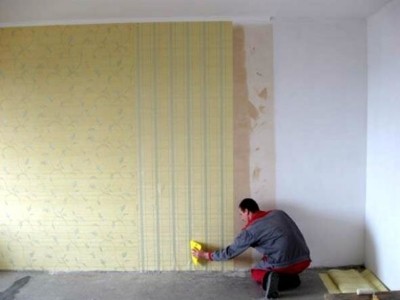
- The paper expands from the moisture contained in the glue. After applying the adhesive composition, the canvas begins to soak unevenly. In the most stretched places, swelling appears when gluing. Most often, paper wallpapers are subject to such changes; heavy multi-layer canvases swell less often.
- Attempt to glue the canvas on a damp wall without waiting for the surface to dry after priming or puttying.
- Sometimes swelling during gluing appears due to the fact that the canvases lie on the floor for a long time, thickly smeared with glue. You need to apply glue to the canvas and immediately apply it to the wall.
- After spreading the strip with glue, dry gaps may remain in some places. Subsequently, these places turn into bubbles. Colored glue will help eliminate this problem; when applied, it will indicate “dry” areas.
You should attempt to remove any air from beneath the wallpaper if bubbles start to form during the glue process. If not, the bubbles will stay in place after drying and be more challenging to remove.
Certain manufacturers advise gluing walls and wallpaper together. The packaging makes note of this point.
After pasting
Not everyone who wallpapers can get the ideal outcome. The following are the main causes of wallpaper swelling after work is finished:
- Wrong adhesive selected. Wallpaper composition must match the material. For example, it is not recommended to use glue for paper wallpaper to glue non-woven wallpaper.
- Irregularities, dents and cracks on the walls negatively affect the coating. Any uneven place is a potential bubble; do not ignore the putty and primer of the walls.
- Non-compliance with the temperature regime in the room. Before work, you need to close all windows in the room and prevent drafts. The air temperature should be 15-23 degrees.
To ensure that the material adheres to the walls firmly and the glue dries, it is advised to close the rooms for two to three days after repair work.
What to do and how to fix it?
You should remove them if it was not possible to keep them from swelling while they were being glued. The type of finishing materials determines the methods for smoothing wallpaper.
Vinyl
After the vinyl wallpaper has dried, piercing can be used to remove any bubbles that may have formed.
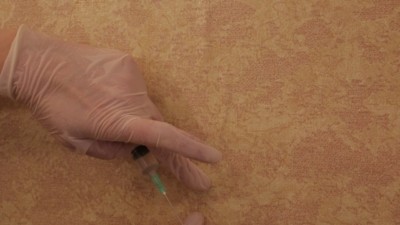
- Use a regular needle to carefully pierce the bubble.
- After the hole appears, they begin to smooth the surface.
- Protruding excess glue should be removed with a dry cloth.
It is advised to use this blister removal technique as soon as the vinyl wallpaper is adhered to. Using an adhesive-filled syringe, remove the bubbles once the glue has fully dried.
Non-woven base
Because non-woven wallpaper is made of cellulose and polymer components, it swells less when hung than other coatings.
With non-woven coverings, a syringe full of glue is required to remove bubbles. There are multiple stages to the process of removing defects:
- Prepare a little fresh glue in a separate container. You should not use PVA, as it does not dissolve in water and leaves yellow stains after drying.
- A 10 cc syringe is filled with glue.
- If the bubble is large, carefully cut it with a stationery knife. The incision of the swelling is made so as not to disrupt the integrity of the pattern. Small bubbles are pierced with a syringe needle.
- The adhesive composition is squeezed into a punctured bubble and distributed over an empty area. At this time the bubble will smooth out.
- Residues that come to the surface are removed with a dry cloth.
The blister removal technique that has been suggested is all-encompassing and can be used on bubbles that have been there for a while as well as ones that have recently surfaced.
Paper
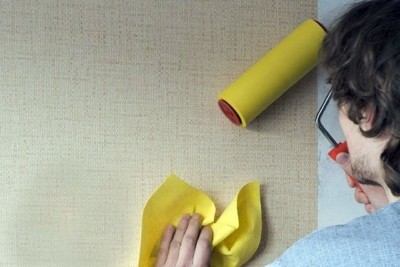
If bubbles form on the wall after a paper strip has been applied, you must act quickly to remove them.
- It is necessary to iron the canvas with a dry cloth, moving from top to bottom and sides.
- Movements must be careful so that the joint does not move.
- Remove excess protruding from under the edge with a dry sponge, without allowing it to dry.
If something goes wrong and a lot of bubbles appear, then the only solution in this situation is to re-glue the bad strip.
In the corner
Regluing the wallpaper finish is advised if the following day, after the wallpaper has been adhered, there is swelling in the corners.
The most common cause of bubbles is improper gluing technique.
- To ensure that defects do not appear, the fabric is divided into 2 parts.
- The first part is glued to the corner of the room, and the second part is glued with the cut edge to the adjacent corner.
- Using a roller, spatula or hand, press the canvas into the wall.
- If the strip is wrinkled, small cuts are made on it perpendicular to the folds.
Preventing the appearance of blisters on the wall
You must attempt to avoid blisters after adhering the materials in order to avoid suffering from them.
Easy strategies to avoid blisters:
- When preparing the adhesive composition, follow the instructions. It is not recommended to mix the glue intensively to avoid the appearance of a large number of oxygen bubbles in it.
- The density of the adhesive composition must correspond to the finishing material. You should not use a dense adhesive composition for thin materials, otherwise the appearance of blisters is inevitable.
- The canvas is glued to the top of the wall, monitoring its location. At this time, the assistant must hold the lower part of the strip and monitor its vertical position.
- A good side light will help you apply the composition correctly to the strip. If possible, you should purchase pink glue, which will turn white after drying.
- At high room temperatures, the glue will dry very quickly. To avoid this, you should place containers of water in the room and cover the windows with thick cloth.
- Any unsealed crack or recess in the wall will lead to the appearance of blisters on the surface of the coating.
It is simpler to prevent canvas swelling than to completely eradicate its effects. Before you finish, you must prepare the walls and choose your materials carefully (you can learn how to properly prepare walls and wallpaper for hanging here).
If you’ve ever observed your wallpaper beginning to bubble or peel off the wall, you’re probably experiencing wallpaper blistering, a common problem. When moisture or air becomes trapped between the wall surface and the wallpaper, an issue arises. Environmental factors or improper wallpaper application are frequently the cause of it.
A clean surface is essential to preventing wallpaper blistering. In order to apply wallpaper, make sure the wall is smooth, dry, and clean. Eliminate any previous wallpaper, repair any holes or cracks, and apply a suitable primer as needed. This lessens the possibility of bubbles forming and helps the wallpaper adhere evenly.
Use a wallpaper smoothing tool to gently press out any air bubbles as you apply the wallpaper. To release trapped air and guarantee a smooth, level finish, work your way outward from the center. Seams and edges should receive extra attention because they are more likely to lift.
Don’t freak out if bubbles or blisters appear after wallpapering. Small bubbles can frequently be fixed without removing the entire sheet. Cut a thin slit across the bubble with a sharp utility knife. The wallpaper should then be smoothed back into place after any air or moisture has been gently removed. Larger blisters might require you to peel back the damaged area, smooth and reposition the wallpaper carefully, and then apply adhesive or wallpaper paste underneath.
You can greatly lessen the likelihood of wallpaper blistering by following these instructions and exercising caution when wallpapering. For many years to come, your wallpaper will continue to look smooth and new with careful application, prompt repairs, and proper preparation.


