
Constructing a robust and dependable roof requires building a wooden rafter system. This framework, which gives the structure shape and strength, serves as the roof’s skeleton by bearing the weight of the roofing materials. Whether you’re building a new house, adding an addition, or replacing an outdated roof, knowing how to design and install a wooden rafter system is crucial for any construction project.
Planning and measuring are done carefully before starting the process. The proper roof pitch, or angle, must be chosen because it will have an impact on the building’s practical and visual aspects. The pitch must be appropriate for the climate; in drier climates, flatter roofs might be preferred, but steeper roofs are better at shedding rain and snow.
The next step is to choose the appropriate materials after the design is finalized. To guarantee the rafter system’s longevity and durability, high-quality wood is necessary. The best kind of wood to use for a given project will depend on a number of factors, including the project’s needs, budget, and local availability. Different types of wood offer different benefits.
The rafters are cut and put together during construction in accordance with the design plan. Here, accuracy is crucial because even minor mistakes can have serious consequences down the road. The proper length and angle must be cut into each rafter before it is firmly fixed in position. Using the right tools and having a solid understanding of carpentry are prerequisites for this step.
In order to guarantee stability and safety, the rafter system installation must be done carefully. This entails making sure everything is level and aligned, adding bracing where necessary, and appropriately spacing and fastening the rafters. A well-built rafter system adds to the building’s overall structural integrity in addition to supporting the roof.
| Step | Description |
| 1. Planning | Design the layout and calculate the load. |
| 2. Material Selection | Choose quality wood and hardware. |
| 3. Cutting | Measure and cut wood to size. |
| 4. Assembly | Join the rafters using brackets and screws. |
| 5. Installation | Fix the rafter system to the structure. |
| 6. Inspection | Check alignment and stability. |
- Roof and roofing
- System requirements
- Parts of the structure
- Roof shapes
- Types of rafters
- Video on the topic
- Installation of a gable rafter system from "Stroy and Live"
- HOW TO CORRECTLY SECURE RAFTS
- ATTACHMENT KNOTS OF RAFTS TO MAUERLAT AND RIDGE 1
- Roof installation complete instructions. Rafter system. Drainage system.
Roof and roofing
There are two things you should understand before you begin installing a private home’s roof. Although there is often confusion among non-professionals, builders make a clear distinction between the terms "roof" and "roofing." The entire structure that divides the building from the street above is the roof. A private home’s roof structure consists of rafters, roofing, thermal insulation material, and all other load-bearing components.

What’s on top of the roof is called the roof. It covers the roof as well. A careful selection of materials is necessary for roofing. Ultimately, the dependability of waterproofing and living comfort are contingent upon it.
System requirements
If you want to install a rafter system yourself, there are a few guidelines you need to follow. The structure won’t be able to effectively fend off outside influences if they aren’t taken into consideration.
It is important to think about the strength first. Every component needs to be able to bear the weight without breaking. In order to design the roof truss system, load-bearing structures must first be preliminary calculated using the first limit state. He is the one who makes sure the rafter system’s components are strong.

Stiffness is the second prerequisite. This considers the highest possible deflection. A wooden house, or any other kind, shouldn’t have a very sagging roof. The midpoint of the span’s allowable deformations is equal to the span’s length divided by 200. Prior to starting construction, the rafter system’s structure has to be calculated for rigidity using the second set of limit states.
DIY The structure’s light weight is taken into consideration when installing roof raftering. If not, walls and foundations are subjected to a significantly increased load. Wood has become widely used as a base material because of this. Although the wooden rafter system is lightweight, it is strong enough. It is important to pay attention to both the roof structure and the selection of roofing materials. It shouldn’t weigh a lot. Not only are ceramic tiles more expensive, but they also require reinforcement of the house’s walls, foundation, and roof in order to be installed.

Specific standards are set for the material’s quality. Only high-quality raw materials should be used in the production of wooden elements. It is advisable to take into account the subsequent suggestions:
- For the main elements, grade 1 or 2 wood is used. Grade 3 can only be used for sheathing and other small parts.
- It is recommended to make rafter structures for pitched roofs from softwood. They are more resistant to rot and other problems because they contain resin. With the same cross-section, the permissible span for hardwood will be less.
- Before starting work, all elements must be treated with an antiseptic. This stage of preparation allows you to prevent many troubles in the future. You can also treat the wood with fire retardants if desired. This will increase fire resistance.
- It is better to purchase wood from the northern regions, which is harvested in winter. This material is of the highest quality.
Parts of the structure
There are numerous components in the rafter system diagram. You must be aware of at least the fundamental ones in order to comprehend drawings and interpret information accurately. So what is the composition of the roof?

These are the slopes, cornice, and ridge first. These are the principal components. The highest point on the structure is the ridge. Overhang or cornice at the bottom. The inclined areas between the cornice and the ridge are known as slopes.
To construct a rafter system, one must be familiar with load-bearing components. Among them are:
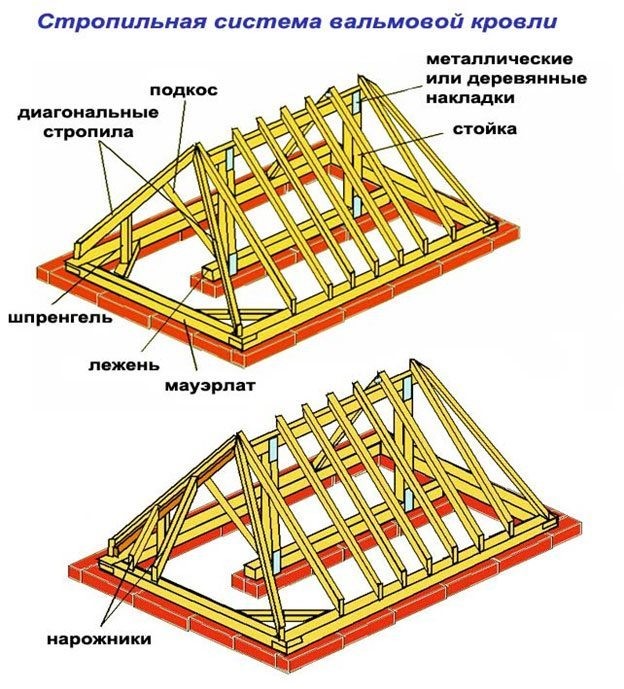
- Mauerlat is a timber that is laid along the edge of the walls of a building. The Mauerlat is needed to evenly transfer the load from the rafter legs, which rest pointwise. Typically, timber with dimensions of 150×150 mm or 200×200 mm (for large buildings) is used for its manufacture.
- Rafter legs are inclined beams that transfer the load from the roof"s own weight, snow and wind to the mauerlat. Such beams are usually installed from the ridge to the eaves. But when constructing a hip roof, elements appear that have only one of the specified points. They are supported on a ridge or cornice. Such details are called narozhniki. They usually have the same cross-section as the rafters. In fact, sprigs are rafter legs cut off on one side.
- Purlin – a beam on which roof elements rest. The purlin can be installed under the racks. Another option is a ridge girder (crossbar). The rafters rest on it at the top point. The cross-section of the purlin depends on its span, usually 200×200 mm.
- Sloping legs are only needed for hip roofs. They are diagonal rafters resting on the Mauerlat at the corners. The cross-section is assumed to be enlarged, usually 150×200 or 100×200 mm.
- The design of a wooden roof requires the presence of puffs, struts and racks. They are designed to reduce the load on the main elements. When building a house with your own hands, it is important to remember that the racks cannot be rested on the floor span. Installation is only possible on underlying walls or on purlins spanned between walls. Such elements can be mounted on the ceiling only if it is designed for such a load and reinforced in the required area.
- The lathing is needed to make a base for the covering. For metal tiles and seam roofing, the sheathing can be sparsely made of boards 32-40 mm thick. For bitumen shingles, you need a solid base made of boards 25-32 mm thick or moisture-resistant plywood.
- In order to make the cornice overhang, install fillies. They become an extension of the rafters. The filly is attached to the rafters for a length of at least 1 m. The cross-section of the element is usually taken to be 50×100 mm.
A truss is an additional component of the rafter system. Rigidly attached to one another, the rafters, tie rods, struts, and racks make up this one-piece construction. The truss’s internal division into multiple smaller triangles gives it good stability despite its triangular shape.
Roof shapes
Pitched roofs can take many forms. Here is something important to note:

- single-pitched;
- gable;
- hipped (tent and hip);
- broken lines.
A hip roof with a gable or hip design is the most popular choice. For the first, pediments must be installed. When building an attic, broken lines matter. The rafters go at an acute angle at first, then a less angle. With the use of this technology, you can raise the attic space’s ceiling. Reading up on the rafter system for a half-hip roof is also advised.
One of the most important steps in building a stable and long-lasting roof is creating and installing a wooden rafter system. The process entails meticulous planning, accurate measurements, and expert craftsmanship to guarantee that the roof is capable of withstanding a range of weather conditions and offering durable protection for the structure beneath. Homeowners and builders can confidently take on this essential part of any construction project, resulting in a safe and aesthetically pleasing roof, by knowing the essential steps and materials required.
Types of rafters
Two designs are available:
- with layered rafters;
- with hanging rafters.
A wooden house can only have its roof installed using the first method. Two rules are the reason for this:
- hanging rafters must be firmly attached to the mauerlat;
- in a wooden house, the rafters must be hinged to the mauerlat.
Since these two claims are incompatible, a wooden house’s rafter system can only have layered components.

Elements known as layered beams are supported at both the top and bottom by ridge girders and the Mauerlat. By doing this, you can lessen the horizontal thrust that the rafters attempt to exert on the walls when they separate and assume a horizontal position. Racks and struts can be used to reinforce elements. In this instance, contractions can pass through a single leg pair.
Only at the mauerlat’s lowest point are hanging tanks supported. They merely rest against one another at the top. The wooden elements in the system need to be tightened to keep them from coming apart. Installing them on every pair of legs is preferable. You can gain more free space inside the attic with this option, but it has a strong thrust effect on the external walls.
Constructing a robust and dependable roof requires building a wooden rafter system. This framework serves as the foundation of your roof, guaranteeing the building’s overall stability and giving roofing materials the support they need. You can build a long-lasting rafter system by carefully choosing high-quality materials and adhering to exact construction methods.
For your rafter system to be successful, proper installation is essential. In order to guarantee uniform weight distribution and resilience against outside forces such as wind and snow, each rafter needs to be precisely cut and firmly fixed. Paying close attention to details during this process will stop problems down the road, like shifting or sagging, which can damage the structural integrity of your roof.
Maintaining the proper functioning of your rafter system also requires routine inspections and maintenance. You can prolong the life of your roof and avoid future expensive repairs by regularly inspecting it for wear indicators like rot or cracks and taking quick corrective action. You can experience the peace of mind that comes with having a sturdy, well-built roof over your head by following these steps.


