
Constructing a garage can be a fulfilling undertaking, and installing a sol
- Is a strip foundation suitable for a garage
- Advantages and disadvantages
- Which type is suitable and its depth?
- General installation diagram
- Installation of formwork
- Choosing reinforcement and its diameter
- Reinforcement
- Knitting reinforcement
- Fill
- Final stages of work
- Useful video
- Video on the topic
- How to make a foundation for a garage in Siberia so that it does not crack from A to Z
- Building a frame garage yourself. Part one. Foundation
- Budget Garage / Installation of formwork / Reinforcement / Pouring the foundation with a mixer / Part 1 (autumn 2026)
Is a strip foundation suitable for a garage
When building a garage, the strip is the best option in terms of construction technology.
In these situations, the primary technologies for building foundations are:
- Slab.
- Columnar type.
- Tape.
Pile and pile-screw foundations are examples of specialized and uncommon foundation types that are purposefully left off this list.
The inability to construct an inspection pit or basement (cellar) is a drawback of the first and second types of foundation. This means that the garage is reduced to a space for car storage, which is undesirable for the majority of car owners.
With a strip foundation, you can construct a basement of nearly any size that is feasible given the hydrogeological conditions, as it can support the entire weight of the walls and roof.
Strength and resistance to loads originating from the ground and outside sources are substantially greater than those of columnar foundations and are on par, if not better, than slab types.
Advantages and disadvantages
The following are some benefits of garage tape:
- Strength, high bearing capacity of the base.
- Resistance to external loads, good tolerance to frost heaving.
- Possibility of uniform load distribution along the entire length of the belt.
- High construction speed (especially when using prefabricated tape types).
The drawbacks consist of:
- There is a dependence on the type of soil and the level of aquifers.
- When constructing a monolithic strip, a lot of time is spent on concrete hardening.
- Considering the need to pour a concrete floor and additional structural elements, the consumption of building materials is quite high.
Which type is suitable and its depth?
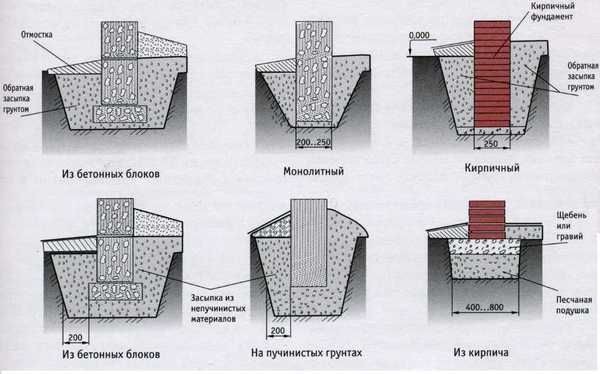
To construct a garage, the following kinds of tape can be used:
- Monolithic. Manufactured by concrete casting directly on site. Allows you to get a strong and reliable base, but it takes too much time to harden the concrete – almost a month from the moment of pouring.
- Team. Consists of individual elements. The use of piece materials (brick, cinder block) significantly reduces the load-bearing capacity of the base. If construction is carried out using specialized foundation blocks (FBS), construction time is significantly reduced, but the volume of excavation work increases and the participation of lifting equipment is required.
Additionally, depending on the placement depth, various tape types can be used:
- The shallow-depth type of tape is economical, labor costs and consumption of building materials are reduced. However, this option is only possible on suitable types of soil.
- Recessed type. Requires immersion to a depth exceeding the freezing depth of the soil in the cold season. Has maximum load-bearing capacity, but requires large volumes of excavation work using special equipment.
Since the garage is a lightweight structure, shallow strip foundations—whose performance characteristics are more than adequate for loads this size—are used to build the great majority of these kinds of structures.
The tape’s immersion depth typically ranges from 0.5 to 0.7 m, depending on the site’s characteristics, the garage’s size, and the materials used.
General installation diagram
The conventional approach to building a garage foundation is essentially the same.
The following is the work schedule:
- Site preparation. Removing the top layer of soil, marking and digging a trench (pit).
- Creating a sand preparation layer (pillow).
- Construction and installation of formwork.
- Reinforcement of the future tape.
- Pouring concrete.
- Holding, procedures for creating an optimal material hardening mode.
- Stripping, completion of curing period.
- Subsequent work, completion of foundation construction.
While some work-related details are left out, the overall process always adheres to the provided list.
Strip foundation construction technology has been refined over many decades and is unchangeable. The supporting structure runs the risk of being quickly destroyed or deformed if any operations are refused.
Installation of formwork
Formwork is a form used for pouring concrete that is made on-site from a variety of materials.
Plywood that is at least 14 mm thick or edged boards that are 25–40 mm thick are used to create. They typically favor boards because they are more straightforward and easier to use.
Two panels are arranged in parallel rows to make up the formwork. Their widths are all marginally bigger than the tape’s heights. The greatest care is taken during assembly; any gaps or cracks are unacceptable and are quickly filled with thin or tow splinters.
This is crucial because leaking concrete can ruin the foundation-building process from start to finish.
The installed shields are fastened with stakes and inclined stops, aligned along the trench’s axes. The width of the tape is determined by the distance between the shields, which is fixed by the crossbars.
The installation is done using all of your strength. Every compound is manufactured outdoors in order to prevent damage to the tape during the formwork’s eventual careful disassembly.

Choosing reinforcement and its diameter
Typically, the width of the tape beneath the garage wall is no more than 30 cm; in most cases, it is much smaller, measuring between 20 and 25 cm.
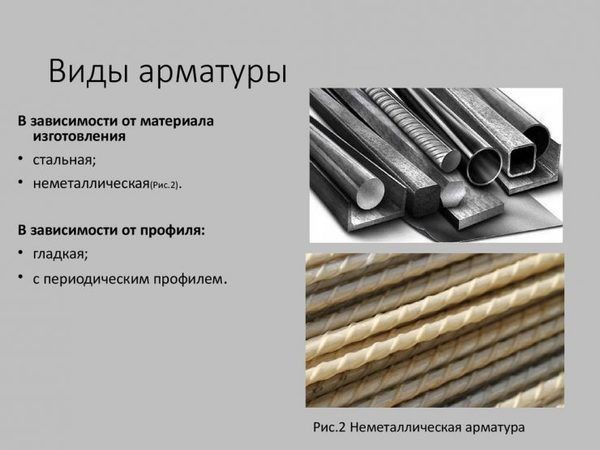
The best choice for such a foundation would be to use auxiliary smooth rods that have a thickness of 6 mm and working (horizontal) rods with a diameter of 10 mm.
Nutty rods made of composite (fiberglass) or metal can be employed as functional reinforcement. Composite reinforcement can support large weights and is corrosion-resistant.
Nonetheless, a lot of builders have shown through years of experience that they prefer to use conventional metal rods.
Reinforcement
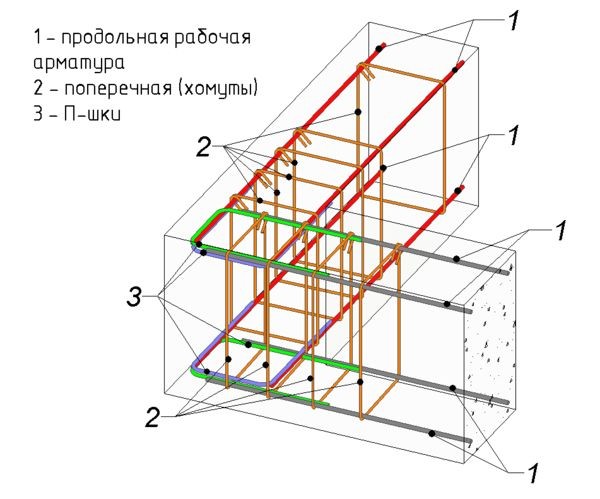
The horizontal rods that make up the reinforcement frame are positioned two to five centimeters below the surface, within the concrete casting’s thickness. Typically, a shallow belt has two functioning bars on top and two on bottom.
Only in order to keep the working rods in the proper position until pouring is vertical reinforcement required. It is applied as clamps, which are U-shaped components with working rods fastened to them.
In this instance, the clamp installation step is between 0.4 and 0.7 m.
Knitting reinforcement
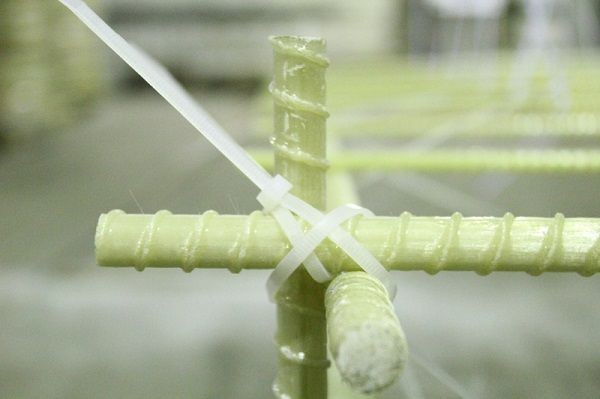
Knitting is the simplest method of joining the armored belt rods. One to two millimeters thick soft steel wire is used. It is divided into 25–30 cm pieces.
A hook, which you can purchase from a store or, more easily, make yourself out of a welding electrode or a long nail, is used as a special tool for connection.
Knitting is an easy process. A half-folded piece of wire is inserted beneath a cross or longitudinal connection from below. The wire ends lift up and clamp down on the junction.
After that, the hook’s end is put into the loop and twisted around the second free end multiple times to create a tight, sturdy twist. There is no need to connect to the power supply network for this easy task.
Fill
It is advised to use concrete grade M200 for pouring. Using less dense brands is not advised as this can weaken and reduce the durability of the tape. As little time as possible should be spent pouring to ensure that the material’s quality is consistent all the way along.
You must schedule the delivery or production of the material in the necessary quantity ahead of time in order to accomplish this. To expedite the process, it is advised to pour concrete at multiple locations along the formwork. Air bubbles are eliminated by continuous bayoneting or vibrating machines.

Final stages of work
The tape is covered in polyethylene to shield it from the sun’s glaring rays after it has been poured. Water once every four hours for the first three days using a hose. After that, it receives three days of daily watering. The formwork is then taken down, and the tape is left open until the entire hardening process is complete, which is 28 days after pouring.
After the tape is finished, it is waterproofed using hot tar or bitumen mastic, and if needed, insulation is added (a basement is a good place to install insulation). After installing insulation and waterproofing, the trench sinuses are backfilled.
Subsequently, the rainwater ribbon cannot be accessed as a blind area is poured.
We’ll take you step-by-step through the installation of a strip foundation for your garage in this guide. We cover every crucial step in simple detail, from clearing the area and laying out the foundation’s dimensions to pouring and leveling the concrete. This article attempts to offer useful advice and pointers to help you successfully build a strong foundation that guarantees the stability and longevity of your garage structure, regardless of your level of experience with construction projects or level of do-it-yourself skills.
Useful video
This video will teach you how to physically install a strip foundation for a garage:
| To install a strip foundation for a garage, start by marking the layout of the foundation trenches according to your garage"s dimensions and local building codes. | Next, excavate the trenches to the depth specified in your design, ensuring the bottom is level and compacted. |
| Place a layer of gravel or crushed stone at the bottom of the trenches for drainage, then install formwork along the trench outlines. | Pour concrete into the formwork, ensuring it"s properly reinforced with steel rods or mesh for strength. |
| Smooth the concrete surface and allow it to cure for the recommended time, keeping it moist to prevent cracking. | After curing, remove the formwork and backfill around the foundation, compacting the soil as you go. |
Installing a strip foundation yourself is a realistic and doable option if you’re looking to build a strong foundation for your garage. By evenly distributing the weight of your garage onto the ground, this kind of foundation ensures stability over time.
Begin by carefully arranging your foundation’s dimensions and layout in accordance with regional building codes. Make sure the trench is level and adequately compacted to support the weight of your structure as you excavate it to the necessary depth.
Next, build the formwork out of wood and plywood, or other sturdy materials. As the concrete cures, this framework will shape it, so make sure it’s properly braced and aligned to prevent any shifting when pouring.
When it comes time to fill the formwork, mix the concrete well and move quickly. To remove air pockets and create a smooth surface, spread the concrete evenly using a shovel and a screed board.
To avoid cracking, let the concrete cure gradually after it has been poured. By covering it with plastic sheeting and occasionally misting the surface, you can maintain the proper moisture levels. Carefully remove the formwork once it has cured to reveal your sturdy foundation.
Lastly, check the foundation for flaws and make any required corrections. Installing a strip foundation for your garage can be a satisfying do-it-yourself project that guarantees the stability and longevity of your building for many years to come, provided you plan ahead and carry out the process carefully.


