
In order to define rooms or areas within a larger structure, partitions are frequently built or renovated. Drywall partitions, sometimes referred to as plasterboard partitions, are an adaptable and affordable way to divide areas. These dividers are lightweight, simple to assemble, and have doors and apertures for customization. Gaining knowledge about how to install plasterboard partitions with doors and create openings can help you improve the aesthetics and functionality of your space, whether you’re remodeling a home or office.
Plasterboard partitions are highly advantageous due to their versatility in meeting different architectural styles and functional requirements. With the right equipment and advice, DIY enthusiasts can handle the simple process of installing these partitions. Making door openings is a crucial step in this process that needs to be carefully planned and carried out to guarantee both structural integrity and aesthetic appeal. Understanding the basics of cutting and framing plasterboard openings will help you incorporate doors into your partitions in a way that maximizes space efficiency while allowing for simple room-to-room access.
Plasterboard partition opening creation requires a few crucial steps. First and foremost, it’s crucial to measure and mark the intended opening dimensions precisely. This guarantees that the door fits into the partition precisely and lines up with the walls around it. Next, the doorway can be precisely and cleanly shaped by using precision tools like a drywall saw or rotary tool to cut the plasterboard panels. Stud framing the opening offers structural integrity and a framework for fastening the door frame firmly.
Aesthetic integration and practicality are taken into account in addition to functionality when planning the installation of plasterboard partitions with doors. Selecting the appropriate door and hardware will improve the usability of your space and blend in with its overall design. A more comfortable living or working environment can also be achieved by adding soundproofing materials to the partition walls, which can maximize privacy and reduce noise transfer between rooms.
- When is a plasterboard doorway possible??
- What types of interior structures are they made for??
- Types of material for the device
- Requirements
- Calculation of a gypsum board wall and design of the project
- Optimal thickness
- Consumables, tools and materials
- How to choose a profile, sound and thermal insulation?
- How to do it yourself: step by step instructions
- Base
- Marking
- Fixing the bottom guide rail
- Fixing the outer posts on main walls
- Installing a ceiling guide
- Installation of doorway pillars
- Top crossbar device
- Intermediate posts
- Sheathing
- Electrical wiring
- Heat and sound insulation
- Installation of gypsum board on the other side and finishing
- Cutting through an already installed structure
- Creating openings in plasterboard walls
- With sliding doors
- Corner
- Is reinforcement required??
- What to pay special attention to?
- How to insert a door frame?
- Difficulties and errors
- Pros and cons of the process
- Average prices in the Russian Federation
- If the structure is on a wooden frame
- Useful video
- Video on the topic
- Plasterboard partition. Video tutorial. Do it yourself. All stages
- We build a partition from gypsum plasterboard. Which profile is better?
- How to make a plasterboard partition with a door
When is a plasterboard doorway possible??
Later on in the text, we will use the new marking, GSP (gypsum plasterboard building boards), or the abbreviation GKL to identify the material in question. restricts the use of gypsum plasterboard for building any structures, even ones with openings underneath doors or for any other purpose, to the uses permitted by the material.
Drywall in this kind of setting:
- Simple type (GKL or according to the more modern designation GSP A) – for dry and normally humid conditions, that is, where this parameter is up to 60…75%.
- Moisture-resistant, fire-resistant (GKLV, GKLVO or according to the new marking GSP H2, H3, DF, DFH3IR). For locations with high humidity (up to 80%) and wet conditions, but protected by a waterproof primer, the same cladding, the room must have exhaust ventilation.

GCR can be used in damp environments, but only if the material is waterproof and meets certain requirements (simultaneous presence): waterproof cladding (PVC, ceramic tiles, etc.), exhaust ventilation, and protection with a primer or special compounds that repel water. The use of waterproof GSP in highly humid conditions is permitted provided that the product is treated with water repellents and covered with cladding, according to the manufacturer’s instructions. For instance, bathrooms are frequently finished in this manner, and splashes—that is, brief direct contact with water—occur in areas where such a structure is present.
An excerpt from Knauf’s technical documentation is provided below: The material will last a long time if the aforementioned precautions are taken. Because of its inexpensive cost and simple installation, its use is advised despite its somewhat shorter service life. However, it is still preferable to use an especially improved variety of drywall for a damp environment, such as aquapanels or moisture-resistant gypsum fiber.
Although it’s not always advised, drywall can be used outside in certain situations. These are the only materials that are waterproof and have the same lining and water-repellent treatment (primer with this property).
For example, on one of the forums they mention window slopes made of gypsum boards plastered with a cement composition, which have been in service for 5 years, however, there is no mention of the climate – if these are hot regions, then this is quite possible.
GSP is damaged not only by moisture, but also by cold, and especially by these two factors in combination. In terms of frost resistance, the material has extremely low indicators: 8 cycles for a simple variety and about 15 for GKLV, GKLVO. At the same time, the minimum for building materials is 35. For the reason described, HA is not used in unheated rooms where the temperature is below +10° C.
Plasterboard partitions with door openings were requested in all situations where a light wall with an entrance was required, such as:
- dividing one large room into two (one can be a walk-through room or both are completely separate);
- creation of separate locations “from scratch” in one large space.
There are situations in which doors are unnecessary, in which case the opening is left unoccupied and may not require amplification. These GSP partitions are typically needed in any scenario where you need to quickly divide a space with a light wall that still has an entrance and exit.
Additionally, if solidity in terms of strength and load-bearing capacity is not subject to any unique requirements.
When certain requirements are met, such as noise and heat insulation, these structures are also built because the parameters are at HA walls’ height if the frame cells are packed with mineral wool.
Our guide on plasterboard partitions and doors covers doable methods for making openings on your own. We go through all of the detailed instructions, including how to plan, measure, cut, and secure the materials. This article will provide you with the necessary knowledge to effectively take on this do-it-yourself project, whether you’re remodeling a home or office, saving you money and time while producing results that look professional.
What types of interior structures are they made for??
In summary, the drywall itself has the potential to support a hanging object load of roughly 15–30 kg per square meter. However, this is merely a very basic guideline.

You can attach objects weighing about 70 kg, and only on a sheet of material (not on the sheathing) – it all depends on the fastening, the type of grout, the partition. This aspect is covered in detail by the instructions of the companies Knauf, Giprok (available on the Internet). Here we will consider only the weight of door frames, below is an extract from Knauf recommendations:
The filling mass is limited only by the load-bearing capacity of the frame, but within reasonable limits. That is, this is a full range of standard weight interior doors up to very heavy ones made of solid wood. The frames here are quite blurry, since if you take a particularly thick reinforced profile (UA), make reinforcing crossbars, etc. P., then the weight withstand can be up to 100 kg.
Lightweight interior doors up to 25–35 kg are typically installed; these doors can be bought ready-made and assembled.
- tsargovye – up to 10…12 kg;
- combined (MDF+wood) – up to 15…20 kg;
- with honeycomb filling – up to 10 kg;
- from solid pine – up to 25 kg.
The maximum withstandable weight for lathing an opening with no reinforcement and a standard PS profile is 25 kg. Reinforcement and/or specialized posts and guides, like UA, will be needed for heavier fills.
Any standard interior door—that is, one that is relatively light—can be embedded into a plasterboard partition:
- tsargovye (prefabricated with jumpers);
- wooden;
- PVC;
- coated with veneer, film, enamel, paint.
That is, the standard selection of ready-made doors in the "interior" category that can be found at any location where these goods are sold. The maximum weight limit is 25 kg with a regular profile and no reinforcement; it is 100 kg with reinforcement and special strips (UA).
No limitations exist regarding the kind of filling:
- install swing doors;
- sliding;
- lifting and any other options.
However, the first two kinds are typically these. Since they are space-efficient and easily open and close, sliding doors, also known as compartments, are frequently used as interior doors. Rather than moving in an arc, the leaves glide along rails parallel to the partition. However, there is one minor flaw: their framework is a little intricate.
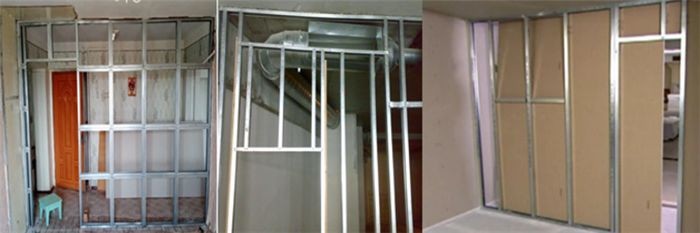
Door openings can be made in walls that already have them or during the construction of a GSP partition.
Types of material for the device
Use so-called "wall" sheets with a thickness of 12.5 mm for plasterboard partitions. 9.5 mm "ceiling" panels can be used in two- or three-layer structures, which are constructed when greater strength, rigidity, and insulation are needed.
Avoid using 6.5 mm slabs (designer, arched, restoration) as they won’t offer the necessary degree of reliability even with multiple layers.
Because two and three layers of cladding can withstand higher loads and provide superior sound insulation, they are frequently utilized in public spaces like offices.
Using moisture-resistant or moisture-fire-resistant GSP products won’t harm you; comparable reinforced options (such as sapphire from Knauf or an equivalent from Giprok GSP-DFH2IR) are more robust and have superior insulating qualities. Additionally, if the wall is near a bathroom or another area with high humidity (below 75%), you should definitely choose the above option.
Requirements
A plasterboard doorway partition needs to have the following features:
- Opening posts: reinforced profiles or UA if the weight is heavy. If the weight exceeds 25 kg, then mandatory reinforcement with at least wooden blocks, paired PS.
- Upper lintel with intermediate posts.
- The first vertical substations after the opening at a reduced distance from it (200…300 mm).
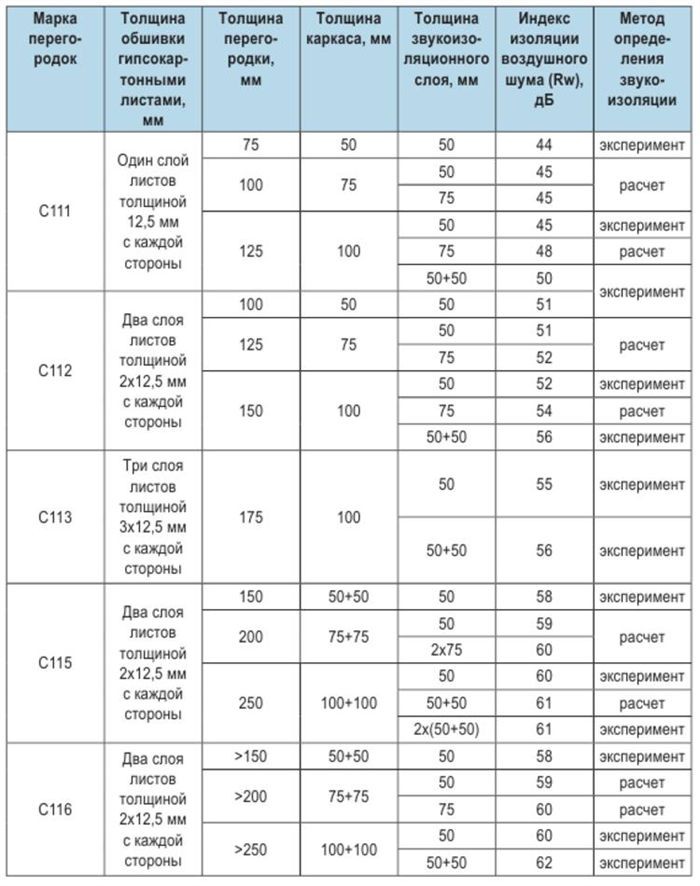
The standard range is occupied by the thickness of the door-equipped partition because reinforcement has no effect on this parameter. The following figures apply if we use the Knauf diagrams:
Calculation of a gypsum board wall and design of the project
Preliminary actions begin with calculation and drawing. GC sheets come in multiple common sizes (3000×1200, 2500×1200, and 2000×1200). We modify the diagram to fit the most practical size, keeping in mind the future object’s height and width.
This is typically 2500×1200. Large slabs can be cut into small sheets if necessary, but it is best to first peruse the manufacturer’s selection and order multiple small-format slabs if available; this will facilitate fitting.

- The width of the wall below in the diagram is 5.8 m, height 2.5 m. We make a drawing by analogy.
- Calculating the number of sheets. Divide the length of the future object by the width of the sheet of the selected standard size. In our example 5800/1200=4.8. The sheathing will be single-layer, but on both sides, so multiply by 2, we get 9.6. The slabs are only sold whole, so we will need 10 sheets.
- Number of racks. As a standard (if there are no special conditions or any technical precautions), the racks are placed in increments of 600 mm (in half a sheet) along the two edges of the slab and in the center, which is clearly visible in the diagram above (the screw heads are there).
- At the junction, the rack profile is common to the two panels. One rack is fixed to the main walls at the beginning and at the end of the partition. Plus 2 pcs. those for the doorway. So, according to the presented scheme, we will need 11 complete racks with a height (length) of 2500 mm. The profiles are sold in 3000 mm, so we’ll take them and cut them. We use segments (500 mm) for elements above the doorway.
- Guide profiles (PN). We divide the length of the partition by that of a three-meter profile: 5800/3000 = 1.9. We multiply by 2, since the slats will go both on the floor and on the ceiling, we get 3.8. Round up to 4 – this is the required amount.
- Insulation material. The quantity is equal to the area of the partition. We multiply its length by its height, subtract the opening from the resulting opening (we also determine its size). We count in meters (5.8×2.5)-(0.87×2.04)=14.5-1.77=12.73 sq. m. We use mineral wool, which will serve as both insulation and sound insulation. The optimal thickness is 50 mm, the area is indicated on the packages, take the required amount.
In the absence of specific requests, 12.5 mm sheets are typically used to create a single-layer structure; 9.5 mm sheets are avoided because the wall’s insulating qualities will be diminished and it will be more vulnerable to sporadic blows. However, they construct a two- or three-layer partition if greater strength is needed, and in this case, you can choose between 12.5 mm and 9.5 mm.
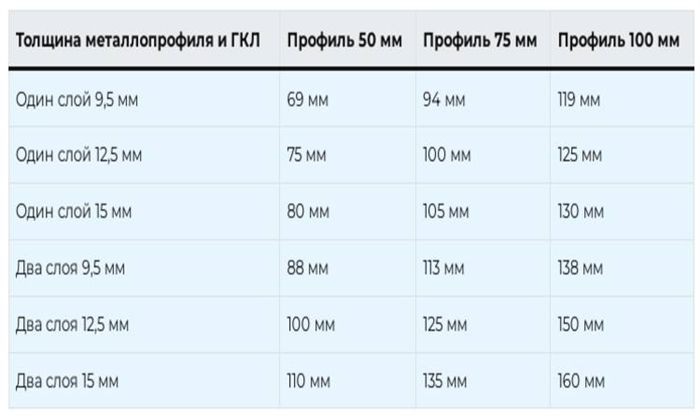
The following illustrates how the slab thickness and layering affect the profile parameters:
Optimal thickness
The plasterboard wall must have a minimum thickness of 69 mm. More suited for ornamental purposes than weight-bearing ones (fit for hanging objects larger than small photos). This device can be used to divide the kitchen from the bedroom, but if people enjoy gathering in the first room, there will be a noticeable increase in noise and voice in the second room.
A minimum thickness of 100 mm is ideal. Adding more stone wool to the layer will improve insulation against heat and sound. You can put this design between any noisy rooms and individual restrooms.

The partition should be as thick as possible. A measurement of 150 or 160 mm is advised to divide particularly noisy rooms (children’s rooms) and isolate areas that need quiet (bedrooms).
Consumables, tools and materials
Materials and consumables (for our example):
- HA sheets, usually 12.5 for a single-layer version or 9.5 mm for a two-layer version;
- rack profile (PS) 50x50x3000 and guide profile (PN) 50x40x3000;
- noise and heat insulation (usually 50 mm thick mineral wool is used);
- self-adhesive sealing tape 50 mm;
- self-tapping screws for metal profiles ("bugs"), for drywall (TN 25 mm or 35 mm for a two-layer version);
- dowel-nails 6×40;
- hammer-in anchors 6×40.
Instruments:
- screwdriver with screwdriver bits;
- hammer drill or drill, 6×60 drill bit for them, drills;
- knife or saw with fine teeth for drywall;
- plane for chamfering gypsum board (can be replaced with a knife);
- metal shears for cutting profiles;
- hammer;
- large aluminum ruler 1.5…2 m, building level (ideally if there is a laser one), magnets are often attached to it, so that your hands are free;
- stepladder;
- extension cord 5 m or more for powering power tools;
- tape measure 5 m, marker, pencil;
- plumb line;
- wooden blocks for insertion into the profile for strengthening.

How to choose a profile, sound and thermal insulation?
Knauf, Giprok developed detailed instructions for their schemes, where it is shown how to choose a profile and other consumables, materials according to the parameters of the partition. You can consider these recommendations. An example for a wall according to drawing version C111 (you can find it on the Knauf website): 
Determined by the thickness of the future wall – this parameter affects the MP parameters. The width of these standard elements is 50, 75, 100 mm. Accordingly, the thickness of the partition with sheets of 12.5 mm is 75, 100 or 125 mm. If the option is two-layer, then: 100, 125, 150 mm. 
Metal profiles (MP) are available with thin (0.35 mm) and thick walls – 0.6 mm (these are usually from Knauf). The rule here is simple: the larger the number, the better, the partition will be stronger and resistant to vibrations. But higher quality planks can be 2.5 times more expensive.
Thicker wall profiles are preferable if the door is heavy, heavily used, or causes frequent vibration loads.
Mineral wool is typically used for insulation. Certain MP widths are better suited for mats with varying thicknesses (50, 100 mm).
Wool with a higher springing effect is available; it typically has a 100 mm diameter but can be compressed to fit a 75 mm profile.

In the event that wires (internet, electrical) are to be installed in the wall, it is preferable to use a profile that has pre-drilled wiring holes; otherwise, a lot of metal will need to be drilled, and sharp edges will need to be cleaned.
How to do it yourself: step by step instructions
Let’s go over the detailed instructions for installing the partitions from GSP using the given parameters:
- one opening, intended for doors;
- slabs 12.5; layer 1;
- height 2.5 m, like ceilings in most apartment buildings; Sheets 2500×1200 mm are well suited for this parameter; At the same time, there is another plus – the joints are only vertical, that is, the costs of finishing them will be reduced.
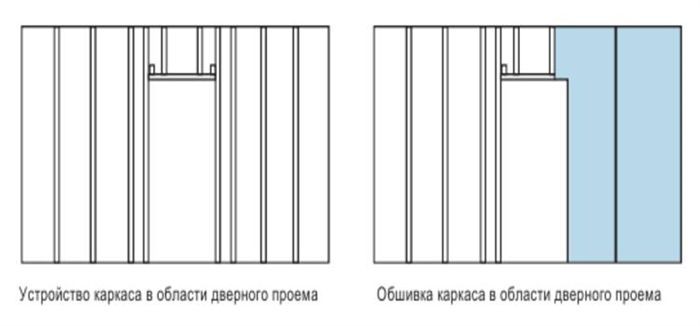
Base
The base on which the MP is fixed is thought to be level:
Up to 2 mm of disadvantage per 1 m are permitted. You must level it if this is not the case. Gypsum plaster is used for walls and ceilings; in any case, the screws are inserted into the "body" of the material rather than the finish. Cement-sand mortar or concrete mixture are used to level stone floors.
Marking
The following is the order:
- We put the rule on the floor and use it to mark the outline.

- Mark the opening: for a standard sheet 800 mm wide, the opening is 870 mm.
- From the end points we draw vertical lines on the walls, use the level and the rule.
- We put several marks on the ceiling above the bottom line, use a plumb line for this.
- Using the rule we connect all the marks.
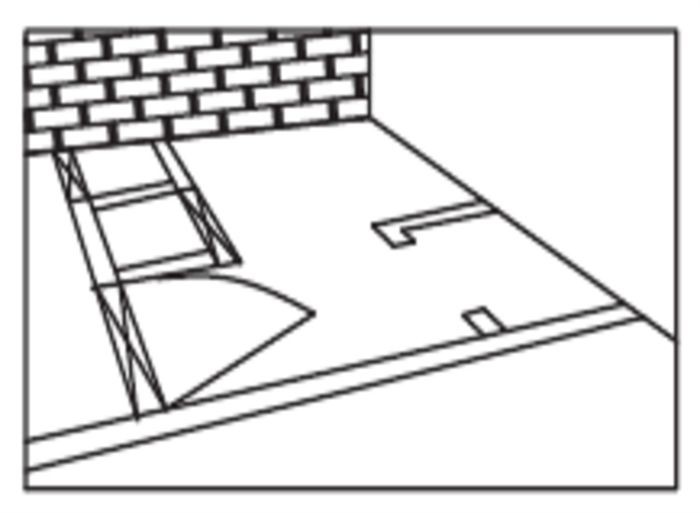
- We get a contour, we will place profiles on it.
Fixing the bottom guide rail
The following is the order:
- We cut off the PN to the length we require, taking into account the markings and the designated location of the opening. Glue a sealant to its outer surface. Place the bar along the contour.
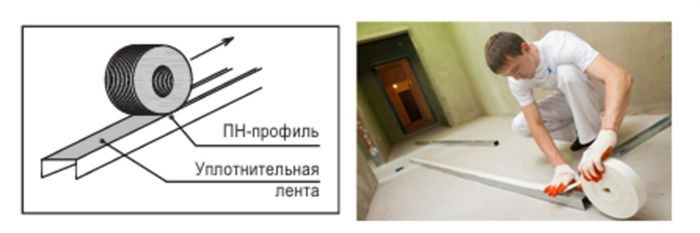
- The sealing tape reduces the transmission of noise and vibrations coming from the supporting elements of the house. This material also levels out micro-irregularities, the profile will fit more tightly.
- We hold the profile tightly, use a hammer drill to make seats for the dowel-nails. Interval 60 cm…1 m, indent 5 cm from the edges. Insert the hardware and drive it in with a hammer.

Fixing the outer posts on main walls
Method:
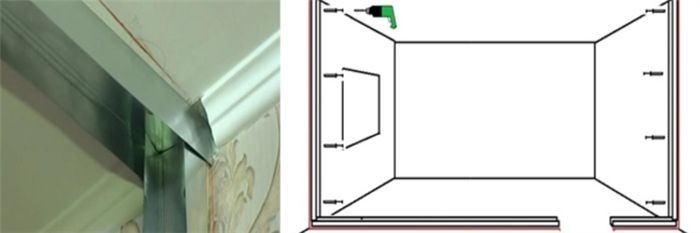
- We measure the gap from the bottom of the bottom rail to the ceiling. Subtract 5 mm from the result, cut off two PS. We glue sealing strips on them. We place the PS in the rail (PN) on the floor and press it along the intended contour to the wall of the room. Using a hammer drill we create seats for the dowels and drive them in.
- When attaching the profile to plastered surfaces, the 6×40 mm dowel-nails may be too short. Then we replace them with larger ones (80, 100 mm).
Installing a ceiling guide

In accordance with the design and the calculations, we cut the PN to the necessary size for the upper base and install a sealing strip. We drill holes, test-fit the slats in accordance with the markings, and use anchors to fasten the strips to the ceiling. The frame’s base is completed.
Installation of doorway pillars

We gauge the separation between the base slats’ interior surfaces (the floor and ceiling). We used the length that the computations produced to cut two wall profiles. Inside the designated strips, we insert the modified PS. Precisely align the bottom with respect to the opening’s shape. Using "bugs," we fasten it to the floor PN on both sides.
Top crossbar device
We follow the plan of action:
- We cut the PS to the required length, determined as follows: opening width + 300 mm. For a hole of 870 mm, this parameter is 1170 mm. We retreat 15 cm on both sides, mark these points.
- We cut the walls of the MP to the end, bend it along these cuts by 90°, so that its side segments look inward.
- We measure the height of the opening on already installed substations. For a 2 m high canvas without a threshold, the required figure will be 2040 mm.
- The height of the crossbar, in addition to the size of the filling box, is affected by the thickness of the floor covering. If it is parquet, then it is placed higher by an amount equal to how much it protrudes above the screed.
- We insert the upper lintel of the opening between the posts with segments bent upward. Using a level, we make sure that it is level horizontally, fasten it with four self-tapping screws for MP.

Intermediate posts
The opening is where intermediate rack installation starts.

- First we place short posts above the horizontal jumper. We measure the gap between the bottom of the crossbar and the ceiling batten. According to the obtained length, cut 2 PS. We insert them into the above planks so that the gap from the door substations is 15…20 cm. The side segments of the MP should be directed inside the opening, this will make it easier to attach the sheets.
- We place the PS vertically in level, screw it on top and bottom with “bugs”. From the centers of these strips in both directions on the ceiling guide we mark marks in increments of 600 mm. We will obtain the attachment points for the remaining vertical posts, the length of which is equal to the gap between the internal parts of the upper and lower base strips.
- We place the cut racks inside the ceiling and floor profiles. In this case, the side segments should look from the opening. We center it according to the marks, screw it first to the top base rail, then to the bottom. At the same time, we periodically check the evenness with a level.
- If the markings show that the points of the outer posts are closer than 250 mm from the main walls, then it is not advisable to install them in these places. The mark is moved to a distance of 250 mm and then all work is carried out as usual.
This is the last stage of the frame; it is now fully assembled.
Sheathing

The sheets will need to be trimmed in order to cover the partition with plasterboard. Using a construction knife, carefully break the slab inward by cutting through the cardboard on one side and then the other. A fine-toothed hacksaw can also be used to cut straight through the slab. We begin with the introduction:
- We attach the sheet to the sheathing. Align the edge of the panel with the center of the short post above the opening, adjust it according to the level. We screw the gypsum board to the profile with plasterboard screws (TN) in increments of 25 cm. From the edge, the hardware is located with a gap of 10…15 mm.
- Cut off the sheet segment covering the opening. You can use more than just a knife. If a hacksaw is used, then make a through cut from the outer surface of the wall along the lintel. The tool is held at an acute angle, with pressure strictly away from you.
- The GSP is placed similarly on the other side.
- Next we install a whole gypsum board. At the same time, we make a compensation gap between the panels of 2 mm. We fix it with self-tapping screws. We mount all the other panels this way.
- The outermost slab, as a rule, never perfectly matches in width; it is trimmed. To do this, take a measurement between the last intact panel and the load-bearing wall, subtract 4 mm (for 2 gaps). Mark the required distance on the gypsum board and make the trim according to the construction rules. Further steps are usual: insert onto the profile, secure with self-tapping screws.

Two millimeter gaps serve as expansion joints to keep the plasterboard from cracking in the event that the material expands or contracts. Putty is then used to fill in these seams, and sickle tape is used to reinforce them.
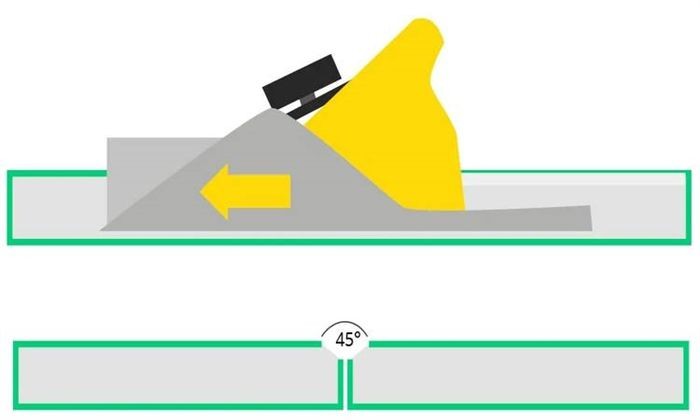
To achieve a total joint angle of 45°, the ends of the sheets are cut (chamfered) at an angle of 22.5° by 1.2 mm from the outside. Using an edge plane is recommended; a knife can be used, but the outcome will be worse. The quality of joints requires this type of trimming. Lastly, we create an insert from the main building block above the opening by measuring the width and height of this space, cutting out the necessary section, inserting it, and screwing it on.
Electrical wiring
It is preferable to use a profile with holes for wiring if it is intended to be installed inside a partition. The wires themselves have a diameter of 20–25 mm and are laid with corrugation decoration. In order to later cut out spaces for sockets and other components and safeguard communications from unintentional fastener penetration, the core locations are marked on the design plan and saved.
Heat and sound insulation

The spaces between the planks and cladding sheets are typically filled with insulating materials (mats, mineral wool strips), though the frame may be left empty. It’s critical that the material completely fills the area, leaving no gaps. Working with mineral wool solely while wearing gloves is strongly advised to avoid irritating and itchy hand skin.
Installation of gypsum board on the other side and finishing
The partition is ready when you install the insulating mats on one side and use the GSP to close the other. The last phase is coming to an end. First of all:
- prime the entire surface;
- then cover the seams with putty;
- also use reinforcing serpyanka tape, grind.
After that, you can clad with any material—plaster, paint, or wallpaper. They can be fixed directly on the panel if they are finishing with stone, gypsum panels, or tiles.
Cutting through an already installed structure
In the event that a wall from HA has already been constructed and a door needs to be cut into this sturdy structure, the issue is easily resolved:
- At the location of the future opening, unscrew the plasterboard sheets and remove them. In this case, of course, we rip off the lining in these segments.
- The frame is exposed, the profiles are unscrewed and rearranged to the required places to form an opening. If necessary, we install new these elements. In this case, we make, as we described above, the upper jumper.
- Before reassembling the racks, do not forget to strengthen them.
- Then we sew up the partition with plasterboard sheets, cutting them, taking into account the changes.
Creating openings in plasterboard walls
Let’s focus on a unique variety of door leaf: the sliding kind. as well as opening-equipped corner structures.
With sliding doors
To start, let’s identify some quirks:
- the frame will be double, since it is necessary to make an opening in it for the entry of the canvas;
- we strengthen the sheathing with horizontal jumpers, it finally looks like a lattice with cells;
- we reinforce the opening in the same way as we described.
The features mentioned above are taken into consideration while building the frame in accordance with the previously discussed principles.
We use dowels to secure the lower guide after beating off points for the upper one on the ground and fastening it with anchors. We reveal the side racks and secure them.
The rack-mount MP is inserted into the upper and lower guides, and it is fastened on both sides using tiny self-tapping screws, or "bugs."
Using scissors to make profile adjustments. We make the final cut, bend, and cut along the sides.
Top Gain: 2 MP, with a block in one of them. Self-tapping screws in increments of 20 cm (3 and 4 photos) will be used to firmly fasten the guide to it via two MPs and a wooden mortgage. The rail with the "bugs" is fastened to the top profile. The fifth image shows a canvas roller, or wheel.
We put the wheels in the sliding door leaf rail ahead of time because it will be very difficult or even impossible to do so later.
We make a frame with cells, that is, we add horizontal crossbars here. It is necessary to strengthen the lathing in this way, since the door leaf will create a load on the entire partition array when moving. 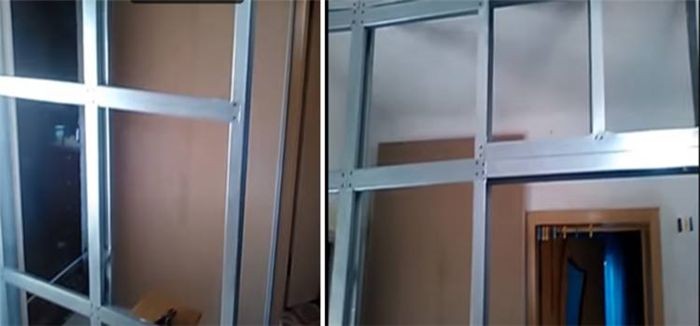
On one side, we do not install the profile completely yet, since we will hang the leaf. The photo shows that there is only one part of it:
The other side has a full frame, since the door will not go there. For comparison: in the first photo, the side near the opening with incomplete lathing (single for now), where the leaf will go, in the second – the frame is complete (double, you can put mineral wool there).
This top is particularly strengthened, meaning that in addition to the main ceiling crossbars, horizontal crossbars are also installed. Using them to create a suspended ceiling will be more practical.
The door was fastened. These blades come fully assembled with rollers that fasten to the blade using unique hangers fastened with nuts and bolts. Although rails can be purchased, these are made by hand: an aluminum two-meter corner is cut in half, and the two halves are joined at 20-centimeter intervals with bugs.
The door is already in place, and the trim can be completed, but the partition is not quite sewn up (the canvas shows when it slides away). Finishing, reinforcing mesh installation, puttying seams, and priming the sheets are the only tasks left.
Corner

We used a double CD profile example with two rows of cross bars as the frame. As a result, there will be maximum reinforcement throughout the entire structure, not just at the opening site. The three-layer sheathing validates the specified measure. One side has two layers of HA, while the other has one. There is no shared frame; instead, sequential assembly is employed:
- installation and covering of one side;
- then the second and its docking to the first, etc. d.
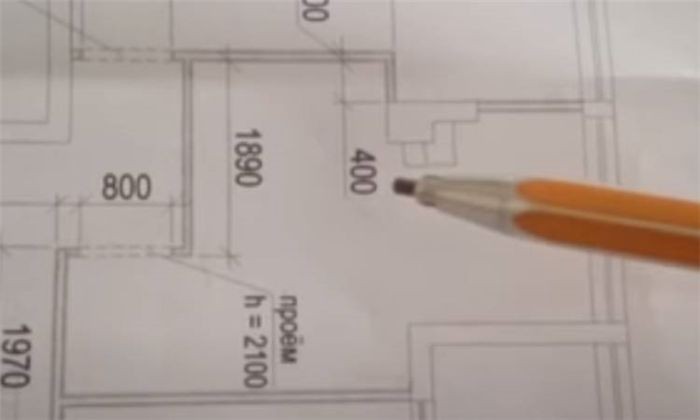
Scheme:
- First of all, we put marks and beat off lines along the floor, ceiling and walls. We use a plumb line, rule, level.
- We fasten the upper and lower guides in the right place, make a place for the opening. We assemble the partitions one by one. Next we fill the perimeters with racks (steps 50…60 cm). We install two rows of jumpers. Some freedom in their placement and frequency is allowed. Here on the sides of the opening there are segments with smaller cells. In photo 4 – corner. As you can see, there are no special nuances – the MP is joined as standard (attached to each other with “bugs”) and creates the desired configuration.

- Then they sew it up with plasterboard sheets as usual on both sides: on the outside we have 2 layers, on the inside – 1. We use 9.5 mm slabs. Photo 3 shows how the wool and wiring are installed.
- Our doorway is 210 cm high, and there are also shoulders (the gap from its edge to the wall of the filling box) decorated with MP. Here it was necessary to narrow the opening. This was done with another MP and short horizontal mounting jumpers. Photo 3 shows the finished upper part and shows how the double bottom beams also strengthen the frame.


Is reinforcement required??

Let us remind you that reinforcement, if at all possible, should always consist of wood, even in cases where it is theoretically possible to install lightweight doors weighing no more than 25–30 kg, as this makes it possible to consistently tighten the screws. Furthermore, it is required if the weight is greater than the given amounts. The following methods are used to strengthen the partition’s doorway from GSP:
- a wooden beam is inserted inside the racks and the upper lintel; fasten it with self-tapping screws to the MP or with plates;
- make paired racks by inserting one profile into another, attaching them with “bugs” to each other
- ideal option: combine the two methods described above; the screws can be taken a little longer.
- the first racks on the sides of the opening are placed at a distance of 20…30 cm from it – this is also reinforcement.
Experts consider it a mistake when there is no reinforcement, at least in the form of timber, inside the pillars of the opening, even for light doors.
What to pay special attention to?
Considering the type of infill installation opening, let us enumerate its primary characteristics:
- For sliding and especially heavy canvases, a double frame is made. In addition, for them, and especially for the latter, it is desirable that the sheathing has not only vertical posts, but also horizontal jumpers (the frame resembles a mesh with cells).
- The heavier the filling (exceeds 25…30 kg), the thicker the walls of the profile should be. Optimal 0.6 mm.
- The upper part above the opening must also be strengthened and have at least one, and usually two vertical short posts.
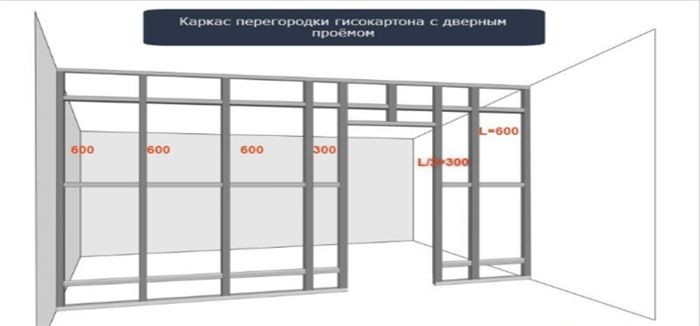
- The pitch of the vertical posts is up to 600 mm (usually a minimum of 400 mm), with heavy canvases this figure can be reduced to 500 mm. The first strips near the opening are located with a gap of 200…300 mm from it.
- For heavier filling, special UA profiles are used (mounted only on special corners) or similar ones with thickened, modified walls.
- The width (thickness) of the door frame and partition must be correctly related. The first is placed flush with one surface of the wall already covered with gypsum board. If the latter is wider, then the unclosed gap is sewn up with a strip of plasterboard and a door extension (casing).

The first side rack profiles are positioned 20–30 cm away from the opening.
About the UA profile, see below: Rules also apply to where screws and plasterboard sheets should be placed, particularly in cases where the partition is multi-layered, but that is a different discussion; in this case, we will concentrate on the doorway. Several Knauf schemes:
One more image featuring the MP docking:
Two technological strategies exist:
- Professional. According to the manufacturer"s technological maps. For example, Knauf and Giprok produce complete systems, have developed many partition schemes and very detailed instructions for them.
- Amateur. Any suitable profiles are purchased (they are all universal) and the object is constructed according to general rules.
If you follow the general guidelines, the amateur method doesn’t result in lower quality, although you are still free to exercise some discretion. For instance, it is technically correct to construct lathing from PS (rack-mount) profiles; however, in practice, they are occasionally swapped out for profiles of any other type, such as PN or PP, provided that the item in question is robust.
Given that the user has a technological map that shows them exactly what to buy and in what quantity, as well as how to connect profiles and in what order, the professional option might be simpler and quicker. P. In other words, some computations have already been completed.
How to insert a door frame?
It is presumed that the hinges are cut in and the door is assembled. There are two primary methods for fitting a door frame into a plasterboard partition opening:
- On self-tapping screws leaving some gap filled with foam. Most masters consider this method the most reliable.
- On mounting plates (hangers).
We will first go over how self-tapping screws are fastened.
At the door frame, the width of the opening should be 2…3 cm greater than this parameter. Foam will be positioned to fill the space between the latter and the partition profile.
Thus, the box is fastened to the MP, which is filled with polyurethane foam, by means of two self-tapping screws set into the opening’s vertical posts at intervals of forty to fifty centimeters. The space is required to prevent the canvas from jamming in the event that the frame expands or deforms.
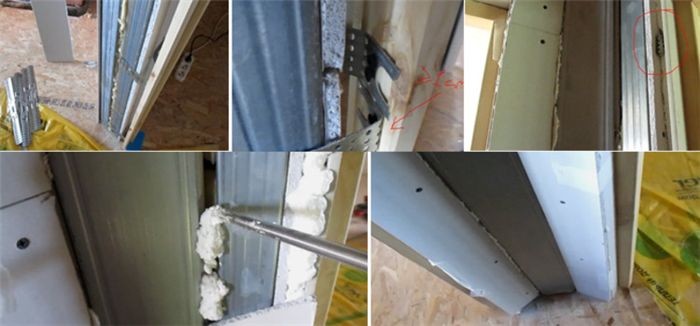
Below is an illustration of the installation on hangers with a thickness of 0.9 mm: Sliding sash installation is easy: just slide the moving leaf into rails that are fastened to the floor and ceiling profiles. It is necessary to insert the rollers before covering the frame.
In the event that the installers neglected to provide reinforcement for whatever reason, it is still preferable to make external reinforcement by screwing thick plywood strips onto the substation.
Difficulties and errors
Typical flaws and challenges encountered when assembling plasterboard partitions include:

- Violation of the pitch of the slats. Between the racks (PS, vertical) it should not exceed 60 cm, otherwise the sheets will “walk”. For heavy filling, it can be reduced to 40 cm. This figure for crossbars (PN, horizontal) is usually about 50 cm.
- Ignore Gain. Even for a relatively low weight (up to 25 kg) it is highly recommended, at least in the form of a bar inserted into the profile.
- Sometimes the door is mounted on hangers, that is, on perforated mounting plates. Some craftsmen consider this method not particularly reliable, since it causes backlash and the fastening strips become loose over time. It’s better to use rigid corners instead of hangers, but the installation will become more expensive.
- The first side posts are placed too far from the opening. They should be located with a gap of 20…30 cm from it on both sides.
- There are no short PS above the top lintel; it is not reinforced.
- Error when calculating the width and height of the doorway. They forget that they should be 2…3 cm larger than the box.
- Incorrect pitch of self-tapping screws, location of HA sheets. When using multi-layer cladding, they forget that the sheets of the “pie” must be shifted horizontally in relation to those under and above them by the step of the racks, and vertically by at least 40 cm.
- Installation of a partition during unfinished “wet” and finishing work indoors, in unheated locations will lead to the material becoming saturated with moisture and warping it.
Pros and cons of the process
The benefits of having doorways in plasterboard walls:
- Quick and easy installation and dismantling.
- The work is much cleaner than if bricks or concrete blocks were used.
- Cheapness.
- Low labor costs. GK profiles and sheets are easy to cut and attach. They themselves are light and mobile.
- Doors can be relatively easily cut into an existing partition and rearranged.
- You can install lightweight sashes of any type, including sliding ones.
Drawbacks:
- Typically, lighter doors up to 25 kg are installed in plasterboard partitions. Still, there is a conditional weight limit. The upper limit is about 100 kg, but powerful reinforcement and special profiles (UA) will be required.
- A wall made of HA is much inferior in strength to brick, concrete and similar structures. That is, there is an increased risk of backlash, loosening. However, with light doors and high-quality work, this is almost never observed.
Average prices in the Russian Federation
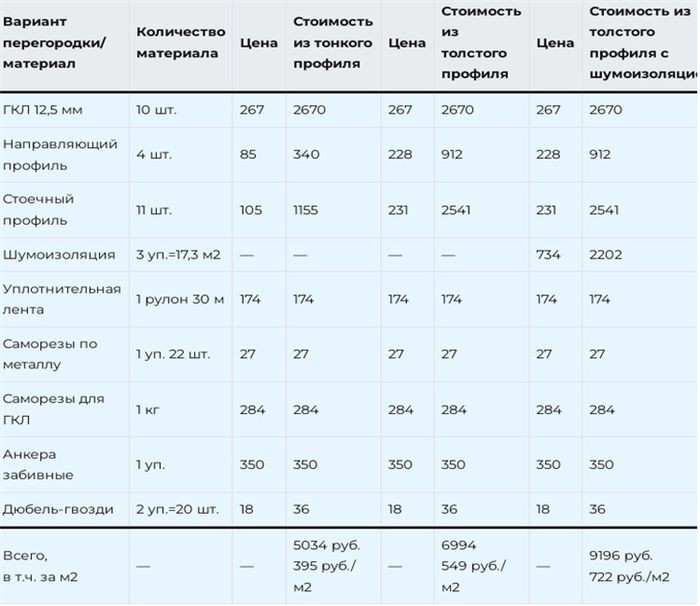
One of the final tables that was uploaded to the Internet aligned with our price analysis.
If the structure is on a wooden frame
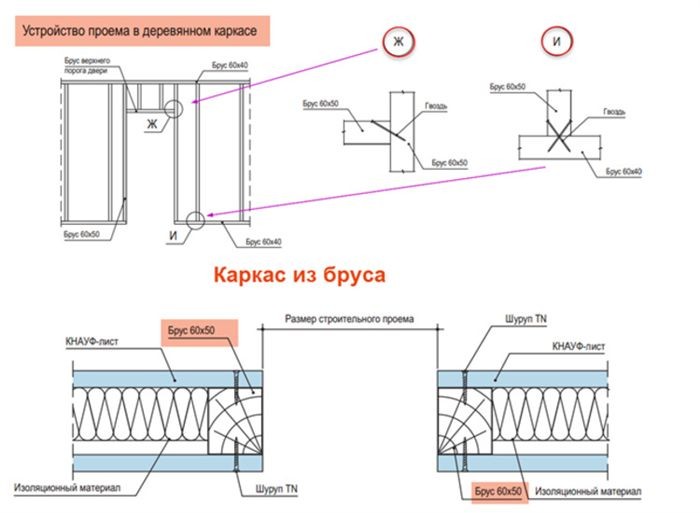
Using a wooden frame, mark the opening in a plasterboard partition in the same manner as previously explained. However, profiles mesh differently in this context. Not only are TN screws used, but nails are also. Here are a few diagrams: Compared to a metal frame, a wooden frame does not require as many extensive reinforcement methods.
Useful video
In the video, there are visual instructions for making an opening for a door:
Plasterboard partitions with doors are an adaptable and affordable way to divide areas in a house or business. These partitions provide customizable layouts without requiring bulky building materials because of their flexible design and functionality. Plasterboard is a material that makes it simple for homeowners to rearrange rooms to accommodate evolving needs or tastes.
Making door openings is one of the main advantages of plasterboard partition installation. The plasterboard must be precisely measured and cut in this process to make room for the door frame. With the correct tools, including a spirit level, measuring tape, and utility knife, and by following step-by-step instructions, do-it-yourself enthusiasts can produce results that look professional.
It is important to take into account the type of door being installed and the necessary dimensions when making openings in plasterboard partitions. Typical methods involve drawing the outline of the door frame on the plasterboard and then carefully cutting to make sure the frame fits snugly. This method preserves both the partition’s practical functionality and visual appeal by enabling doors to be seamlessly integrated into it.
Plasterboard partitions with doors can also improve a space’s overall livability by offering privacy, sound absorption, and clearly defined spaces for various uses. These partitions provide a balance of affordability and versatility, whether they are used to separate a large room into smaller sections or to create private office spaces.


