
A frame house’s overall comfort, energy efficiency, and aesthetic appeal are all impacted by the windows you choose and install. With so many options available, it’s critical to comprehend the crucial elements that will guide you in selecting the option that best suits your needs.
When choosing windows, take durability, insulation, and style into account. The correct windows will improve your home’s appearance while also improving energy efficiency and weatherproofing. To ensure durability and performance, pay attention to the quality of the construction and materials used.
Selecting the right windows is only as important as ensuring proper installation. Inadequate installation may result in leaks, drafts, and structural problems. For your windows to be fitted securely and efficiently, make sure you adhere to advised procedures or employ experts. You’ll reap long-term rewards and help preserve the structural integrity of your frame home by doing this.
A frame home’s windows must be carefully chosen and installed, taking durability, energy efficiency, and insulation into account. Choosing the correct windows guarantees adequate ventilation and energy savings in addition to improving the house’s aesthetic appeal. In order to avoid problems like drafts, moisture intrusion, and structural damage, proper installation is essential. These pointers will help homeowners maintain the comfort, energy efficiency, and aesthetic appeal of their frame home.
- Features of window openings in frame structures
- Casing
- Quarters
- Cladding slabs
- How to insert correctly: important installation nuances
- Installation depth
- Measurements
- How to choose the type of window opening?
- Tools, devices, materials for work
- How to do it yourself: step-by-step instructions
- General points for all methods of fastening in frame buildings
- Hall profile or wedges (stands)
- Plate mounting
- Installation of double-glazed windows on dowels (with self-tapping screws through the profile)
- Finishing after installation
- Possible difficulties and errors
- Average prices
- Useful video
- Video on the topic
- Installation of windows in a frame house. Step-by-step instruction
- Correct installation of windows in a frame house. Main control points.
- Installation of windows in a frame house. SP 31-105 (Outdated methodology) "New Dacha"
- Installation of plastic windows in a frame house. Sand. Day 17.
- Installation of windows in a frame house according to SNiP. Build Yourself a Home.
- Instructions for installing PVC windows in a frame house
- Vapor barrier of windows and slopes. 2026. "New Dacha"
- Installation of windows according to GOST Stroi i Zhivi
Features of window openings in frame structures
It is important to distinguish between frame homes and timber houses.The former have a system of comparatively thin lintels and racks, covered in sheets (boards) of cladding and insulation, if they resemble log houses.
In this instance, the walls are multilayer: the typical external set consists of nine layers (heat, waterproofing, OSB boards, etc.); the internal set consists of four layers.
There is no specific document for frame objects; instead, the regulatory framework for window structure openings is standard and includes GOST 30971, R 52749, SP 52.13330.2011, and 23.102.2003.
The maximum loads that are allowed are computed for the frame’s skeleton, or frame, with special attention to the corner sections. The upper and lower trims are both constructed with a step of racks of approximately one meter; however, the distance will be greater and the pressure will rise in situations where it is impossible to maintain this gap. The issue is resolved by the reinforced support racks (walls) of the opening in addition to the jumper.
The design becomes more difficult if the window is longer than 120 cm; you will need to make specific adjustments to the project and reinforce the beam. This is significant because frames are made specifically to support a given weight.
Since they are much more interconnected than other structures and all of their components need to be precisely where they belong, an uneven load or a weak spot will have a big impact on the entire structure.
There are two ways to make the openings beneath windows and doors in frame buildings:
- With hiders. These elements are most similar to jumpers. Postock-tenks of the opening in the presence of these parts are often additionally enhanced-double, built.
- With the crossbars. This is a strapping of long and thick overall boards along the upper part of the entire wall, the perimeter of the house. Racks at the walls of the opening for the window can be single, since such a design is more stable, durable.
A header is a transverse beam that serves as the upper wall of an opening for a window block. It is a literal lintel. The ends of it rest against the double side posts on both sides.
The top trim may be directly adjacent to both the crossbar and this crossbar. However, the first is a sort of belt running the entire length of the wall, and the second is just the upper, relatively short wall along the width of the opening.
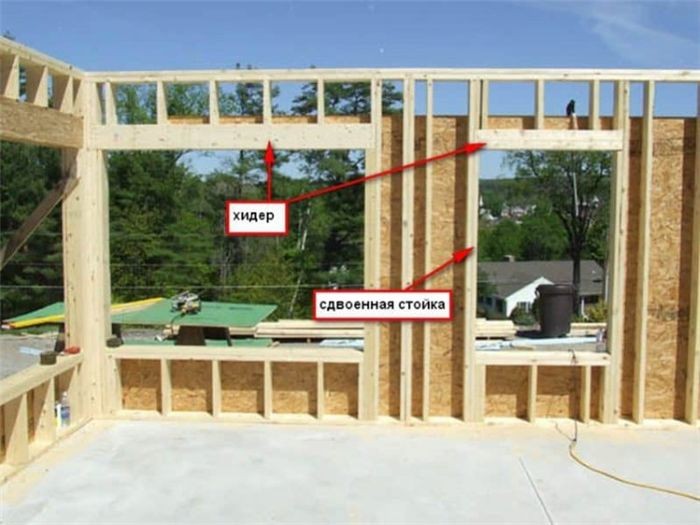
Here, the load is evenly distributed by the short racks that run from above to the frame (bearing beams) and at the bottom of the opening. The header is typically made up of two or three boards that are nailed together and installed on edge. When this portion is a solid board that is next to the upper belt, there is an additional choice.
Fascinating! While the crossbar design is typical of Finnish frame assembly technology, the hider design is typical of Canadian frame assembly technology.
Standard windows don’t really differ in terms of dependability, but it’s better to use the latter if you install particularly heavy standard sizes. The crossbar device has an advantage in that there are fewer and thinner racks, which lowers the possibility and quantity of cold bridges.
Other load-bearing and other parts rest on crossbars, which are large, as long as possible, solid support beams connected into a belt. These parts frequently appear to collide with this reinforcement.
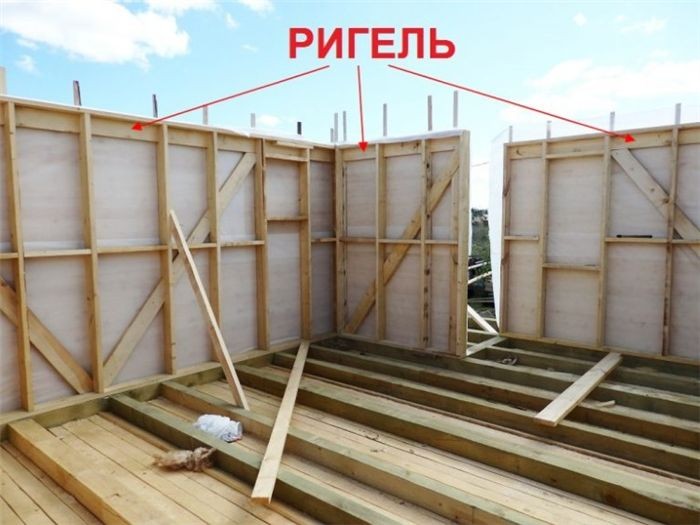
This is the base that is above the opening; it is made up of long, thick boards that are mounted on edges and secured together. Such a belt can be next to, continue, or reinforce a harness, and it most closely resembles one in terms of appearance and functionality.
The crossbar for a window opening is typically the only one and is positioned at the top of the frame racks along the length of the wall. It is joined to supports and other components to form a sturdy framework that disperses the weight uniformly and lessens it in the vicinity of window and door blocks.
There is an opening between these racks, though these are typically single ones. The lintel above it is the same, regular, and reasonably thin because additional reinforced elements don’t need to be installed.
The following are the average parameters for the initial pillars:
- for external walls 150×50 (40);
- for internal 100×50 (40).
The boards need to be at least twice as wide as they are thick. However, considering the cladding, insulation, and layers of insulation, the wall or window opening itself can ultimately be much thicker. The size of this pie also influences the depth of the glass unit within it.

Casing
In wooden houses, a casing is frequently erected to offset the loads caused by the structure’s shrinkage (frame, deck, carriage, box), but in frame buildings, it is typically not used because the opening’s frame is designed first and the posts are made with the appropriate dimensions right away.
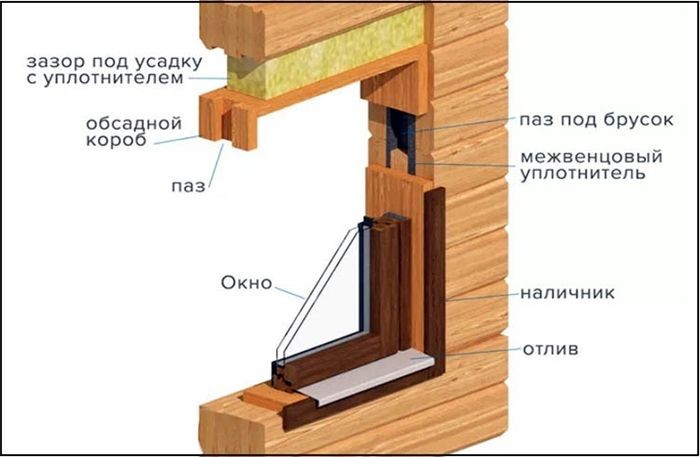
Although slight alterations are not excluded, deformation also happens in these houses because they are lightweight and the window frame and its fastenings are resistant to external forces.
Better dried wood is used for the frame, the design is lightweight, and there is greater interdependence between the elements, all of which contribute to the best possible load distribution and compensation. As a result, there is less shrinkage in this type of home, and the window frame can tolerate the surrounding structures’ deformations. It only needs a crossbar or a header with double or triple reinforced posts to be protected.
It is theoretically possible to create a pigtail, but doing so will require strengthening and increasing the number of racks in both the upper and lower sections.
Quarters
Similar to all other types of buildings (log, timber, stone), the opening for windows can have quarters or not. A quarter is a U-shaped protrusion that surrounds the opening’s edge and conceals the window frame.
The glass unit will be firmly held in place by self-tapping screws and plates, so the quarter’s function as a stopper against it falling out is secondary. Naturally, it will make the structure’s extrusion more difficult, but its primary goals are to improve heat capacity, insulating qualities, and protection of the assembly seam—which is the main weak point—as well as to simplify and boost reliability and stability of fixation.
Although many houses lack this element and it is not required, most experts view it as a desirable structural detail. Furthermore, the quarter serves as a practical base for finishing the exterior slopes (putty, plaster, panels), and it is convenient to rest the window against it during installation.

Since the size of a frame house depends on the depth of the filling, the width of the frame, and the mounting seam, quarters are not made when the structure is being assembled. These components are made during window installation; the placement of the product is decided upon after it has been ordered.
The same penoplex, wood, and board frame sheathing is used to create these protrusions, and it is secured with screws and glue. Since the quarter must cover the mounting seam, which is approximately 2.5 cm, and leave room for the frame stop (a few centimeters), it must be at least 4 cm thick. The width depends on how far the structure is buried, which is equal to how far it is from the opening’s edge.
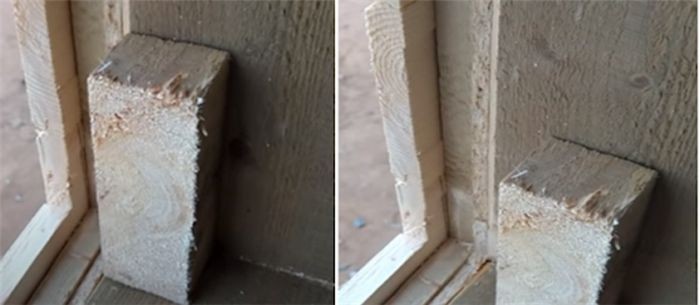
The image below illustrates how quarters are traditionally made in frames: an opening in the sheathing is made along the top and sides, but it must be narrower than the installation gap (2–2.5 cm) plus an additional 1–2 cm for the frame stop. Prior to the window being positioned in close proximity to the ledge, PSUL tape is affixed to the frame at the joint. This tape expands and permeates the gaps, forming a dependable seal.
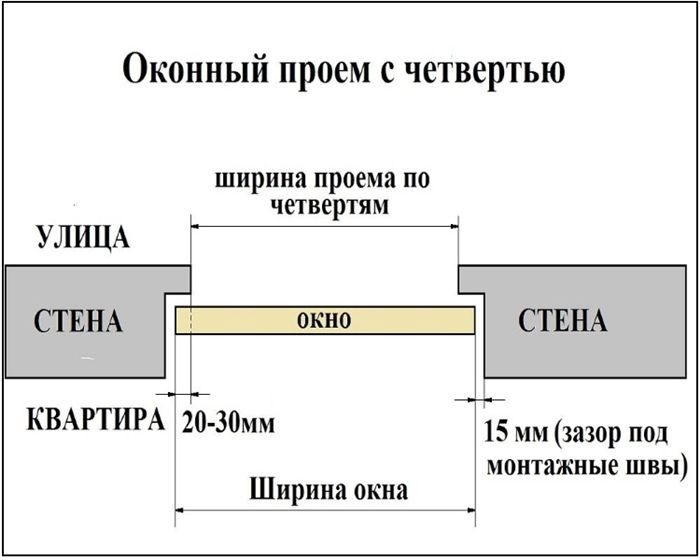
Here, the quarter acts as a stopper to keep the window from falling out and to keep water out of the room until the job is done. After that, you can replace it by making a 2-3 cm incision and covering the joint with counter strips.
Cladding slabs
Frame buildings typically cover their walls with OSB panels tightly, and only then—per SP 31-105-2002—do openings get sawed through. In other words, they don’t attach prefabricated panels that have openings cut out for them. This is always done to conceal all of the strapping and joints as well as to allow the slabs to tighten the building’s skeleton and fully integrate into the rigidity of the frame.
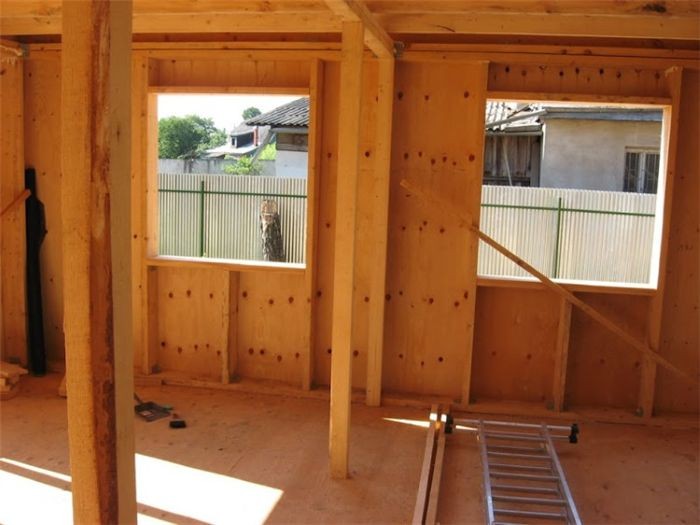
This is made possible by the shields’ direct attachment to the racks, with a 2-4 mm gap between them because they are initially dry and will expand slightly when it rains. In humid environments, there are almost no gaps between the slabs as they swell. Additionally, because all the joints have been tightened, rain that is slanting inside will not get through.
How to insert correctly: important installation nuances
As a result of their considerable shrinkage and deformation, it is best to wait at least a year, if not three years, before building a house made of wood or logs. In the meantime, window frames are frequently installed during the building phase, following the completion of the walls with OSB boards.
Some building owners choose to fill the openings with temporary filler (cheap structures, stretch film) after waiting a year for the building to stabilize as much as possible. However, as we said, windows are typically installed right away.
Naturally, as time passes, the frame shrinks and deforms, but because of the building’s light weight and the close bond between all of the racks and lintels, the changes have little force, are balanced out by the entire structure, and cannot damage the window unit.
Installation happens right away after slab lining because a closed circuit of vapor and hydro insulation must be created. Throughout the house, a unique membrane is frequently, though not always, positioned between the layers of materials. This membrane’s allowance is folded inside the opening and fastened with a stapler. Additionally, protective films that have their edges turned back and overlapped with the previously mentioned protection are glued to windows during installation.
Installation depth
Standard guidelines govern the window structure’s installation depth. Placing the block along the axis running in 2/3 or 1/3 (this interval is more commonly taken) of the thickness of a solid homogeneous wall is ideal. In the insulation zone of a layered fence (sandwich, if there is a heat-insulating layer, ventilation gap): flush with the lining or a little inward, say 5 cm.
Selecting the ideal depth will move the dew point outside the frame while keeping the window from getting too cold.
There is an option in the picture below for the block to be installed right next to the cladding, but keep in mind that there will also be cladding with separate insulating layers.
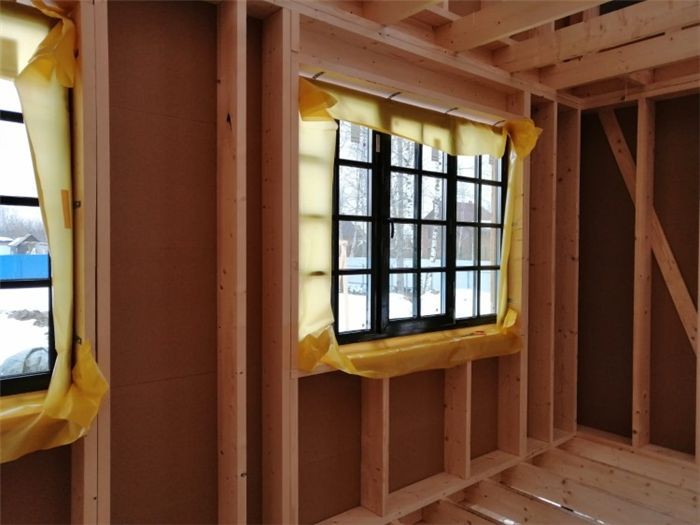
The width of the racks in our case is typically not more than 15–20 cm, and the window profile itself is about 7 cm, leaving about 13 cm if the surrounding stone structures and other houses are large enough to allow a window block to be placed deep there.
Where to install becomes the question. The wall and slopes will freeze more intensely the deeper the depth. Additionally, the window freezes more and is more likely to develop condensation, even on the interior frame, the closer it gets to the street.
It can be positioned in the center of the opening or even closer to the inner edge, almost flush with the wall’s edge, or even almost parallel to the street. Finding a balance is necessary; making a decision based solely on emotion or whim is not an option.
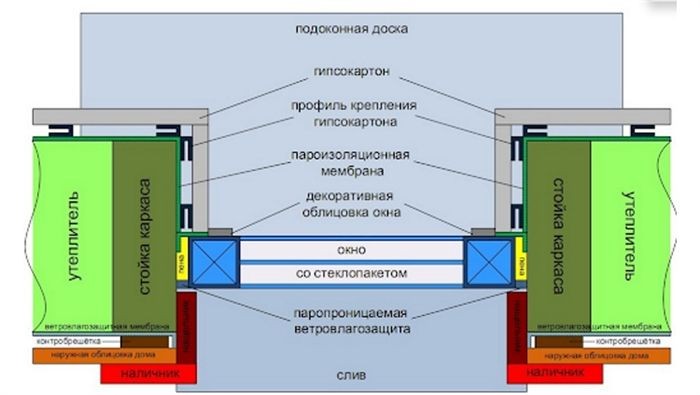
Installing at a depth of ⅓ or ¼ is advised. We decided to go with the golden mean in this instance, which means that the windows will be in a warm zone where the heat from the house will warm the double-glazed window and counter, making them less icy and less like a piece of frozen plastic. The pattern won’t "cry" or fog up. In other words, instead of trying to place it closer to the street, it is preferable to deepen it by roughly 5 cm, without going overboard. The ideal choice is seen in the picture below.
The most widely used general rule for deepening is 1/3 of the opening’s width.
Counseling! The edge of the glass unit should be positioned 3–4 cm from the outer edge of the insulation if insulation with a thickness of 11–12 cm is intended. If not, you risk hitting the dew point, which will ensure that the structure will "cry."
Measurements
Rules for measurements:
- The width is measured both from the top and bottom; the height – at the edges on the right, left. Next, choose the smallest value.
- Subtract the size of the mounting seam from the width, usually 2-4 cm. Similarly from the height, but if the base profile is not removed, but placed on wedges, then it is also subtracted – about 3 cm. But most often the gap is the same along the entire perimeter – 2-2.5 cm.
- If there are quarters, then they are not taken into account – the counting is carried out precisely from the walls of the opening, subtracting the thickness of the gaps for installation seams.
For instance, if there is a 20 mm seam all the way around, the opening will be 755 mm wide at the top and 750 mm wide at the bottom. After accounting for the smaller figure, we arrive at 730 minus 20 mm. Since the gap can be somewhat widened, you can take a value that is a few millimeters less—for instance, 725—within reasonable bounds. The same is true for height: 1280 mm on the left, 1278 mm on the right, and 1258 mm (rounded to 1255) when we deduct 20 mm.
How to choose the type of window opening?
Every kind of window, including PVC, wooden, and others, is set up in frames. Other than the small, general restrictions listed below, there are no particular limitations.
Typical location of the opening:
- Height above the floor is 80–90 cm, which will provide optimal visibility for a person sitting on a chair or in a standing position. In the kitchen this figure is 105–110 cm for better lighting.
- From the upper edge to the ceiling is the maximum – 30 cm.
Organizing openings based on standard parameters will prove to be the most convenient approach. Most of the time, this is what they do. Additionally, you can order any size window you want, but doing so will complicate the design of the house and raise the cost.
Regardless of the type of building material, standard window sizes for residential buildings are as follows, per GOST 11214-2003, SP 52.13330.2011, and 23.102.2003:
- Width from 87 cm to 2.67 m; height from 1.16 to 2.06 m.
- The optimal glazing area in relation to that of the floors of the room is in a ratio of 1:8; for bathrooms, utility rooms, non-residential parts – up to 3%. These are average parameters, rules and calculation formulas are in SP 23.102.2003.
PVC window manufacturers emphasize the following standard features of their product:
- Height: 60; 90; 120; 135; 150 and 180 cm; width: 60; 90; 100; 120; 135; 150 and 180 cm.
- Typical: 700×1350 mm, with two leaves – 1300×1400 mm, with three – 2050×1400 mm.

Limitations on the installation of double-glazed windows that are not standard:
- The area of fixed windows should not exceed 6 m2 due to increased wind load.
- Maximum height of models with opening parts – 2200 mm.
- Minimum parameters of fixed structures – 300×400 mm, casement – 400×500 mm.
The area of the room is important to consider when selecting windows for private housing. For instance, one product 900×900 is sufficient if the bedroom and children’s room are the typical sizes of 10 to 12 square meters; if they are twice as large, then more openings should be added.
Remind yourself that when making a purchase, you must distinguish between the cameras in the glazing (1, and more frequently, 2) and the profile (from 1 to 6).
The guidelines are as follows if we take into account the heat capacity and insulating qualities for external openings:
- In a southern climate – at least 3 cameras in the profile; there may be 1 in the glazing.
- For moderate conditions in the central strip, the previous option is often used, but it is better to choose a model with more than 3 cameras in the profile and 2 cells in the glazing.
- For Siberia and similar cold regions, there may be at least 3 chambers in the profile, but 3 are highly desirable in glazing.
- For interior rooms, a product with a minimum number of chambers in the profile (usually two, since there are almost no windows with one) and glazing is suitable.
Tools, devices, materials for work
The following equipment will be necessary:
- A screwdriver with bits (including Torx), drills for 6, 10 and 12 or others for the anchors used, for drilling (it will be enough for tightening self-tapping screws to create holes).
- An inner vapor-permeable insulating film (usually foil) and an outer film similar to it, but sometimes also called a moisture-and-wind barrier, with a butyl rubber layer. Instead of the latter, diffusion material is also used. You can further enhance the insulation with Steez group sealant.
- PSUL tape. Placed on the frame at the junction with the quarters, as well as on the stand profile;
- Mounting polyurethane foam.
- Yellow self-tapping screws (pins) for concrete. Standard sizes can be: 7.5×95; 7.5×132. Length depends on installation gap. But usually 92 mm is used for side fastening, and 132 mm for bottom fastening; they may have a Torx head, which is why such a bit is needed. To fix the ebb, you can use such short parts (6×60).
- Typically the plate is secured with one self-tapping screw and two black screws. The first ones are recommended in the sizes indicated above with a drill and a press washer, and the second ones are 4.8×90 or 4.8×110.
- Plates for fastening windows (purchased at hardware stores). You need to choose stronger ones, since they are often excessively flimsy, to the point that craftsmen make them from pieces of steel themselves.
- Simple construction level and laser level (optional).
- Square, tape measure, metal ruler, folding meter, pencil.
- Plastic wedges: stand (support), spacer and/or stand profile (may be included with the window).
- Chisel or spatula for snapping off glazing beads.
- Pneumatic suction cup (optional) to hold the glass unit when unpacking.
- Ebb. This is a steel strip, which is also often called a window sill or drip edge, it is located outside under the window.
- Hacksaw, hammer, mallet, nails – for auxiliary work.
Crucial! Using a 5-6.5 mm drill bit, drill a hole in the profile for a screw or self-tapping screw intended for concrete that is 7.5 mm thick. It is impossible to overtighten dowels; doing so will cause the frame to turn out and cause plastic cracks to show.
How to do it yourself: step-by-step instructions
Regarding stone-based buildings, there are two methods for installing window blocks in wooden frame structures:
- On dowels, that is, only on self-tapping screws (these are used for concrete).
- On plates that are screwed with self-tapping screws and black wood screws.
General points for all methods of fastening in frame buildings
There is no separate regulatory act for the installation of windows; instead, GOST 30971 applies to all buildings and does not address frame structures. led by it. The installation techniques are comparable, with only slight variations.
Unglazing or unpacking entails removing the chambers (blocks with glazing), snapping off the glazing beads on fixed windows, and removing any sashes that may be present. To avoid touching them while working, arrange these components in a handy location and place them on substrates (soft rags or a stand profile work well).
Wintertime handling requires extra caution since the cold causes plastic to become brittle.
There are layers at the assembly seam:
- internal – vapor-permeable membrane;
- central – foam (inside the joint between the window frame and the opening pillars);
- external – external moisture, wind, vapor protection.

GOST specifies that the installation seam’s thickness should range from 15 to 50 mm. Usually, two to three centimeters is used.
The following guidelines apply to the window frame’s fastener pitch (which is measured from the inner corner; occasionally, the numbers vary slightly amongst schemes):
- between self -tapping screws, the maximum step 70 cm for white and 60 cm for a color profile;
- from the corners of at least 15-18 cm;
- from imposts a maximum of 15 cm.
The membrane that is positioned in between the frame’s casing during assembly has the following features:
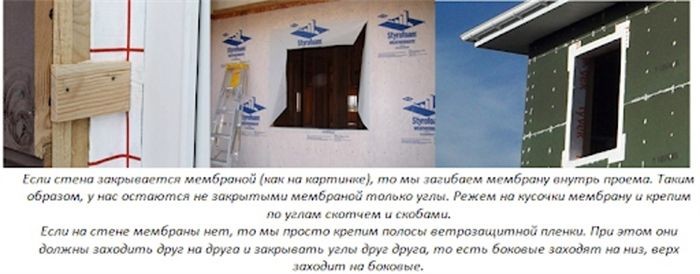
Installation should allow for the presence of window sills, slopes, seals, and drains, per GOST.
Hall profile or wedges (stands)
Frequently, the Donnik that comes with the window is thrown away along with the stand-in profile. Don’t forget that this component is essential for installation as well as serving as protection for the product during transit. His second direct use is as a standing profile substitute for supporting wedges. According to GOST, the part’s height is already ideal for the gap’s thickness.
Crucial! Use the support wedges or the standing profile (two can be used simultaneously); there is no specific difference.
Followers of two options about equally. If clover is utilized, however, its interior cavities must be foamed and removed. A tape must then be positioned at the point where it joins the PSUL frame, and the clover must be quickly reinstalled on the profile before it has a chance to swell.
In addition, the PSUL is positioned in the center to hide it from view, and the tape is squeezed in between the stand profile’s chambers before being installed and fastened to the frame with two self-tapping screws.

Plate mounting
First, let’s talk about mounting on plates. There are two types of variations for these brackets (clips): universal, which fastens straight to the frame using self-tapping screws, and butterfly, which fits into the profile’s groove and needs to be chosen for the particular measurements of the double-glazed window. Additionally, the component can slide into the outer recesses or the internal groove.
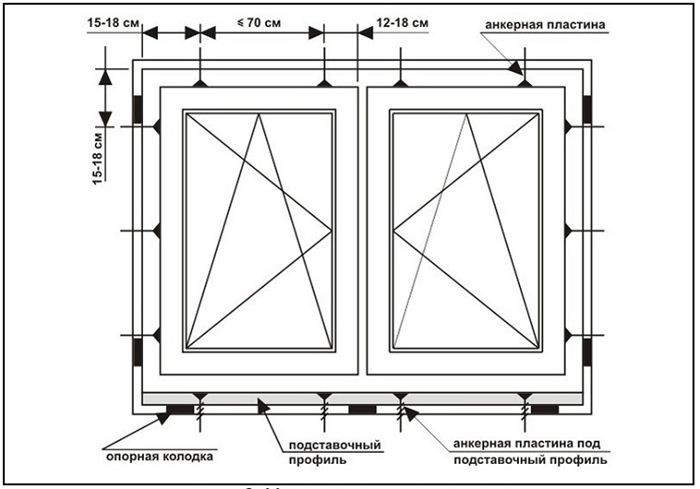
Because the butterfly-adorned plates have a hole, a self-tapping screw can be used to further secure them. Some artisans create them by hand, severing the steel from the strips and perforating holes beneath the metiz.
For each side, you’ll need a minimum of two pieces of plates. We highlighted the step and diagram above.

Two vapor-permeable tapes are adhered to:
- Foil (internal, Robiband NL is often used) on the end facing the inside of the room.
- Outer with a butyl rubber layer (it is also called wind-hydroprotection, this is Robiband BC) on the outer end.
We leave half of the tapes along the length covered in protective film; after the window is inserted, this portion will be glued to the opening’s walls. We fasten it to the profile groove’s projecting walls.
Other options exist for steam and hydroprotection, such as covering the entire opening with it (using super diffusion tape). However, we were skeptical of this solution because the foam does not stick well to this material and because slopes will need to be applied right away to prevent UV deterioration. Why use this option when there is a more practical and efficient way mentioned above?
The sandwich panel will then slide behind them onto the slope, improving its fixation, once we snap the plates together. Occasionally, they also place plastic clips on the sides in a manner similar to this. These are optional enhancements that aren’t always utilized, but we included them because we thought they were highly practical.
We insert wedges at the bottom of the opening and adjust it to 20 mm (or the chosen gap thickness). Alternatively, you can use a stand profile or plastic and polyurethane foam blocks in steps of roughly 30 to 40 cm.

After inserting the window, we level and make sure it is even. To ensure there are no distortions, we first secure the plates with a black wood screw before tightening the stronger yellow screws. The black clip that the sandwich panel will fit into is visible in the penultimate image. The entire perimeter—both inside and outside the room—is then foamed.
It is considered an error that steam and a guido-insulating tape were not used in the above photo. However, we presented this option because it offers a practical way to finish the slope using a plastic clip. The installation procedure is similar to the one below, but it includes vapor-permeable outer and inner tape (we’ve already covered how to glue it), as it should.
After cutting off the foam, the material is affixed to the opening’s wall and may also be taped. The house’s waterproofing membrane, if any, is then overlapped when finishing.
Installation of double-glazed windows on dowels (with self-tapping screws through the profile)
At home, a moisture-proof membrane covers our opening. We make a hole for the window, leaving about 6 to 7 centimeters around the edges because it will overlap a comparable waterproofing tape made of butyl vapor. This material, which runs outside the house between the sheathing and the posts, was put in place when the structure was being assembled.
Counseling! Installing mosquito net fastenings right away is advised.
Next, take out the sash by using a nail to beat the pin, opening it with the handle, pulling it up, and taking it out. We remove the glazing chambers from blind windows by simply snapping off the glazing beads with a spatula or chisel and pulling them out.
The frame is positioned on the support wedges, and the same spacers are used to wedge them from above as well. We position the window in accordance with the pre-marked boundaries of the recess. We use a laser level to ensure that everything is level, and we use a regular level to identify the frame’s plane. If there is any unevenness, we give it a quick rap with a hammer. The positions of the wedges are visible in the picture.
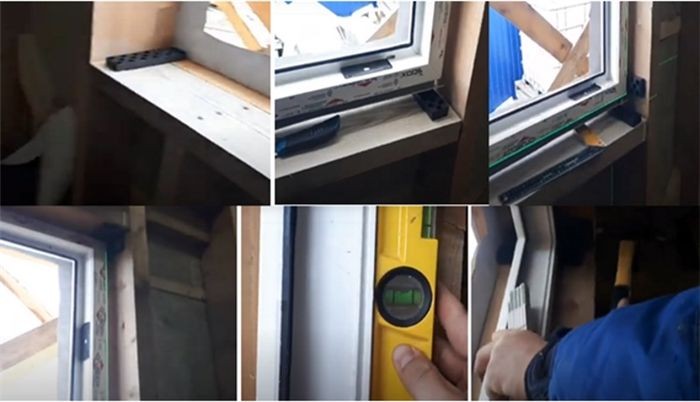
Next, mark the center of the frame from above and 15 cm from the bottom (inner corner) to accommodate the self-tapping screws. A colored profile should have a distance between marks of no more than 60 cm, but no more than 70 cm. For fasteners, we have given a diagram above.
Using a 5 mm drill, we drill through the frame and then expand the plastic by 12 mm only on the upper wall. This allows the self-tapping screw’s head to enter the frame and stop close to the metal strip in the profile. Put it in place and cover the holes with plugs (sealant can be used to seal them).
After putting the glass unit and sashes inside the frame and snapping the glazing beads, we install them. Within the profile groove are wedging inserts; stay away from them and do not touch them. The two top ones, taken out prior to unpacking, are beneath the frame and are inserted when the glazing is installed. We break the glazing beads by striking them with a mallet or the handle of a hammer.
The sash is inserted in this manner: push the shaft (pin) into the lower hinge, then the upper hinge. Before foaming, the support wedges can be removed or left in place, but the side, spacer wedges must always be removed.
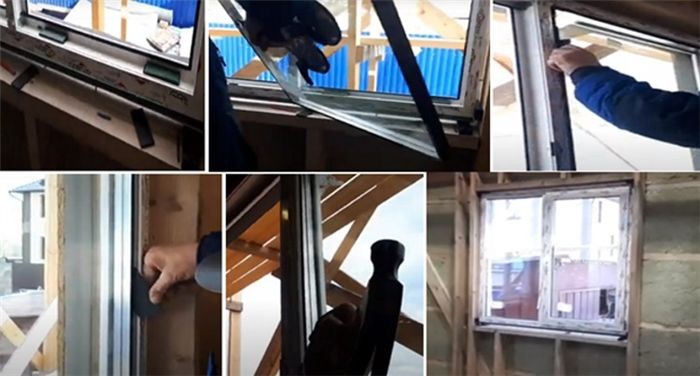
The vapor barrier tapes are installed a little later, that is, after the window has been mounted in the opening, prior to foaming, as we can see. And it makes perfect sense: as long as seals and insulation are left exposed during other tasks, sunlight won’t harm them, and there is also no chance of damage occurring during manipulation.
Recall that the vapor barrier is fastened to the end of the opening from the inside, with its edge projecting parallel to the room’s slope. An identical membrane, intended exclusively for the street, is fastened outside in a comparable manner. For the same reasons as before, they don’t foam here either.
The window’s depth is visible in the third picture. Next, it is demonstrated how the house’s remaining membrane contour (refer to the opening of this section) will overlap and adhere to the yet-to-be-installed butyl rubber external vapor barrier.

Regarding the installation depth once more, the finger indicates the end of the warm contour; cross-insulation exists in this space. Installing it end-to-end would have resulted in a worsening of the heat capacity, made it impossible to create visually appealing slopes, and an excessively narrow or protruding ebb.
The third picture illustrates how much room remains in the opening: the 75 mm protrusion is perfect for the 150th window sill, but there will also be external finishing, adding another 50 mm. The foaming will be consistent everywhere because the installation seam is 2 cm across, making it canonical. It is also evident in the final image that the wedges and the stand profile were both utilized.
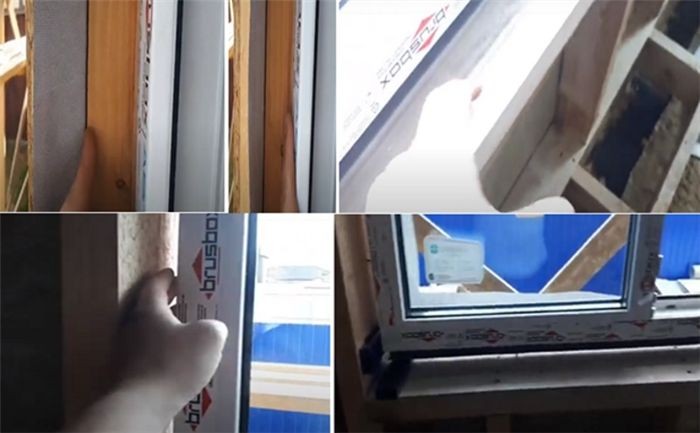
Finishing after installation
We install the ebb (the width can be selected tightly or with a 1-3 cm protrusion, depending on the homeowner’s preference):
- We measure the opening between the platbands, take a value 1 cm less so that the part fits in easily and presses.
- Mark 1.5-2 cm on the sides of the ebb for bending.
- Using metal scissors, we make cuts along the marks on both sides, but only on the curved edges; we cut off these pieces altogether.
- Using a corner, draw an oblique line along the remaining protrusion (45° angle), starting from the end of the cut. We do this only on one side, the one that will be adjacent to the house. We bend the protrusion with pliers, clamping it in two blocks of wood. We do the same on the other end.
- We put an ebb to the window, you can screw it to the profile with short self-tapping screws with a press-shaped (3-4 pcs is enough.) or insert into the lower groove, which is provided specifically for this part.
- It is advisable to treat the gap between the wall (bottom of the opening) on which the ebb is placed and it with Stiz sealant, as well as foam it, in the way we will describe later for the window sill (with fixing blocks).

Slopes
- The interior is paneled and plastered.
- External ones can be decorated with platbands and overlays, which will also create a pseudo-quarter.
How a window sill is installed:
- We screw two blocks to the side walls from below so that they hold its top exactly at the level of the cutout in the window profile, that is, so that it does not fall behind or go higher.
- We insert it from below. There will be a small gap across the entire plane, since the installation seam cannot be accurately calculated to fit the window sill.
- We press the window sill to the blocks with clamps, and where they cannot be installed, we screw it in with self-tapping screws – one on each side is enough, you only need to hook the very top, that is, screw it in shallowly.
- Next, we place a board along the entire length that will keep it from rising when the foam expands, and secure it to the wall with screws. We put a second one on it, a little shorter, so that it fits between the blocks. Fasten with self-tapping screws to the first board. We foam from below, install a decorative overlay like a plinth.
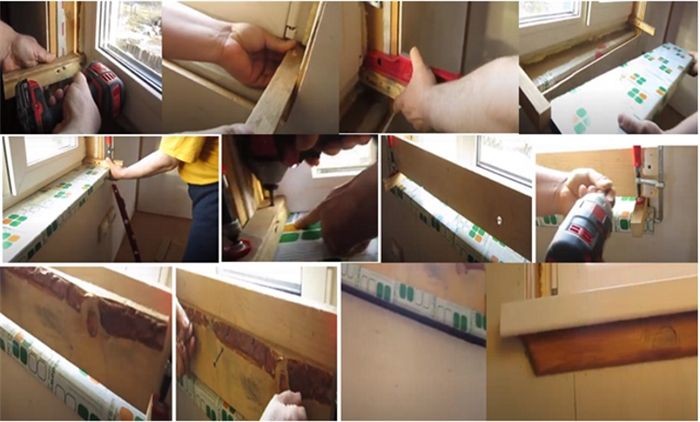
For both internal and external work, it is recommended to apply Stiz sealant to all joints, particularly those with foam, as well as the plane where the ebb is installed, close to the window sill (this is particularly crucial). The compounds are designated A, B, and D based on their intended use. Applying this material to surfaces prior to foaming is also advised as it will improve adhesion.
Possible difficulties and errors
Let’s enumerate typical errors:
- Application of non-special vapor-permeable film (external, external). Using polyethylene and the like instead is a gross mistake.
- Failure to comply with the rules for installing insulation (the tapes are glued carelessly, are not smoothed, and the ends are not overlapped).
- Non-foaming of the support profile inside, if one is used.
- Poor foaming. This procedure must be done slowly, carefully, so that there are no voids or cavities.
- PSUL tape is applied long before installing the window and pressing it to the quarter. This material expands over time, so it must be fixed immediately before inserting the glass unit into the opening.
- Incorrect depth selection and fastener spacing.
- Checking the level of evenness of the position of the window block is ignored. This must be done often several times at each stage of work.
Take note! If wedges are used, it’s a good idea to use even wedges so they can be positioned along the opening rather than across it. This will ensure that the foam seam is unbreakable, which is required by GOST.
Particular attention has been taken to insulate the opening’s bottom:

Average prices
Installing windows in an empty opening of a frame house costs between 1,300 and 1,775 rubles per square meter. They charge extra for slope installation; the cost per linear meter is about 500–700 rubles, and the cost at low tide is 300–350 rubles.
Useful video
A video showcasing the benefits of window installation in a frame home:
| Rule | Explanation |
| 1. Insulation | Choose windows with good insulation properties to minimize heat loss in the frame house. |
| 2. Material | Select window frames made from materials suitable for the local climate and conditions. |
| 3. Size and Style | Ensure windows fit properly into the frame openings and complement the architectural style of the house. |
| 4. Orientation | Consider the orientation of windows to maximize natural light and energy efficiency. |
| 5. Installation | Follow proper installation techniques to prevent air leaks and ensure long-term performance. |
In a frame house, selecting and installing windows is an important decision that can have a big impact on your home’s comfort, energy efficiency, and general appearance. It’s crucial to take into account elements like the kind of window, the materials utilized, and the installation procedure. Your home will look better and be more energy-efficient with well-chosen and installed windows, which also ensure that it is well-insulated.
Consider factors such as style, durability, and thermal performance when choosing windows. Superior materials such as wood, fiberglass, or vinyl can provide exceptional durability and insulation. Because of their exceptional energy efficiency, double- or triple-glazed windows are highly recommended for helping to maintain a comfortable indoor temperature while lowering energy costs.
The installation procedure is just as significant. The best insulation and proper operation of your windows are guaranteed by proper installation. To avoid common installation errors that can result in drafts, leaks, or decreased energy efficiency, it is best to hire professionals. Experts possess the knowledge and experience to guarantee that windows are fitted firmly and sealed correctly.
In conclusion, the functionality and aesthetics of your frame home can be greatly improved by giving careful thought to the kinds of windows, the materials they are made of, and having them professionally installed. You can have a more comfortable, energy-efficient, and aesthetically pleasing home for many years to come by taking the time to select and install the correct windows.


