
For any construction project, laying a strong foundation is essential because it gives the structure stability and longevity. Shallow strip foundations are one of the more straightforward but efficient types; they work well for light-weight buildings like sheds or tiny houses. By distributing the building load over a large area of soil, this kind of foundation ensures even weight distribution and keeps the building from settling.
Before you begin, prepare a spade for excavation, a level for precision, string lines to indicate the layout of the foundation, and concrete for foundation pouring. Wearing protective clothing, such as gloves and boots, is crucial.
Mark the foundation’s perimeter with stakes and string lines first. Make sure the measurements exactly match your building plans by using a tape measure. Once the trench has been marked, begin digging it out to the necessary depth and width. A shallow strip foundation is usually wider and deeper than the walls it will support, by 12 to 18 inches.
Next, use a spirit level to level the trench’s bottom. To guarantee that the foundation rests level and firmly, this step is essential. To create a solid foundation for the concrete, compact the soil at the bottom of the trench with a hand tamper or compactor tool.
- What is a shallow strip foundation
- Advantages and disadvantages
- Scope of application
- For what soils is MZLF used
- Types
- How it works
- Laying depth
- Pillow under the foundation
- Step-by-step installation instructions
- Preparing the trench
- Installation of formwork
- Reinforcement and knitting
- Fill
- Features of foundation waterproofing
- Insulation issues
- Final stages of work
- Useful video
- Video on the topic
- How to easily assemble a reinforcement frame and install formwork
What is a shallow strip foundation
A more affordable and lightweight alternative to traditional strip foundation is shallow strip foundation. The design is essentially the same as that of a full-fledged foundation; the only distinction is the immersion depth, which is kept below the freezing point of the soil.
In actuality, the depth can be decreased by nearly three times, which can drastically lower the quantity of excavation work that needs to be done as well as the price of labor and building supplies. When digging a trench by hand is feasible, you can construct close to existing buildings and structures in areas where using construction equipment is not feasible.
Concrete can also be produced independently thanks to the simplification of the pouring process.
MZLF is a riskier option that necessitates careful consideration of the site’s geological circumstances and calculation. It is not advised to use it without calculations when building residential structures.
Advantages and disadvantages
Among the benefits of shallow tape are:
- Reliability and strength of the base.
- Reduced labor costs, in particular excavation work.
- The consumption of building materials is reduced by almost three times.
- Possibility to do all the work yourself.
There are also disadvantages:
- There are restrictions on the weight and number of floors of the building.
- It is necessary to equip a drainage system, especially when building on heaving soils.
- Before construction, it is necessary to conduct a thorough examination of the geological situation on the site.
Since practically all foundation types depend on the type of soil, the only significant drawback is that they cannot support large, heavy buildings.
Scope of application
The best option for small, low-rise building construction, such as private residential buildings, is a shallow strip foundation.
Users find it very appealing to be able to complete the work without the use of construction equipment, and shallow tape’s popularity only grows due to the significant labor, time, and cost savings.
A shallow belt cannot support the weight of a large building, so in order to prevent errors during the construction of a heavy or tall building, the foundation parameters must be calculated.

For what soils is MZLF used
Strip foundations are unique in that they are adaptable and can be used on different kinds of soil. In this sense, MZLF is not an exception, offering plenty of chances for application on heaving soils that are wet or dry.
Fundamental contraindications that deviate from the standard criteria for strip foundations do not exist. Both clayey, loamy, or sandy loamy soils as well as dry, dense soils are appropriate; however, in these situations, a detailed analysis of the hydrogeological parameters and soil composition will be necessary.
The type of drainage and backfill layer thickness that are used in construction vary depending on the type of soil, so having the most accurate and comprehensive data is essential.
Types
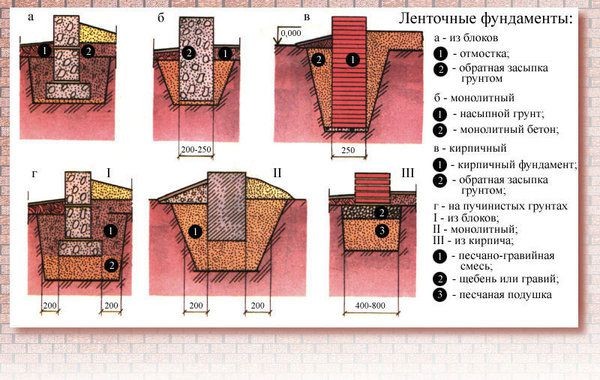
There are several ways to put in place a shallow strip foundation:
- Monolithic. Consists of a solid reinforced concrete strip, has the highest load-bearing capacity, strength and resistance to external loads.
- Team. Constructed from individual elements – concrete blocks (FBS), bricks and other fragments. Has fewer capabilities, but does not require curing for concrete to harden. In some cases it is the optimal solution.
- Combined. It is a combination of tape and other types of supporting structures – pile-tape, etc.P.
Typically, they favor constructing a monolithic reinforced concrete strip, with the strongest and most reliable base in mind.
How it works
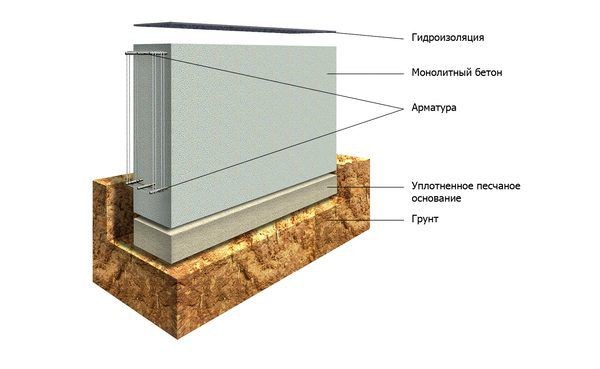
A concrete (or prefabricated) tape set atop a sand and gravel backfill is the MZLF device. Placing the tape in the trench so that about half of its height is above the surface creates a plinth.
The width of the trench is chosen with consideration for the existence of a side backfill composed of sand or ASG, the same material used to make the cushion. These layers are there to drain the trench and keep moisture from coming into contact with the concrete.
Furthermore, a layer of thermal insulation and waterproofing is affixed to the tape’s surface, guaranteeing that the concrete is dry and devoid of condensation.
Laying depth
The depth of the tape is determined by the geological conditions present in the area, specifically the degree of soil freezing. The effect of heaving loads is high enough to create significant loads on the bottom of the belt, even though the base sinks well above this level.
The tape’s depth typically ranges from 0.5 to 1.5 meters. When building on slightly heaving soils, the minimum values are taken at a depth of 1 m or less, and the maximum values are taken at a freezing level of 2.5 m or more.
The ratio of the level of immersion to the freezing point rises on dry, non-heaving soils, though in these situations the problem is not life-threatening.

Pillow under the foundation
A layer of backfill called a cushion keeps the trench’s bottom dry and prevents heaving loads. The cushion is made up of either a single, 20 cm thick layer of sand or two, 10–20 cm thick layers of alternating sand and gravel, with an upper, 5 cm thick layer of leveling sand.
The highest possible compaction is the primary requirement for a pillow. Employ hand tools or vibrators for construction. To ensure that there are no shoe prints on the dirt road after walking, the pillow’s density should match that of the road.
For your article on installing a shallow strip foundation, the following is a succinct and straightforward main thesis statement: Use our useful guide to install a shallow strip foundation step-by-step. For anyone wishing to lay a strong foundation for a construction project, this article streamlines the procedure and offers clear, concise instructions. Learn the crucial procedures and advice to guarantee a solid and long-lasting foundation, from site preparation to concrete pouring and finishing touches, all presented in language that homeowners and do-it-yourselfers can understand.
Step-by-step installation instructions
A shallow belt is being created step by step, strictly adhering to all technological requirements. It is not advisable to add any of your own stages or alter the process, as it has been refined over many decades of construction.
Let’s take a closer look at each building stage.
Preparing the trench
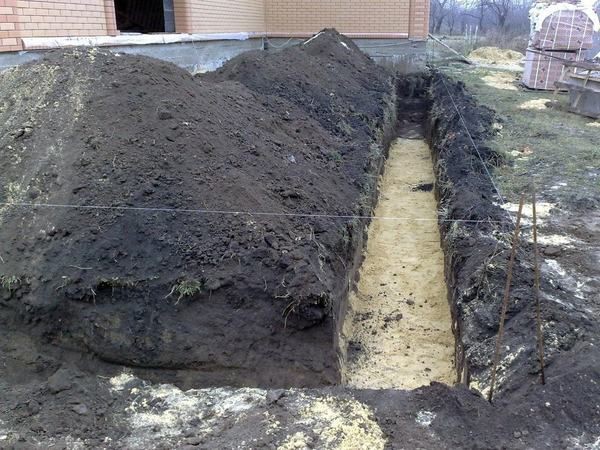
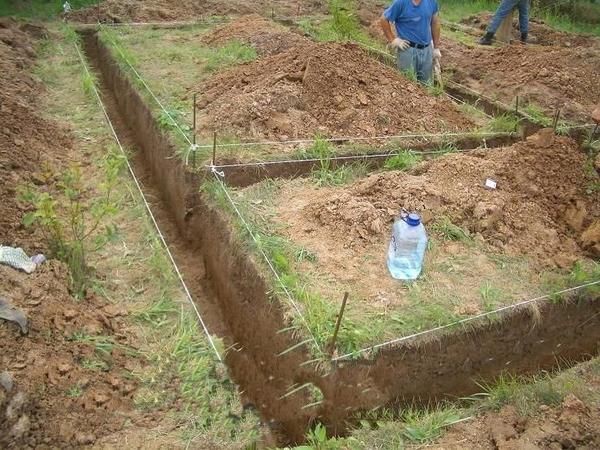
The first step in the process is leveling the site and removing the top layer of fertile soil. A special focus is placed on guaranteeing horizontal. Next, the trench’s outline is drawn. This is accomplished by driving stakes into the ground at intersections and corners, then pulling cords to form the trench’s contours.
Following that, they clear the surrounding areas and corners and dig a trench to a specific depth (particularly if an excavator was used). Maintaining a certain level of the surface is necessary, but leveling the trench’s bottom too much is not advised.
The pillow is then filled after this. Add a layer of sand first. Clay or other foreign organic matter must not be present in the material. Sand from a clean river is the best option. When the filled layer is compacted to the highest density feasible, water may be added.
Next comes a layer of finely crushed stone or gravel that has been packed down to the maximum density. Finally, a 5-centimeter leveling layer is poured on top of the previous layer.
Subsequently, a layer of geotextile is applied to the pillow’s surface, followed by the pouring of a base layer (footing) or the laying of two layers of roofing material (waterproofing material) with a bitumen mastic application in between.
Installation of formwork
The formwork is put together using boards with smooth edges and a thickness ranging from 25 to 40 mm. Dense shields with a width marginally larger than the tape’s height are employed. Make sure there aren’t any holes or cracks; if you find any, plug them right away with oakum or block them with wooden slats.
The assembled panels are lowered into a trench and aligned along their dimensions and axes to form a single system. The external stops, both vertical and inclined, hold the position in place. In order to establish the width of the tape and guarantee the immobility of the formwork, cross members are installed from the inside.

Reinforcement and knitting
Axial tensile loads are concrete’s weak point. Although the material can withstand a lot of pressure, stretching is almost impossible for it. A kind of skeleton, a reinforcement frame composed of fiberglass or metal ribbed rods, is inserted inside the casting to strengthen the tape.
Both vertical and horizontal components make up the frame. The horizontal working rods support the belt and take on external loads in addition to carrying out all other tasks. Only in order to maintain the working rods in the intended position are vertical elements required.
They stay inside once the concrete is poured, but they serve no purpose. Soft, annealed steel knitting wire is used to assemble the frame. Conventional twisting is the connection principle. A 25–30 cm long piece of wire is bent in half, positioned diagonally beneath the rods’ cross joints, and then the ends are lifted up to wrap around the joint.
The rods are then securely joined by inserting a unique hook into the loop of one end and twisting it four or six times with the other. Welding is an option, but knitting is easier and doesn’t need a machine or network connection.
Furthermore, loads are possible during the pouring and curing processes. Rods made of knitting can move slightly to accommodate pressure. Welding just breaks and does not present such opportunities.

Fill
Pouring requires meticulous preparation. The process needs to be carried out in its entirety without any breaks. It is not acceptable to wait longer than a day between steps because you will need to stop working and store the concrete until it has completely set.
Pouring further will prevent the creation of a monolithic tape and prevent a perfect bond between freshly filled and previously filled areas. As a result, it’s essential to plan for the delivery of pre-made concrete or the production of the necessary amounts on site.
Starting from the inner sections of the tape and working your way outward, pour the mixture. Throughout its length, the formwork is filled in at various points in an even distribution.
Pouring concrete in one spot and waiting for it to spread out around the entire perimeter is not possible. A tray that can travel the full length of the formwork and be used to feed and distribute material at the ideal density must be prepared beforehand.
This will guarantee the tape’s maximum strength and consistent quality at all times.
It takes some time for the concrete to harden after pouring. To shield the surface from the sun, plastic film is applied. To reduce stress and balance the moisture content of the internal and external layers of concrete, water the first three times every four hours.
After that, watering is done three times a day (every eight hours) for seven days. After 28 days, work can resume and the formwork can be taken down ten days after the pour.
There should be no attempt to cut this time short. Relying just on "maybe" is strictly discouraged because the foundation is an element of the building that is too important.
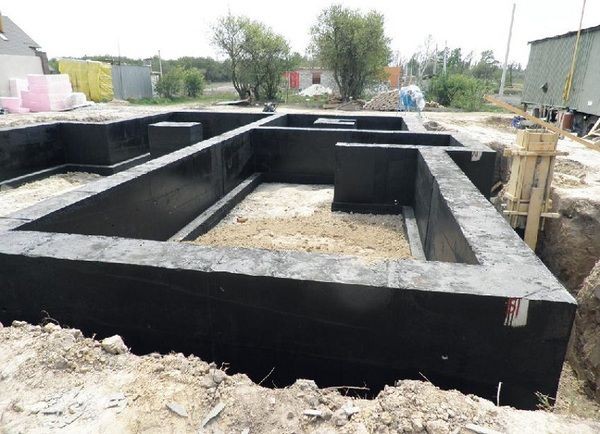
Features of foundation waterproofing
Two varieties of waterproofing exist:
- Horizontal. As a rule, it consists of two layers of roofing material coated with bitumen mastic from the inside. The lower side of the tape is insulated before installing the armored belt, the upper side is insulated after the hardening process is completed.
- Vertical. Special materials are applied to the side surfaces of the tape to protect the concrete from moisture penetration. There are many materials for vertical waterproofing – impregnating, coating or pasting agents. Impregnations and modern materials that completely eliminate the absorption of moisture into concrete are recognized as the most effective. Most specialists do not have experience working with them, so they have not yet gained much popularity.
Because concrete resists water, some owners choose not to waterproof their buildings. However, they fail to consider the fact that moisture damages and rots not only concrete but also metal, wood, and other components.
Consequently, it is not advised to forgo installing waterproofing.
Insulation issues
By installing insulation, condensation will not form and the internal tape sections will remain dry. This is particularly crucial if a basement is intended for the home.
Make use of materials resistant to moisture:
- Liquid polyurethane foam.
- Penoplex.
- Penofol.
- Foamed polyethylene, etc.d.
The owner’s capabilities and circumstances influence the selection of the best material. It is advised to apply the material to all surfaces (aside from horizontal ones) both inside and outside the tape.

Final stages of work
Pouring the blind area and filling the sinuses are the last steps. Clean river sand is the preferred absorbent material for backfilling. As soon as moisture enters the trench, it descends to the bottom where the drainage system removes it. Groundwater can appear anywhere, so backfilling is done from the inside as well as the outside.
To keep rain or melted water from pouring down the walls into the trench, the blind area must be filled in. Water is drained into a drainage well by installing a drainage tray on the nearby soil, which is reached by a concrete strip.
Since these elements were created, they must be given the same consideration as all other elements.
Useful video
This video will walk you through installing MZLF:
| Step 1: Excavate the Trench | Start by excavating the trench according to the planned dimensions and depth, ensuring it is level and compacted. |
| Step 2: Lay Gravel Base | Fill the trench with a layer of gravel to enhance drainage and stability, ensuring it"s evenly spread and compacted. |
| Step 3: Install Formwork | Construct and place formwork along the edges of the trench, ensuring it is sturdy and properly aligned. |
| Step 4: Reinforce with Rebar | Place reinforcement bars (rebar) inside the formwork to strengthen the foundation, ensuring they are spaced evenly. |
| Step 5: Pour Concrete | Pour concrete into the formwork, ensuring it fills the trench completely and is leveled off neatly. |
| Step 6: Cure the Foundation | Allow the concrete to cure for the recommended time, keeping it moist and protected from drying out too quickly. |
| Step 7: Remove Formwork | After the concrete has cured sufficiently, carefully remove the formwork to reveal the finished foundation. |
The article you wrote about installing a shallow strip foundation comes to an end here:
For a variety of construction projects, building a shallow strip foundation can be a workable solution because it provides stability and durability without the complexity of deeper foundations. You can guarantee a strong foundation for your structure by adhering to these detailed instructions.
First things first, preparation is key. Spend some time precisely marking the ground with the dimensions of the foundation. Prior to beginning any digging, this step aids in guaranteeing proper placement and alignment.
The next important step is excavation. Trenches must be dug to the required depth and width in order to accommodate the concrete footing. To maintain consistency in the depth of the foundation, don’t forget to check the levelness of the trench bottoms.
It’s time to reinforce once the trenches are ready. Strengthening the foundation by adding a layer of mesh or reinforcement bars within the trenches increases the foundation’s ability to support weight and resistance to settling.
Pouring concrete comes next to reinforcement. In order to guarantee that the concrete is distributed evenly throughout the trenches, this step requires careful handling. To ensure a firm, compacted foundation and to remove any air pockets, use a vibrating tool.
Curing and finishing bring the process to a close. Give the concrete enough time to cure completely to prevent it from drying out or cracking too soon. After the material has dried, you can backfill the trenches and start building above the foundation.
Once you have mastered these steps, you will be able to install a shallow strip foundation with confidence, providing a solid foundation for your building project.
This conclusion wraps up the article by summarizing the key steps involved in installing a shallow strip foundation, emphasizing clarity and practical advice for your readers.


