
One of the most important steps in strengthening a building’s structural integrity is to create an armored belt. It’s a layer of reinforced concrete that contributes to more stability and even load distribution, particularly in seismically active areas. However, formwork is required to hold the concrete in place while it cures in order to cast this reinforced belt correctly.
It’s crucial to understand when to use formwork when making an armored belt. It’s usually necessary to build the uppermost wall layer before adding the roof or more stories. By ensuring that the concrete retains its strength and form throughout the curing process, proper formwork helps to avoid future structural problems.
It can be a rewarding and affordable project to make the formwork for an armored belt yourself. You can make strong formwork to guarantee that your armored belt is poured precisely and quickly with a few simple tools and supplies. Even if you’re a do-it-yourself enthusiast, this article will walk you through the processes and factors to take into account when creating your own formwork, enabling you to achieve professional results.
| When You Need Formwork for an Armored Belt | How to Make Formwork Yourself |
| To create a sturdy base for walls and structures | Measure the length and height needed, cut plywood to size |
| To evenly distribute loads across the building | Assemble the plywood into a box shape using nails or screws |
| To reinforce areas where walls and roof meet | Ensure the formwork is level and secure, use supports if necessary |
| For additional stability in seismic zones | Apply a release agent to the formwork to prevent sticking |
| To prevent cracks and damage in concrete | Pour the concrete mixture into the formwork and let it set |
- What kind of design is this?
- When construction is necessary?
- Design requirements
- What types are there??
- What materials can be used?
- Tools and equipment for creation
- Fencing technology
- Possible difficulties and errors in the process
- Consequences of errors
- What are the upcoming expenses??
- Video on the topic
- Formwork / 3 types of formwork on aerated concrete / do-it-yourself formwork / formwork for armored belts /
- The simplest and easiest way to assemble formwork for armored belts alone.
- The simplest armored belt formwork! Without helpers and labor
- How NOT to fill ARMOBELT. Now I will only make concrete myself, and not order a mixer.
- A quick way to attach and fix the formwork for an armored belt
- 8. Armopoyas! Why do it, how not to make a mistake when you need it? Seismic belt! House made of aerated concrete from A to Z!
- How to properly make an armored belt on aerated concrete walls.
- What is an armored belt and why is it needed? The device’s purpose How to properly make an armored belt with your own hands
What kind of design is this?
Formwork for reinforced belts is an auxiliary structure composed of various materials that is used to provide certain parameters to monolithic structures, like armored belts. It allows you to alter the structure, position in space, geometric dimensions, and shape of the structure’s surface.
Without formwork, filling an armored belt is nearly impossible. The fence is constructed from various materials and then filled with concrete. It is occasionally composed of gas or foam concrete blocks. Then, since the blocks are specifically designed to resemble boxes, the solution is poured straight into the blocks.

The primary roles are:
- providing the necessary geometric parameters;
- ability to withstand pressure;
- stability during vibration on the construction site surface;
- preservation of the properties of the solution when pouring a reinforced belt.
Crucial! The properties of the reinforced belt will deteriorate if it is constructed without the use of formwork, as the poured concrete may seep into the masonry’s fractures. Thus, when making an armored belt, this step is required.
When construction is necessary?
When building a reinforced belt using pouring concrete, fencing is necessary. When pouring monolithic concrete, the formwork should be if, when using concrete blocks, the formwork function can be substituted by special blocks with a recess.
The truth is that formwork serves as a solution-retaining component when it comes to reinforced belt arrangements. For this reason, the formwork needs to be sturdy, free of cracks, and have airtight joints throughout. Concrete that has cracks in the joints will seep through the openings and some of it will just spill out onto the floors or into the masonry seams.
Usually, the fence is built high enough to accommodate the entire prepared solution. It is preferable to fill it all at once rather than pouring in layers. Should you still need to create multiple layers, you must equip a bevel and shield it from joints.
The reinforced belt won’t be complete without formwork; it will only be a frame with reinforced concrete poured on top, allowing the concrete to seep into the stonework.
Formwork is necessary to hold the concrete in place while it hardens and reaches the necessary strength when building an armored belt. If you use the correct tools and materials, creating your own formwork can be simple and inexpensive. This post will walk you through every step of the procedure, from material selection to formwork assembly, making sure your armored belt is durable and dependable.
Design requirements
The primary prerequisites will be:
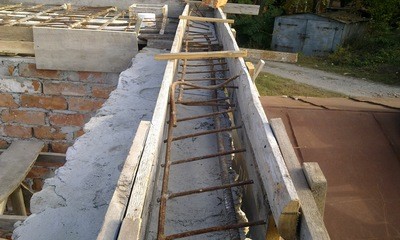
- its strength, stability and lack of fragility;
- simple to manufacture design and easy removal;
- formwork density, absence of cracks, flat surface adjacent to the concrete;
- individual formwork elements must be standard so that, if possible, they can be used again;
- the fence must be installed horizontally and level;
- There should be no gaps at the junction of the shields.
Citation! The structure should be installed using the fewest number of nails possible; it is preferable to join the components with pressure boards or wedges.
What types are there??
Fencing, by their very nature, are:
The first design choice is movable formwork constructed of wood. This is important if you don’t have any plans to buy any special box-shaped concrete blocks.
After the reinforced belt has strengthened enough, the fence is dismantled. You can repurpose removable components when working on another area. Removeable formwork must be completely cleaned of mortar residues before using it again.
You can reuse the element and save money with this kind of design. However, there are drawbacks as well. The construction calls for precision and attention to detail because there shouldn’t be any gaps or cracks when the panels are put together.
One of the simplest technologies is fixed design, but it is not without drawbacks. The primary one is expensive because the components are fixed into the reinforced belt and cannot be removed.
Because the structure is installed using prefabricated blocks and presents challenges, the installation process needs to be handled carefully. Here, the formwork has an additional purpose besides reinforcement and fencing: insulation. Because of the tongue-and-groove system, assembling the structure is quick and simple.
What materials can be used?
The following materials can be used to create formwork for a reinforced belt:
- Sheet steel. Steel materials have high strength and durability. Such raw materials can only be used to create removable structures. The formwork can be curved or straight. Steel must be of good quality, at least 3 mm thick.
- Aluminum. The raw material is resistant to corrosion, so it is used in the construction of the building envelope, since it is not exposed to the moisture contained in the concrete solution. Aluminum weighs little and does not put a load on the overall structure of the building, but there are also disadvantages. The material is expensive, and its repair is difficult.
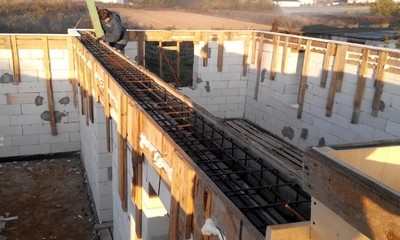
- Wood. For fencing a reinforced belt, boards, timber, plywood, chipboard and OSB are used. Wood is easy to work with, but has low strength and low resistance to moisture. It is better to take wood with a thickness of at least 25 mm – for edged boards.
- Plastic. Composite materials are used both independently and as fiberglass spacers. Raw materials are also expensive, but are easily removed from the solution due to the surface structure.
- Combination of several materials. Sometimes a metal frame and plastic or wood panels are combined.
Wood is the most widely used and reasonably priced material for formwork. Builders frequently select OSB boards or edged boards in this situation.
Take note! If you’re building something on your own, you can use leftover boards; the most important thing is to select the appropriate surface type and thickness.
Tools and equipment for creation
It’s essential to get the instruments ready:
- tape measure;
- building level;
- laser level;
- building square;
- pencil and marker;
- hammer;
- sledgehammer;
- hand saw for wood;
- punch with a drill for wood;
- Bulgarian;
- formwork fastenings.
In the event that you choose to construct permanent formwork out of blocks, you will need to get ready a hacksaw for cutting the blocks. A rubber mallet is another item you can buy to help you reposition the blocks when building a fence. You will need a trowel and a notched trowel in order to work with blocks.
Fencing technology
Use the following procedure to erect the formwork:
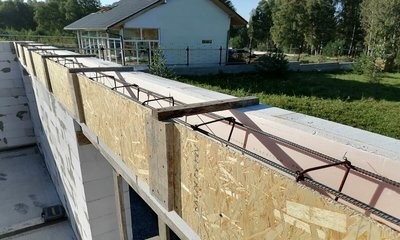
- First, marking is done, taking into account the thickness of the walls, the line is drawn 5-15 cm from the edge of the wall.
- Wooden panels being prepared for installation.
- All cracks and gaps are covered with tow or slats.
- The inner surface of the boards must be covered with plastic film.
- The formwork is secured to the wall with dowels or nails.
- The upper edge of the boards is leveled and reinforced with nails.
- Laying the reinforcement cage.
- Pouring concrete solution.
Polyethylene covers the entire structure. The technology will be the same whether using aluminum, steel, or plastic, but other fasteners will be used in place of nails. When the concrete that was poured hardens, the formwork is disassembled to remove it. After being cleaned and dried, the shields are put to other uses.
See the technology used to create polystyrene foam formwork in the video below:
Possible difficulties and errors in the process
When creating formwork for reinforced belts, the following operational issues and mistakes could arise:
- lack of leveling of walls before installing the fence;
- neglecting the process of cleaning walls from debris and building material;
- lack of vertical control of guides and shields;
- use of weak and unreliable material;
- small number of fastenings;
- the presence of gaps between the formwork and the wall.
Citation! The absence of a polyethylene gasket between the board and the solution is another error.
Consequences of errors

If you commit any of the aforementioned errors, bad things could happen to the concrete when it hardens and when the building is being used.
For instance, if polyethylene is not placed between the mortar and the wooden board, the wood will absorb moisture from the mixture.
This makes it more rotten and destructive. The detachable structure will therefore be unable to be used again in a different location.
If the walls aren’t cleaned, the concrete will be poured unevenly and the shields will become uneven. As a result, gaps will appear and the formwork will become worthless. The builder runs the risk of creating a frail structure that is unable to sustain the pressure of the mortar when they use weak fencing material.
What are the upcoming expenses??
In the Russian Federation, the average cost per linear meter for formwork construction is between 300 and 450 rubles. This expense is frequently covered by the armored belt filling price, which is 800 rubles per linear meter.
The cost of an edged board measuring 25 x 100 x 6000 mm is 125 rubles per piece, while a board measuring 25 x 200 x 6000 mm costs 250 rubles. These are the prices for the materials. The price of an 18 mm thick sheet of plywood is 1,600 rubles.
Building an armored belt requires formwork creation in order to guarantee the building’s longevity and structural integrity. In order to evenly distribute loads throughout the structure, the formwork acts as a stable mold to hold the concrete in place while it sets. If you take the time to build your own formwork, you can make sure that it fits the precise requirements and project specifications.
A few common supplies, such as plywood, wooden boards, nails, and screws, are needed to make your own formwork. To ensure that your materials fit the dimensions of the space where the armored belt will be poured, it is crucial to take precise measurements and cuts. To avoid any movement or deformation during the pouring and curing of concrete, properly constructed formwork needs to be strong and well-supported.
Your armored belt will look smoother and more uniform if the formwork is level and firmly fastened to stop leaks. Furthermore, adding additional supports to the formwork to reinforce it can aid in keeping its shape when the concrete weighs on it. By following these instructions, your armored belt will become more dependable and long-lasting, giving your building the crucial support it needs.
Gaining valuable construction skills and reducing expenses can be achieved by learning how to make formwork on your own. This hands-on approach gives you more control over the building process and improves the quality of your project. You can successfully finish this crucial phase of your building or renovation project with careful planning and close attention to detail.


